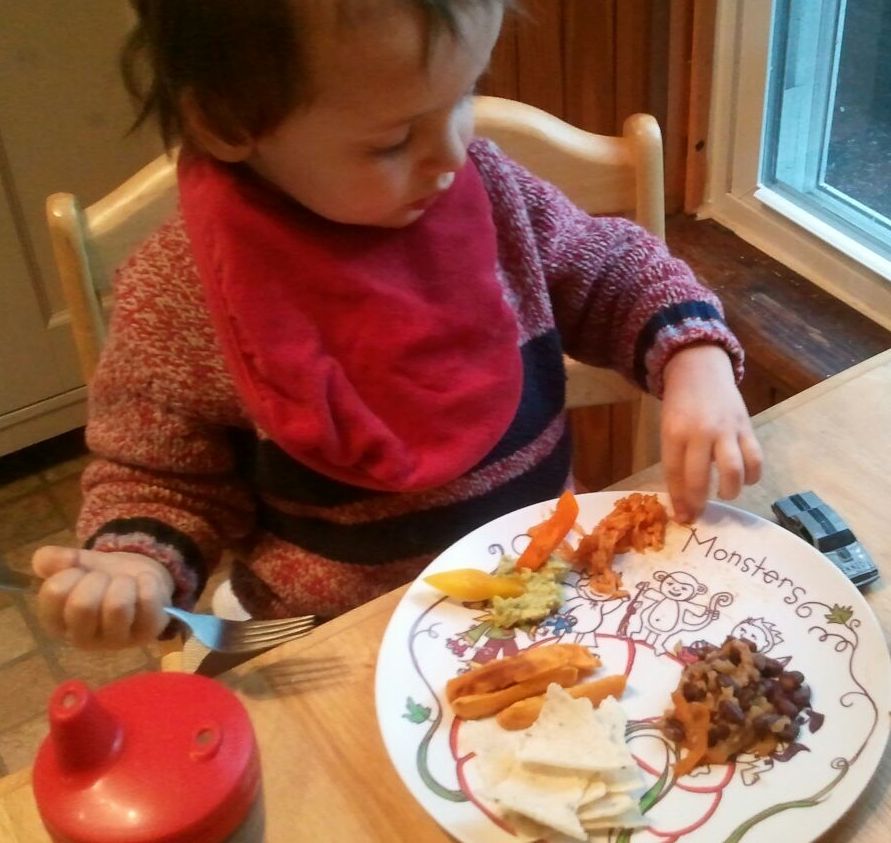
You know that Mama makes quesadillas and fish tacos on occasion, but did you know she also makes fajitas? A lot of people cook a marinated skirt steak or chicken breast, then thinly slice it for the fajita filling, but Mama made ours minus the meat. And they’re really simple—but not necessarily quick, like a quesadilla. Mama said the more thinly the vegetables are sliced, the quicker they’ll cook and soften, so that part’s really up to you.
You can also change up the veggies and spices you use. Try zucchini and carrot ribbons with fresh mint or cilantro. You can even dress them like a taco salad with tomatoes, lettuce, sour cream, and cheese. And if you don’t want to use a corn tortilla (Mama and Papa say they’re pretty bland, but I ate mine), use an alternative kind. You can serve it with salsa, refried beans, Spanish rice, or whatever else you prefer. Mama whipped up a quick guacamole. Normally, I love avocados, but tonight, I just wasn’t feeling the guac. I tried everything (I’m getting very clever about the size of my “no thank you” bite), but I stuck with the Spanish rice.
Love, Jude
Mama deconstructed my fajita for me, but she needn’t have bothered. I was all about the rice.
Easy Veggie Fajitas
Canola oil
½ Spanish or sweet onion, thinly sliced
1 red, yellow, or orange bell pepper, thinly sliced
½–1 jalapeño or Serrano pepper, minced (optional)
1 or 2 cloves garlic, minced
1 can black beans, drained & rinsed
½ tsp cumin
Salt and pepper, to taste
Juice of 1 lime
6” corn or flour tortillas
In a large skillet, heat the oil over moderate heat. Add the onion and pepper and sauté until browned and very tender. Add the garlic, and sauté 1–2 minutes more. Add the beans, cumin, s&p, and lime juice, and stir to combine and heat the beans. Remove the pan from the heat. Heat tortillas according to package directions. Spoon about ½ cup filling into each and serve.
Note: Mama says you can add a tropical twist to this fajita filling by finely chopping up a small amount of pineapple or mango and adding that along with the beans. (Even with the pineapple in ours, I still didn’t want to eat more than 1 bite.) And if you’re adding meat, cook that separately.
How can anyone keep all these holidays straight? Between my daycare’s crafts and Mama’s half-hearted window decorations, I didn’t know if a leprechaun was coming to hide eggs or a giant bunny was snoozing under a rainbow with a bunch of money. It’s all very confusing to a 2-year-old, having Easter follow so closely on the heels of St. Patrick’s day. I’ll just tell you a little bit of what I ate on both days.
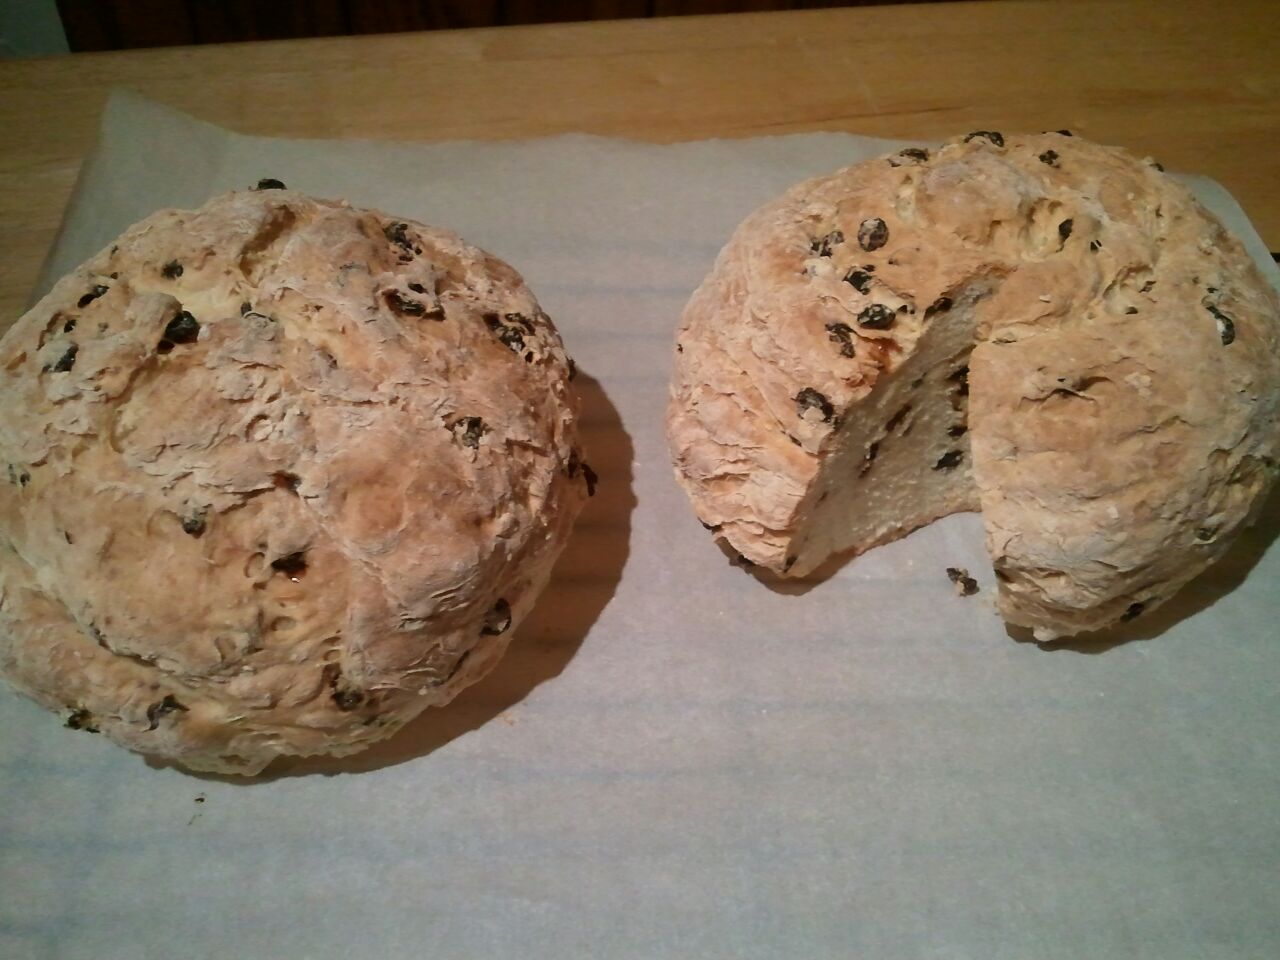
For the former, I helped Mama make Irish soda bread. We’ve made this before, only this time I really helped form my own loaf. (I gave it to my teacher.)
Soda bread just out of the oven
Mama made her honey butter, too, and it was really yummy when the bread first came out of the oven and was still warm enough to melt the butter. Mmmm…
I like picking out the currants.
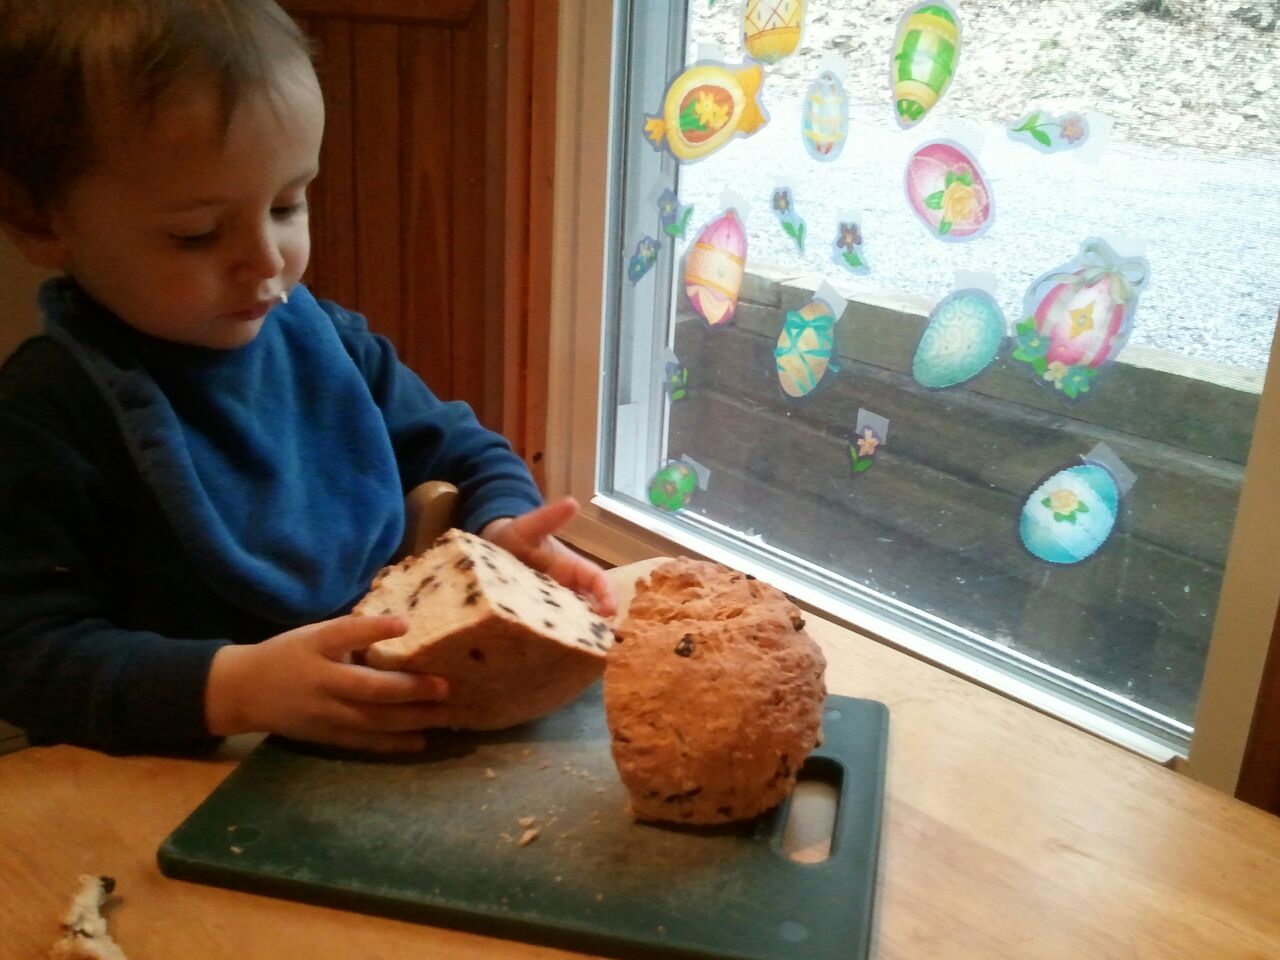
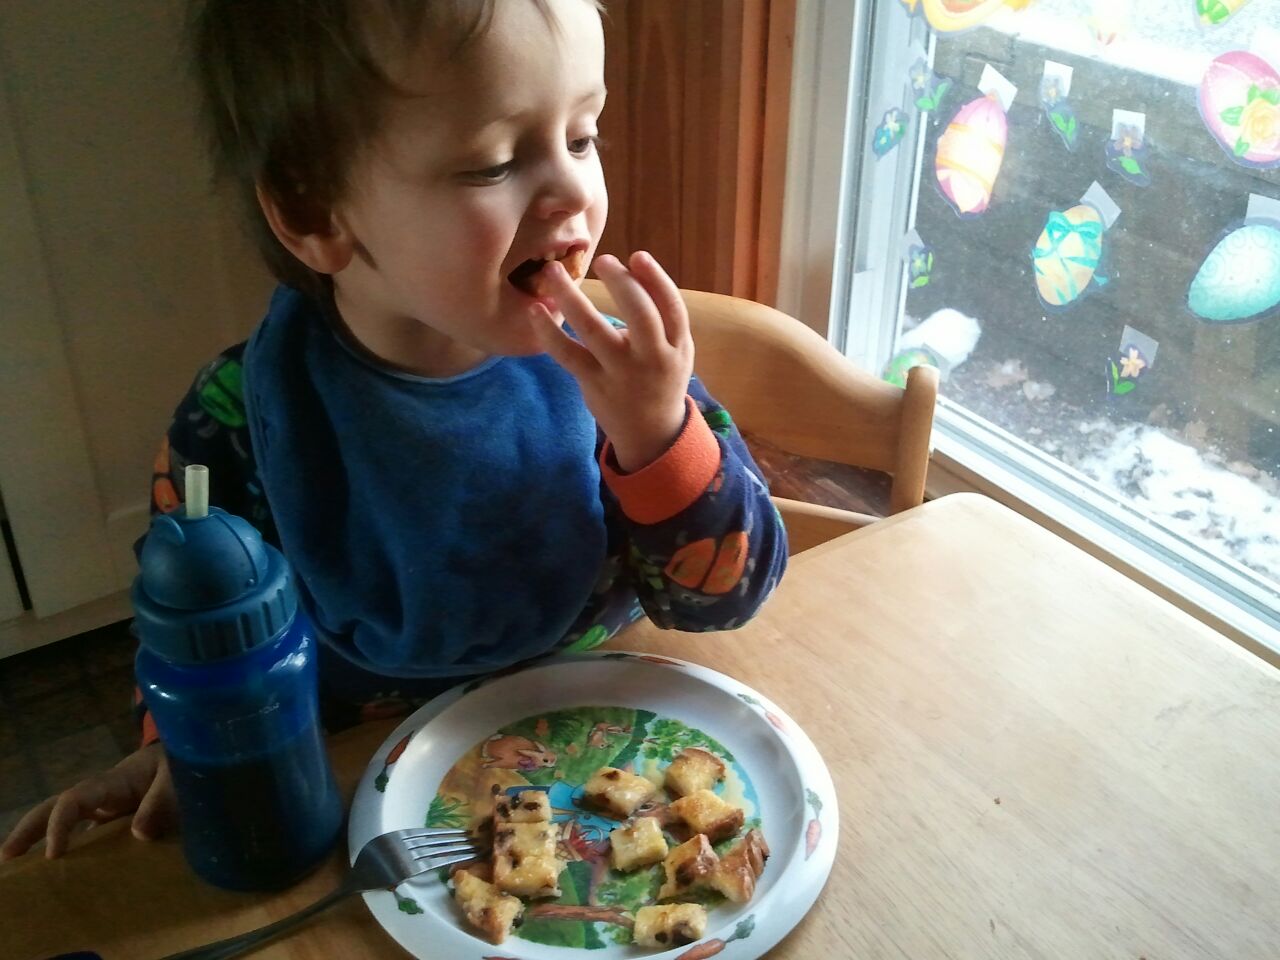
Actually, we made it the day before St. Patrick’s day, so the next morning, Mama sliced it and made French toast out of it. Even better.
Though I wanted syrup, the honey butter really was enough for this French toast.
Next up: Easter. Many have asked me about what I found in my eggs that fine morning. Depending on who’s doing the asking, they either empathize with Mama or feel sorry for me. I’ll just say that I loved it all! I ate what came out of those eggs so fast, I hardly had time to share any of it (but I did, because I’ve always been known as a “good sharer”). There were chocolate-graham bunny crackers and gummy bunnies (just a few) and prunes and apricots. And 2 cars. And lots of coins to add to my piggy bank. Then I ran around the house screaming and jumping on the furniture for about an hour.
Doesn’t everybody get chocolate-bunny grahams and prunes for Easter?
For dinner, Mama decided to treat us to something new. Since we tend to have buttermilk in the house for pancakes, Mama decided to marinate some chicken thighs in it, then fry them up. I’ve never eaten anything like it before! They were crispy, yet succulent. But I ate only a couple bites. As for the rest of the meal, I give it a “meh.” She pureed lima beans with a bit more buttermilk and some herbs. She thought I would eat this up, considering my affinity for the little bean, but I didn’t like that I couldn’t pick them up. Even the sweet potato tater tots didn’t hold my attention. I guess that’s what happens when a kid finally comes down from a sugar high.
I couldn’t really focus on Easter dinner. I just wanted to play outside.
Overall, I enjoyed both holidays. I saw a parade on St. Patrick’s day, and I got to play with both Mama and Papa all day on Easter. There’s not much more that a kid can ask for. Except maybe more cars.
Love, Jude
Buttermilk Fried Chicken
1 pound boneless, skinless chicken thighs (preferably organic)
Salt and pepper
Buttermilk
Vegetable oil
Flour
Other spices, as desired
Rinse the thighs and set them in a shallow baking dish. Season with salt and pepper. Pour in enough buttermilk just to cover. Cover the dish and refrigerate for a few hours. When ready to cook, heat about 1 inch oil in a large frying pan over medium-high heat until a few flecks of flour sizzle in it (about 365°F). Pour about 1 cup flour into a large ziptop plastic bag and season it with salt and pepper and any other spices you like (paprika, chili powder, garlic powder, etc.). Take a thigh, shake off the excess buttermilk, and put it in the bag. Add a few more thighs (but don’t crowd the bag too much). Give it all a few hardy shakes until all the thighs are coated with flour, then take them out and either set them on a plate or gently place them in the hot oil. (Repeat with the remaining thighs–add more flour, if necessary.) Cook the thighs for 7 or 8 minutes, until golden brown, then gently turn and fry until golden on the other side and the chicken is cooked through. Remove to a plate covered with a paper towel.
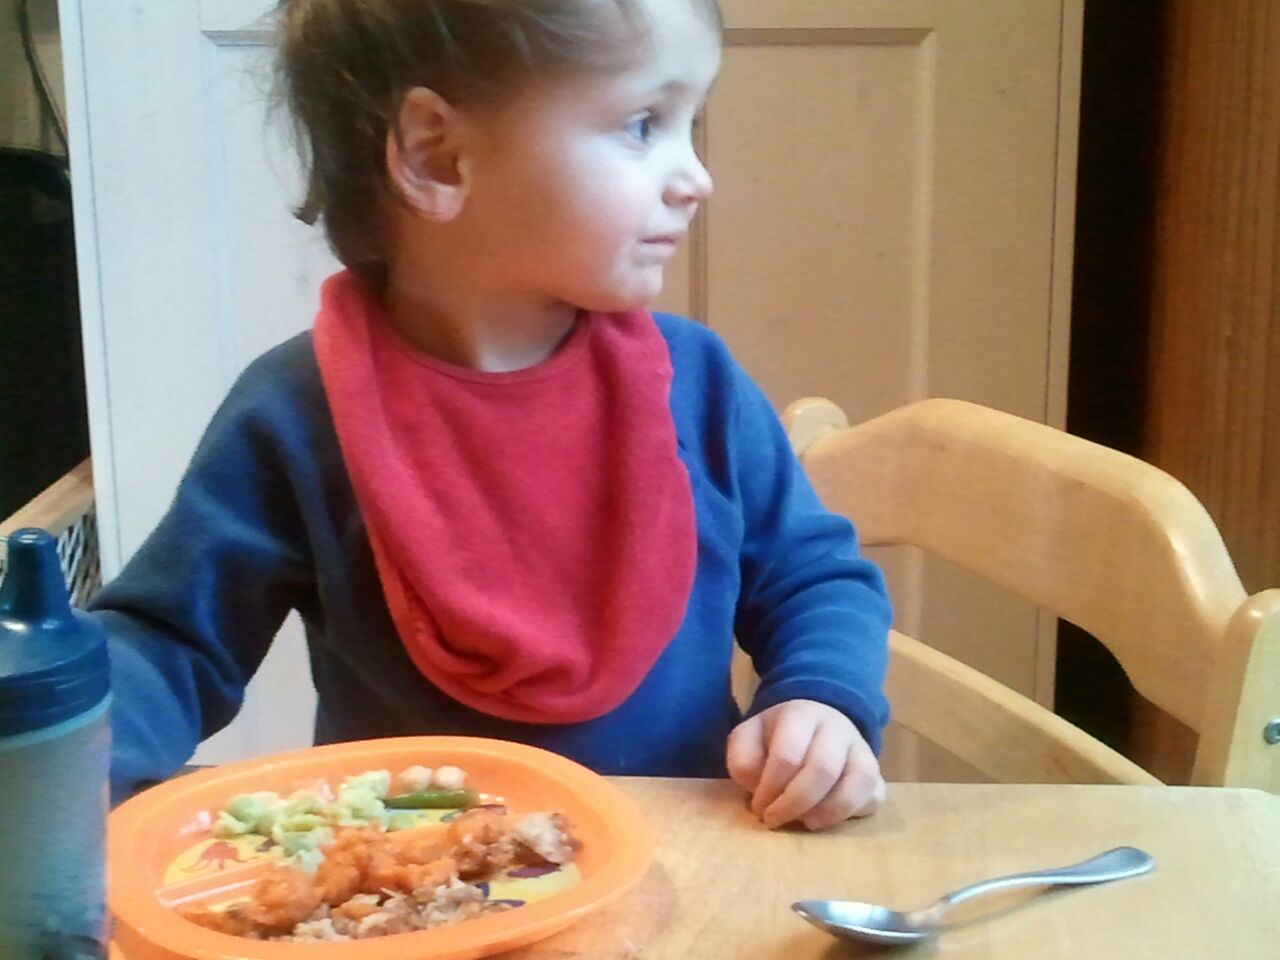
Which is what I told Mama for at least the 20th time. (I can count that high now, so I should know.) She didn’t seem to believe me. She kept saying that wasn’t true, that there were potatoes and cheese involved, and that I needed to have “just 1 bite.” I think if she thought about it hard enough, she’d realize that I really don’t like cauliflower. I couldn’t tell you the last time I ate the stuff. I even took more bites of my meatloaf as a peace offering, but she wasn’t buying. Our standoff eventually escalated beyond “no grapes” and “no Caillou” to “and you’ll go straight to bed.” So I took a stinkin’ bite (while my mouth was full of meatloaf). She asked if it was okay, and I nodded. Then she asked if I would take another bite, and I said, “No, thank you.” Then, “I want my grapes!” and “I want Caillou!” So you see…everyone wins.
Love, Jude
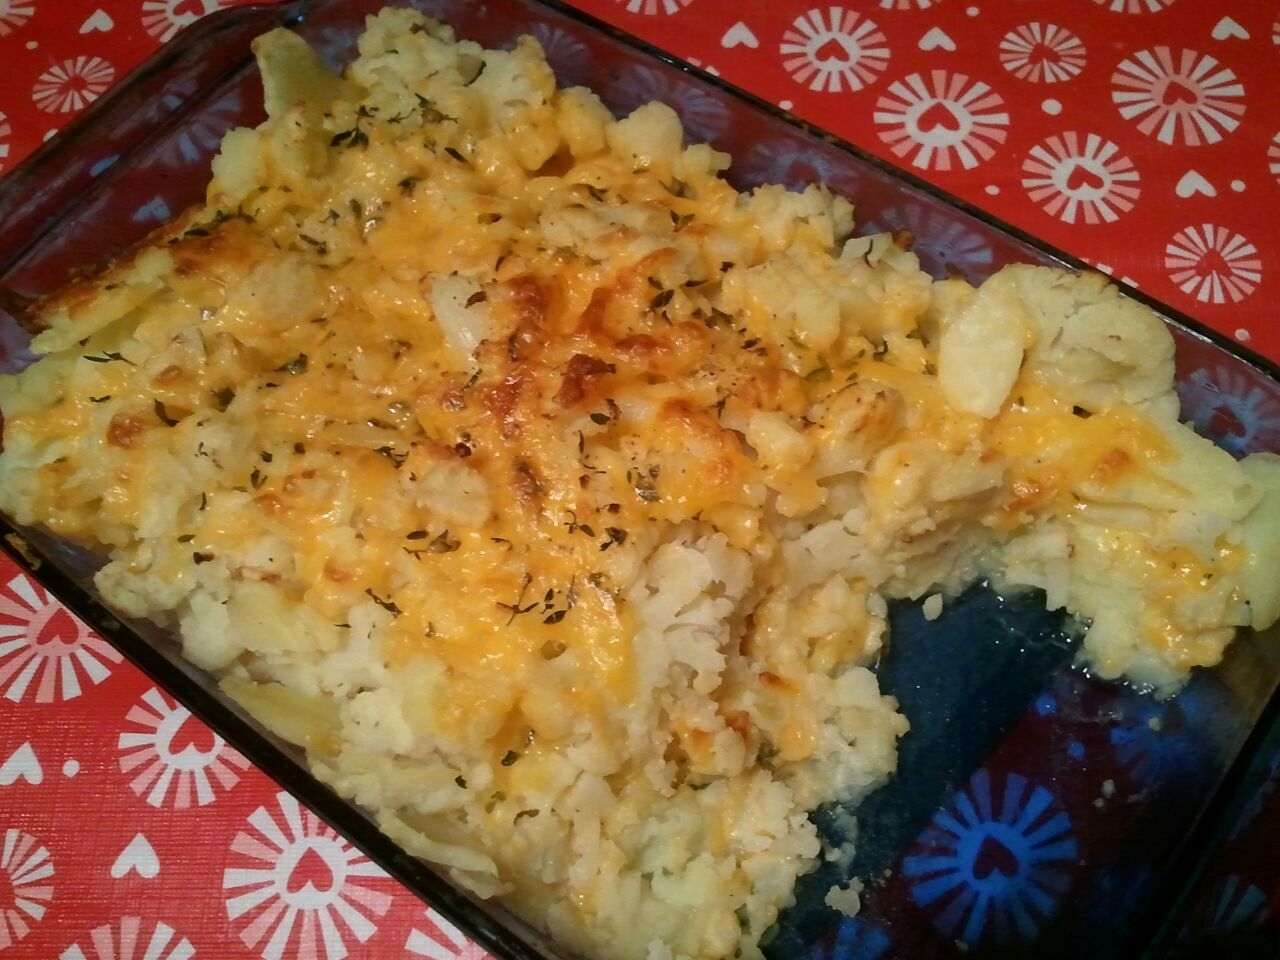
Baked Cheesy Potatos and Cauliflower
3–4 medium potatoes (Mama used yellow ones; choose whatever’s smallish and organic)
1 head cauliflower (organic ones tend to be smaller)
A few sprigs of fresh thyme, leaves stripped (you may also use dill or parsley)
Salt & pepper
A Tbsp or so of butter (optional)
Couple handfuls shredded cheese of choice (Mama used Cheddar)
½ cup veggie broth (or milk)
Preheat the oven to 450ºF. Butter an 8 x 11″ baking dish (or even a 9 x 13″).
Peel and slice the potatoes. Slice the cauliflower into “steaks” and pull away the bottom-most core. (Did you know you could do that? I didn’t!) Place in a large pot, cover with a couple inches of cold water, add salt, and bring to a boil. Boil for about 10 minutes, until the potatoes are tender and the cauliflower just starts to get tender. (Don’t worry if you go over. You can’t hurt it.) Drain.
Spread ½ the potato-cauliflower mixture in the prepared dish. Sprinkle with half the thyme and some salt and pepper. Sprinkle with a handful of cheese (as much as you like). Repeat with the remaining potato-cauliflower mix, thyme, and cheese. Pour the broth over it, then dot with a couple small cubes of butter, if you like. Bake for 15–20 minutes, until the cheese is melty and golden.
I don’t care how much cheese is on there, I’m not eating it!
Note: If you really want to make this a funky-looking dish, choose purple or orange cauliflower and purple potatoes! Also, Mama says it’s important that you buy a block of cheese then grate it yourself. Those packs of pre-shredded cheese have a lot more stuff in them than cheese, like cornstarch. Eww!
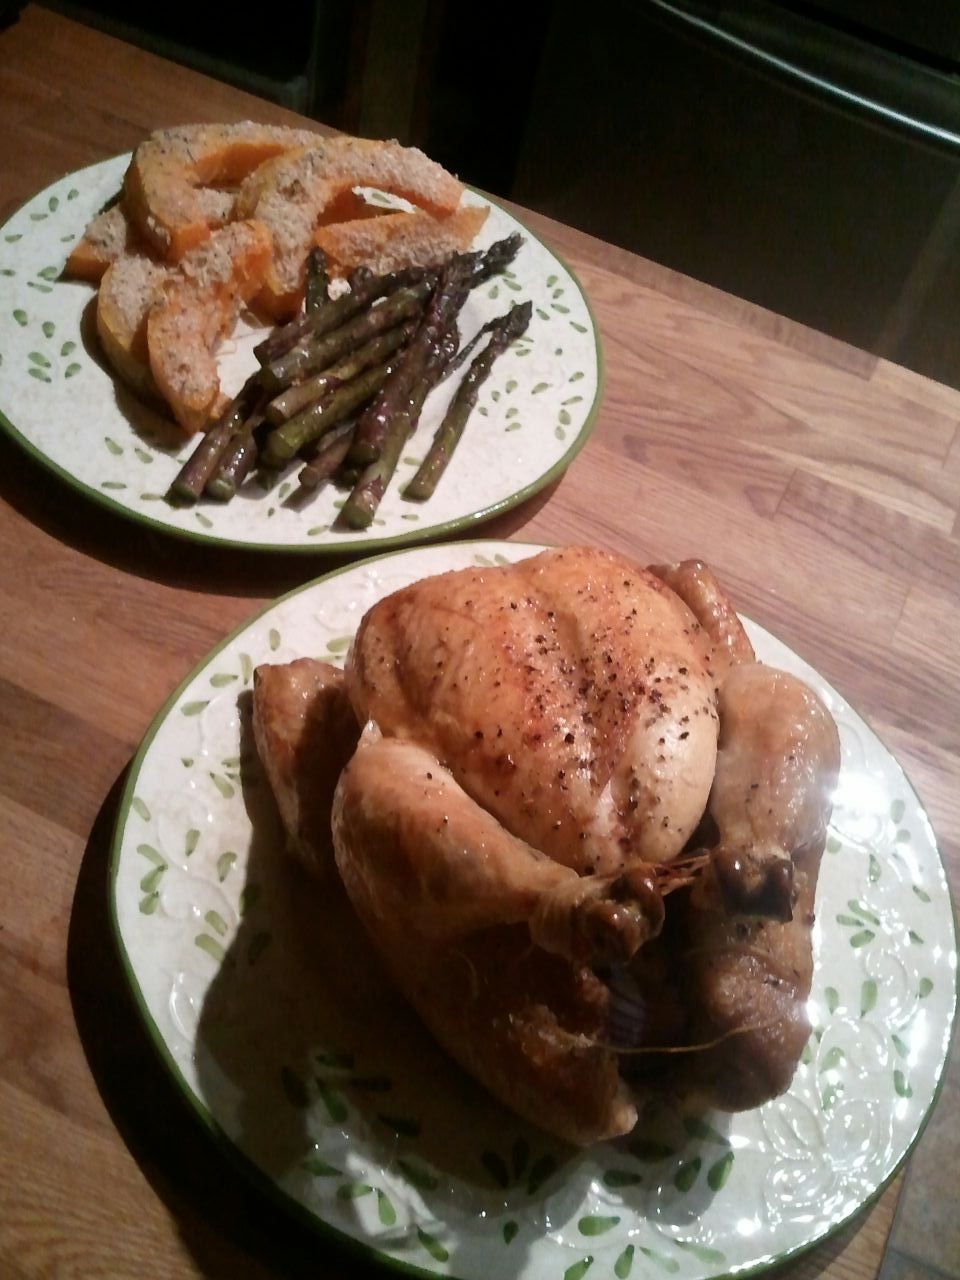
Ina Garten, “the Barefoot Contessa,” has said she makes a roast chicken for her husband every Friday. Mama doesn’t cook one chicken a month, let alone every week, but she should. She says they’re supereasy to prepare and can be made very flavorful very simply. We got a 3-pound chicken from my friend Walter’s mama. It was so fresh, it was barely cold from their refrigerator!
First, Mama rinsed the chicken, inside and out, then patted it dry. Just because. Then, the easiest way to add flavor to your bird, according to Mama, is to let it cook in fat. This means you should keep the skin on it while it bakes (remove the skin before you eat the chicken, and you take all that fat with it, believe it or not). But Mama adds more flavor by rubbing olive oil all over the skin and sprinkling it with a lot of kosher salt and pepper. Sometimes she puts a few pats of butter under the skin, massaging it into the breast meat. And that’s all you have to do! Mama always puts aromatics inside the chicken, too, such as a halved head of garlic, a quartered onion, a halved lemon, and whatever whole herbs she has on hand. You won’t eat these, so you don’t even have to peel them.
Mama tied the chicken’s legs together with kitchen string and tucked the wings under where its neck would be. Doing this keeps these extremities close so they don’t burn (or worse, dry out), but you certainly don’t have to do it. Mama says to bake your chicken on a rack set in a roasting pan (or on a bed of preferred veggies) at 425°F for 15–20 minutes per pound. To test if it’s done, you can temp it in the thigh (careful not to touch the bone) to 165°F, or you can wriggle the leg. If it seems like it might come out of the socket easily, and the juices from it run clear (not pink), then it’s done. If you think it’s not quite done, but the skin is getting very crispy and dark, tent some foil over it.
A tidy little roast dinner.
This little guy took about an hour to cook. You can see that Mama took advantage of that time by roasting some asparagus and pumpkin. Not really a seasonal match, but my folks like asparagus, and I can’t say no to orange food, especially one roasted with rosemary and Parmesan. The Cinderella pumpkin, as Mama called it, roasted with the chicken, and the asparagus cooked while the chicken rested. (Don’t forget to let your bird rest before you slice into it, Mama says, or your bird will lose its juiciness.)
I skipped the asparagus, and even after all that roasting and resting, the chicken didn’t really appeal to me. Papa ate a pretty good dinner, though, and he said the chicken was very juicy. But what to do with all the chicken leftovers? Mama has chicken salad and quesadillas in mind. I don’t know what a chicken “salad” is, but I sure do love quesadillas. And before the carcass was even cold, Mama had it in a pot on the stove for stock. (I’ll tell you about that another time.)
So the moral of the story is don’t be a chicken about a little…er…pullet. If Mama, a vegetarian, can do it, so can you!
A great way to use up half-used vegetables is to wrap them in phyllo dough. Mama has made a spinach pie before, and she’s done many roulades (fancy talk for roll-ups). Tonight she made too much filling and decided to just lay it all out on sheets of phyllo then lay a few more sheets on top and seal it like a big phyllo pillow.
We had half-used packages of baby spinach, cremini mushrooms, leeks, and goat cheese, and three-quarters of a russet potato (don’t ask), which she grated. These she sautéed in olive oil with chopped garlic and salt and pepper, then set it aside to cool as we started our assembly.
Mama reminded me that, when using sheets of phyllo, it’s important to brush melted butter (or olive oil) thoroughly over each layer. You need at least 4 layers to give your finished product some strength. I helped Mama brush the phyllo and the counter with the butter. When the base was ready, Mama spread the filling over it, nearly to the edges. She repeated her 4 buttery layers of phyllo, brushing butter over the top and lightly dusting it with salt. She transferred the whole thing to a parchment-covered baking sheet (since she thought she was going to roll it up, she hadn’t thought to start on the baking sheet—learn from her mistake!), then baked it at 350°F for 20–30 minutes.
It might not look like much, but… who am I kidding? I didn’t eat it.
I had my obligatory no-thank-you bite, munched a bit more on the flaky phyllo, and moved on. But it was fun to make, and Mama and Papa ate the whole thing anyway.
Mama had a mess of heirloom tomatoes ripening on the counter and more kale in the fridge than she knew what to do with. Even I can’t eat that many kale chips. So she decided to make a tomato tart with kale pesto.
You can use beefsteaks or romas…but why would you want to?
The first thing she did was lop off the top of a head of garlic. She laid it in foil, drizzled it with olive oil, scrunched it all up, then put it in the oven for about half an hour. Just until the garlic softened and started becoming golden. She told me this is a really yummy thing to spread over crostini, which she said I’ve actually eaten before, but my baby memory isn’t recalling that.
A drizzle of oil transforms garlic into something YUM.
Meanwhile, Mama made the crust. She explained to me that she doesn’t generally like making crust in the food processor because then she has to clean the darn thing, but since she would be making pesto with it anyway, she figured why not? To the processor, she added her flour, oats, and salt. Then she added her butter and processed it just until little clumps formed.
This is how you want your butter cut in to the flour, whether it’s by hand or machine.
She said you don’t want to process the butter so much that it melts–the cold butter is what makes for a flakey crust. Then she added the ice-cold water and processed it again just until large clumps formed and began pulling from the side. She tested the dough by squeezing a bit in her hand, and she saw that it held together. You don’t want to process it into a smooth ball, otherwise you’ve overdeveloped something called gluten, and your crust will be tough.
This is how you your dough should look when it’s ready. See the squished clump in the top left?
Once she had the crust chilling in the fridge, Mama moved on to the pesto. Ordinarily, Mama makes a pretty traditional pesto, which she first ate, ironically enough, at a friend’s mother’s house in Bad Bramstedt, Germany, back in the ’90s. When you use basil or other fresh green like arugula, you can make the pesto fresh from the garden. When you use something hardier, like kale, it’s better to first blanch the greens. Mama generously salted her boiling water (and I stayed far away from the burner) and blanched the kale for a minute or two, in batches. She then ran the cooked kale under cold water (she said she’s cheating because she really should be putting it in an ice bath…but there are only so many dishes she wants out of the cupboards at any given time). The kale went into the food processor, to which she added olive oil, more salt, pepper, fresh lemon juice, toasted pine nuts (you don’t have to toast them–they just develop a nicer flavor), some freshly grated Parmesan cheese, and the roasted garlic. When the cloves were cool enough to handle, a gentle squeeze popped them right out of their papery skins! She whirred the ingredients in the processor and stopped to taste. I reached in and grabbed a chunk of the pesto to try for myself. I was not happy with it. But neither was Mama! She added more lemon and more salt.
A tart is so pretty and sophisticated (like myself), but Mama had so many tomatoes that she decided to turn this into a deep-dish pie. I sampled many of the tomatoes to be sure of their ripeness, which is rather strange considering that I rarely eat raw tomatoes.
If I see something sitting on the counter, I’m going to eat it!
Then Mama rolled out the dough. I took my bitten tomatoes and stamped them on the dough to make pretty patterns. She showed me how to wrap the dough around the rolling pin to lay it into the pie pan easier. There was really a lot of dough, so Mama trimmed the edges and was sure to have leftovers. Then she spread some pesto along the bottom of the pie. She neatly layered some sliced tomatoes, then sprinkled some mozzarella on top.
I like the pretty colors of the heirloom tomatoes.
She explained that if this were a shallow tart, she’d be done, but she continued with two more layers in the same manner. (The leftover pesto she put in the fridge for pasta, but it would also freeze fine.) She put the whole thing in the oven until the top was brown, about 30 minutes, then grated some asiago cheese on top. She could’ve put it back in the oven for another minute or so, but she didn’t.
I had a few bites, which tricksy Mama was trading off for bites of the crust, which I really enjoyed. She kept telling me that if it were horrible she wouldn’t be bartering, but I’m not so sure. I hear this pie tastes good cold, too. Guess I’ll find out for lunch tomorrow.
Love, Jude
Heirloom Tomato & Kale–Roasted Garlic Pesto Tart
Roasted Garlic
1 head garlic
1 Tbsp extra-virgin olive oil
Pastry Crust (or, Pâte Brisée if you’re really interested)
2 1/2 cups all-purpose flour (you can substitute whole-wheat, if you like)
1/3–1/2 cup ground rolled oats (optional)
1 tsp sea salt
2 sticks cold unsalted butter, cubed
1/3 cup ice water
Pesto
1 large bunch kale, ribs removed and torn into rough pieces
Extra-virgin olive oil (about 2 swirls around the food processor)
Juice of a lemon (or more, to taste)
Kosher salt (to taste)
Freshly ground black pepper (a few grinds)
2 Tbsp toasted pine nuts (toasting optional)
3 Tbsp freshly grated Parmesan cheese
Tart
1–2 pounds ripe heirloom tomatoes (however many you need, depending on size & variety)
1–1½ cups shredded mozzarella
Freshly grated asiago cheese
To roast the garlic: Preheat the oven to 350°F. Trim the tops off the garlic bulb, place it (cut side up) in the center of a square of foil, drizzle with the olive oil, seal the top of the foil, then place the bundle in the center of the oven. Roast until the garlic is soft and fragrant, and slightly brown, about 30 minutes. (You can certainly make the pesto with regular ol’ garlic, too, without the roasting.)
For the pastry crust: Combine the dry ingredients in a food processor. (Mama already had ground oats, but if you don’t have them, grind them in the processor first.) Give it a few pulses to distribute. Add the butter and pulse about 10 times, just until the butter and flour begins to form pea-sized lumps throughout. With the machine running, add the water in a stream and process just until the dough starts to clump. Turn it out onto your counter, give it a few quick kneads to bring it all together, flatten it into a disk, and wrap it in plastic. Refrigerate for half an hour.
For the pesto: To blanch the kale, bring a large pot of salted water to a boil. Working in batches, if necessary, add the kale to the water and stir to submerge. Boil for 1–2 minutes, until the kale is bright green. Transfer with a slotted spoon or tongs to a bowl of ice water (or to a colander that you’ll then run under cold water in the sink). If using toasted pine nuts, toast them in a dry pan over medium heat for a few minutes, shaking every so often, just until fragrant. You can also put them on a piece of foil or on a baking sheet and stick them in the oven, since it’s on. As soon as you smell them, they’re done! Place all the ingredients in a food processor and blend until pasty. You might need to add a little more oil—you can even add some of the blanching water. Taste and adjust seasonings. (Mama notes that all these amounts are approximate.)
To finish the tart: Slice the tomatoes—about as thick as you would a sandwich tomato. Set aside. Take the pastry crust out of the fridge and remove the wrap. Generously flour a surface, then gently roll the dough. Lay into pie or tart pan, then trim the edges, fluting if desired. Spread a layer of pesto along the bottom. Arrange slices of tomato to cover, then sprinkle with mozzarella. Repeat layers, if desired, ending with cheese. Bake until golden, about 30 minutes. Shave additional cheese on top, then pop back in the oven until melted and browned, a few minutes more.
You might recall that I used to eat a lot of spinach, in the form of something we called “gruel.” But now that I’m beyond all that baby food, Mama serves me sautéed spinach and kale, and I notice she puts herbs in everything. I am no longer such a fan.
Mama had some leftover halibut from fish tacos, so she decided fish cakes would make for a good dinner. Papa peeled and boiled the potatoes, and Mama raided the garden for the mint and parsley. The cakes came together pretty quickly, so Mama decided on her favorite chickpea salad as an accompaniment.
While Mama’s a proponent of cooking beans, she feels this is only something a person who has her act together can do, and Mama is not one of those people. She doesn’t have various pots of beans and grains cooking and all her vegetables cut for the week ahead on a Sunday. She just doesn’t. So when it comes to a superfast side dish (or sometimes, in Mama’s case, a main dish), she likes being able to reach into her cupboard and pull out a can of beans. Just drain, rinse, and serve. Now, I’ve been slow to come to chickpeas (though I like to say “chick-pea”), but I very recently ate half a can all on my own. So Mama felt pretty confident I’d share her gusto for garbanzo salad.
Not so much. I couldn’t find one that was just a plain old chickpea. All that basil and parsley. Doesn’t she get that toddlers have a clinical aversion to green showing up on non-green foods? As for the fish cakes, I took my obligatory one bite, but that was enough for me. I liked the crispy fried part okay, but it still tasted fishy—and there was all that greenery. I ended up sharing it with the dog. The green I didn’t mind was the avocado I ended up eating for dinner.
Love, Jude
Herbed Chickpea Salad
1 can chickpeas, drained & rinsed
Handful of fresh parsley, minced
Handful of fresh basil, minced
1–2 cloves garlic, minced
Juice of ½ lemon (or more, to taste)
Kosher salt & freshly ground black pepper
Drizzle of olive oil
Freshly grated Parmesan cheese
As you can see, this is a pretty loose recipe. Mama just does it all to taste. Start with a little of an ingredient and add more. Remember, you can always add more, but you can’t take it away!
That’s what Mama calls lobsters. Having never seen an ocean or a cockroach, I wouldn’t know. (I wonder if they look like any of my bathtub sea creatures?) But having come in to some cooked lobster meat, Mama decided to use it for both dinner and breakfast.
Mama told me she’s not too crazy about the stuff, even though she spent a couple years living in an area known for its lobster. Papa loves it, though, and it was he who suggested she save some for breakfast.
Lobster salad it was for dinner. I don’t think I’ve seen Mama whip up something so fast. It came together quicker than egg salad. Mama and Papa seemed to really like it, but I thought it tasted like a pacifier (and I never liked those either). I ate the avocado and had some roasted red pepper soup for dinner instead.
For breakfast… don’t even get me started. It’s no secret I like eggs. But what Mama did to them today is unforgivable. She sautéed diced shallots and chopped tomatoes in butter, poured in a mixture of milk and eggs, and when it was nearly cooked, she added the chopped lobster meat. She finished it with chopped parsley and salt and pepper. She put that plate before me on my high chair tray, and I just shook my head. Mama thought she could coax me into eating it by saying, “Look, it’s just egg.” But even that little bite tasted like the chewy crustacean interloper.
I think I’m starting to understand what a cockroach is—it’s a destroyer of all that is good.
Love, Jude
Lobster Salad
(Amounts are approximate and subjective to taste—but you get the idea)
1–2 cups cooked lobster meat (thawed from frozen is fine), chopped
1 small stalk celery, finely diced
¼ red onion (or 1 shallot), finely diced (you don’t want as much onion as you have celery)
Zest from 1/3 lemon (add a squeeze of juice, if you like)
1–2 Tbsp flat-leaf parsley, chopped
Healthy pinch of kosher salt
Few grinds of black pepper
About 4 Tbsp mayo
Kaiser roll, or other favorite bread product
Sliced avocado
Combine all ingredients in a bowl. Adjust seasonings to taste. The filling should hold together without being gloppy or wet. Serve on a roll (toasted, if you wish) with slices of avocado.
Yield: 2–4 sandwiches, depending on how much you stuff ’em
Mama suffers from what she calls a “dinner malaise.” She doesn’t like to prepare the same meals close together, even if they’re successful, and as a result, she’s at a loss for what to make. Every night. Papa’s often asked her, “Remember when you used to make…?” But when someone mentions tacos, Mama always thinks, “Oh yeah, tacos. They’re easy, and they’re good.”
So she made tacos the other night. More often than not, it’s fish tacos, but since we had just had a fish fry, she opted for grass-fed beef for me and Papa, and something called tempeh for herself (whatever that is). She showed me how to brown the ground beef in its own fat, and told me that beef’s flavor by itself isn’t that appealing. She demonstrated how to properly dice an onion, and then she sautéed it right alongside the beef, “to add flavor.” Then she seasoned the meat with spices such as cumin, coriander, chili powder, and salt & pepper. She chopped up tomatoes, cabbage, avocados, and cheese to top the tacos, and served it all with a side of seasoned red beans, brown rice, and pineapple. I ate the pineapple and the avocado.
A few nights later, Papa thought he would try his hand at it and made red bean enchiladas with a corn salsa on the side. I didn’t mind the sauce, and I ate a few kernels of corn, but I had to call it quits on this south-of-the-border fare. Give me a grilled cheese sandwich, please. Or ratatouille.
After a cold, rainy day caring for a sick baby (I’ve been barking like a seal), Mama had a hankering for a good old fashioned fish fry, like the kind her Wisconsin hometown is known for. There, they dip fresh lake perch in beer batter and deep fry it to a golden brown and serve it on the town’s famous hard rolls with a schmear of tartar sauce. (I ate lots of GeeGee’s perch when we visited last summer.) Well, we didn’t have perch, but we did have cod. And Kaiser rolls. “Close enough,” Mama said with excitement.
First she made the beer batter because, she explained, it needs to rest. (Incidentally, she happened to have Wisconsin beer on hand. I don’t understand what all the fuss is.) Once the batter was underway, she moved on to the rest of the dinner. Emboldened by her recent vichyssoise victory, Mama felt confident that I would eat oven fries. She sliced a few organic red bliss potatoes and tossed them with olive oil and spices such as cumin and dill and of course lots of salt and pepper. Into the 350° oven they went, and she turned her attention to the tartar sauce. (At this time, she also poured a whole bottle of canola oil into a large frying pan and turned up the heat.)
Because I still can’t eat homemade mayonnaise, she used the kind from the store, added a bit of chopped relish and capers, a splash of Worcestershire sauce (holy cow, is that a word!), and salt and pepper (all to taste). And that was it. My oatmeal takes longer to make.
What came next I could only see from afar, in Papa’s arms. Mama stirred the potatoes on the baking sheet and closed the oven again. (“It’s hot!” she warned.) She sprinkled a few flecks of flour into the oil to see if it sizzled—that means it’s ready. Then, one by one, she dredged the pieces of cod in a bit of whole wheat flour and then dipped them in the rested beer batter before very carefully slipping them into the hot oil. Boy, did they sizzle! We all made the sizzle noise—pa-dop, pa-dop, pa-dop!
While the fish cooked, and because we “needed” a vegetable, Mama sliced half a red cabbage (they have more nutrients, in case you were wondering), shaved a carrot, and mixed up some slaw dressing—mayo, cider vinegar, celery salt, and salt and pepper (again, all to taste). By the time she was done, it was time to turn the fish over. It was golden and puffed, and even I could tell it was crispy. The kitchen smelled kind of funny, to be honest, but Mama was very pleased.
When the fish was done, Mama removed it from the oil with a strange looking spoon—it was wide and flat with all kinds of holes in it—and put the pieces on a paper towel to drain. The fries were done, and all that remained to be done was to set the table. Dinner in no time at all.
Mama and Papa ate that dinner so fast, I think they rivaled the dog. As for me, I wouldn’t take one bite. Not a one. Of anything. What can I say? I’m a baby.
Love, Jude
Though I didn't eat any of it, I could probably have pulled any of it off the table. I'm getting really tall, you know.
Beer Batter
2 Tbsp cornstarch
2/3 tsp baking powder (roughly)
salt and pepper
A few tablespoons flour + more
2 eggs
1 cup room temperature beer
Flour for dredging whatever you’re going to dip in the batter
Whisk together the cornstarch, baking powder, salt and pepper, and a few tablespoons of flour in a large bowl. Add the eggs, and whisk to blend it all together. Add the beer and blend again. Then add enough flour to reach your desired consistency. Some people like a thicker batter, others a thinner one. Whisk it really well to get out all the lumps, then just set it out on the counter until you’re ready to use it.
Note: Mama says this makes a lot of batter, so if you’re only making a small amount of fish, pour some of it into a smaller bowl. That way you can save the remaining batter for something else—such as onion rings and other veggies, shrimp, or chicken strips. She also says you can add dried herbs and spices to the batter.