LittleJudeonFood

One kid's adventures in gastronomy


Leave a comment

Happy anniversary to me!

And to my blog. Thank you for reading. I’ve enjoyed sharing with you my adventures in eating. If you’re new to Baby Jude’s Food Blog, take a moment to read how it came about. If you’ve been with me from the beginning, I’m sure you can appreciate what I’ve been going through. Either way, comments are always welcome. What would you like to see me learn to make and eat?

Remember when it was so hot outside that only a giant, tart lemonade could cool you off?

Remember when it was so hot outside that only a giant, tart lemonade could cool you off?

Love, Jude


Leave a comment

A Sort-of-French Dinner

I suppose it was too much to ask that Mama continue her “easier is better” streak. She had crêpes on the brain (isn’t that a silly image?), so she made the batter before she left for work, as it’s better if it rests a couple hours. Her plan was to fill the thin French pancakes with roasted asparagus and top them with Hollandaise sauce.

Since that wouldn’t be enough of a meal for Papa, she called him on her way home and asked him to turn the oven on and trim a pork tenderloin. What a funny looking thing that was. Papa took a sharp knife and cut away the visible bits of fat and something shiny looking, what Mama called “silver skin.” She said this is a tough membrane that runs along some muscle meats, and it never gets tender, so best to just cut it away.

Usually, Mama sears the tenderloin in a frying pan before putting it in the oven (to give it extra flavor), or she butterflies it and stuffs it with other forms of yumminess, but tonight she had other designs. She rubbed the entire loin with olive oil, then coated it in herbs that smelled like summer and sunshine. She called it herbes de Provence, which is a lovely blend of things like savory, thyme, lavender, fennel, oregano, and basil (like curry, recipes vary). While the tenderloin roasted, Mama took a small saucepan and combined a bit of fig jam with a splash of water, to thin it, and some balsamic vinegar for tartness; she would heat this later as a sauce for the pork.

Then she started the crêpes (she took the batter out of the fridge when she got home so that it wasn’t cold-cold). Even if you use a well-seasoned pan or a nonstick crêpe pan, it’s really difficult to make quick work out of crêpes. You can make only 1 at a time! I saw lots of pan swirling as Mama made crêpe after crêpe. Luckily, you can just stack them on a plate and eat them when you’re ready.

After the pork finished roasting, it had to rest, so Mama put the asparagus in the oven and started the Hollandaise sauce. She said that even Eric Ripert makes his in a blender these days, but Mama dislikes getting out the blender and prefers to make her sauce by hand. She might want to reconsider, as her first attempt “broke.” I saw her trying to save it, muttering under her breath, but in the end, she scrapped it and made a fresh batch with new melted butter and a new egg yolk. I hope she and Papa enjoyed it because I wouldn’t touch the stuff—it didn’t look like any egg I’ve ever eaten.

I dutifully dipped my juicy pork in the sweet fig sauce. I ate my skinny spears of asparagus, after sprinkling some Parmesan on them. And I munched my soft crêpe. (I like regular pancakes better, though.) All in all, a pretty tasty meal. And I’m pretty sure Mama’s eyeing the leftover crêpes for breakfast with bananas and a smear of Nutella. It’s just a guess.

Love, Jude

Provençal-Kissed Pork Tenderloin with Fig Sauce and Roasted Asparagus Crêpes with Hollandaise Sauce

For the pork:
1 pork tenderloin (1–1¼ pound), trimmed
Olive oil to coat
Herbes de Provence (or other herb blend) to coat (about 2 Tbsp)

For the sauce:
½ cup fig jam or preserves (or any flavor that you feel complements pork, such as apricot, peach, apple, plum)
2 Tbsp water (plus more to thin, if necessary)
1 tsp balsamic vinegar

For the asparagus:
1 pound asparagus, bottom inch trimmed
1 Tbsp olive oil
Salt and pepper

For the crêpes:
1 cup whole-wheat flour (pastry flour will yield a lighter crêpe)
1/2 cup + 2 Tbsp water
1/2 cup milk
2 eggs
1 Tbsp oil
1/4 tsp salt

For the Hollandaise:
2 Tbsp clarified butter for every egg yolk (but Mama says she’ll reserve this lesson for another day)

Preheat the oven to 400ºF. (If you’re in a hurry, you could go as high as 425ºF.) Coat the tenderloin with oil, then with the herbs. Set on a baking sheet and roast for about 20 minutes (internal temp between 140ºF and 145ºF). Remove from the oven and let rest for 10 minutes before slicing.

Combine the fig sauce ingredients in a small saucepan and warm over low heat. Add more water to obtain desired consistency. Serve over pork.

Arrange the aspargus on a baking sheet and drizzle with olive oil. Roll or toss gently to coat. Season with salt and pepper. Roast at 400º (or 425º) until tender and browned, about 10 minutes, depending on thickness of stalks.

In a blender or with an immersion blender, combine the crêpe ingredients and blend until smooth. Cover and refrigerate at least 2 hours. Bring to room temperature before proceeding. Heat an 8-inch seasoned skillet or nonstick crêpe pan over medium heat. Add butter or oil, if desired. Stir batter to reincorporate ingredients, then pour ¼ cup batter into hot pan. Swirl pan so liquid runs along the outer edge—it will set as it heats. Cook for 1–1½ minutes, until set, then flip crêpe. (Do not overcook.) Cook for about 30 seconds more, then remove to a plate. Repeat with remaining batter, stacking finished crêpes. Makes 8. Wrap a crêpe around a few spears of asparagus and drizzle Hollandaise over it.


2 Comments

I helped make dinner!

Since it was just Mama and me for dinner, Mama didn’t feel like dirtying the whole kitchen. She’s starting to catch on that easier is better when it comes to weeknight meals. And because I helped from start to finish, this one took us less than half an hour to make. (Mama says the quick-cooking items helped, too.) Here’s what we did:

Mama rinsed a pint of baby tomatoes under the faucet then showed me the bag of frozen, peeled & deveined shrimp she had (quick-cooking item #1), explaining that they come from the ocean. “I want to eat that,” I said, but she said that the shrimp needed to be thawed and cooked first. Into a colander they went, and she ran cool water over them.

I turned my attention to eating the tomatoes as I handed them to Mama, one by one, naming their colors, so she could slice them in half. (This happened after I dumped nearly the whole bowl of them onto the floor…and they had to be rinsed again.) Mama put the halved tomatoes (quick-cooking item #2) on a baking sheet and added the thawed shrimp. (They thawed that quickly!) She drizzled olive oil over it and mixed everything with her hands. Then we sprinkled kosher salt and pepper over everything. (One shrimp may have received the lion’s share of my salt sprinkles…) As Mama put the shrimp under the broiler, she said we had to be very careful because the oil we put on the wet shrimp and tomatoes is going to “jump away” from the water once it gets hot. Then we danced like jumping-beans.

While the shrimp cooked, and after we danced, Mama measured and I poured couscous and water into a saucepan (quick-cooking item #3). (She didn’t have thawed stock, otherwise she would’ve used that.) Using a scissors, she cut a handful of dried apricots and added those while trying to keep me from eating them up. Ditto with the handful of golden raisins. She stirred it together, covered it, got it hot on the stove, then just let it sit. (Alternatively, she could have added hot water to the couscous without ever turning on a burner.)

By the time the shrimp was done—just when they turned pink and their tails curled—the couscous was ready. Mama and I tossed in a few pine nuts, and she cut in some mint leaves with her scissors before fluffing it with a fork.

I love eating couscous. It’s funny trying to keep it on my fork or spoon. I especially liked the sweet apricots and raisins. The shrimp were really yummy, too. We even had leftovers for Papa when he came home. That’s the kind of cook I am.

Love, Jude

Roasted Shrimp & Tomatoes with Fruity Couscous

1 pound peeled and deveined shrimp (smaller cook quicker)
1 pint cherry or grape tomatoes, halved
Olive oil to drizzle
Salt and pepper

½ cup couscous
6–8 dried apricots, quartered (or chopped)
2 Tbsp golden raisins
Pinch sea salt
¾ cup water (or chicken or vegetable stock)
1–2 Tbsp pine nuts, toasted if desired
3 mint leaves, chopped (optional)

Preheat the broiler. Combine the shrimp and the tomatoes on a baking sheet. Drizzle with olive oil and toss to coat. Sprinkle with salt and pepper. Broil 6–8″ from heat source until the shrimp turn opaque and their tails start to curl, 3–4 minutes. (Some tomatoes will start to char, as well.)

Meanwhile, combine the couscous, apricots, raisins, and salt in a small saucepan. Bring the water (or stock) to a boil, then pour over the couscous. Stir to combine, cover, then set aside until cooked through, about 5 minutes. Add the mint, if using, then fluff with a fork. (Alternatively, combine the ingredients up through the mint, bring to a boil, then immediately take off the heat and cover.)

Serves 2 adults and 1 or 2 kids


3 Comments

Breaking Bread

I have a lot of friends whose mamas make bread. (I have more friends whose mamas buy it from the store.) Mama falls somewhere in between. She likes making it, but she doesn’t always have the time or inclination. (This is what she tells me, as I don’t know what inclination is.)

Knowing me like she does, however, she thought I’d enjoy learning how to make it. We’ve made lots of cakes and scones and cookies and even pizza dough, but I haven’t made a yeast bread yet. I have to say it’s about as scary as roasting a whole chicken: once you do it, you realize it wasn’t so bad. (It’s especially easy when you have a stand mixer, as it does all the kneading for you.) Here’s how we did it:

In a small bowl, add the yeast to the warmed water. Whisk until all the yeast is dissolved, getting into all the corners of the bowl (the liquid will foam). Let sit while you pull together the other ingredients.

Make sure all the yeast is dissolved in the water.

Make sure all the yeast is dissolved in the water.

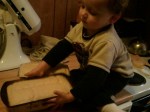
In the bowl of a stand mixer, pour the flours, salt, sugar, shortening, and dry milk.

Look at how well I can add the flour.

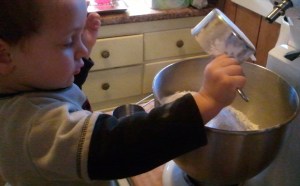
I’m pretty good at getting all this stuff into the bowl. Well, most of it, anyway.

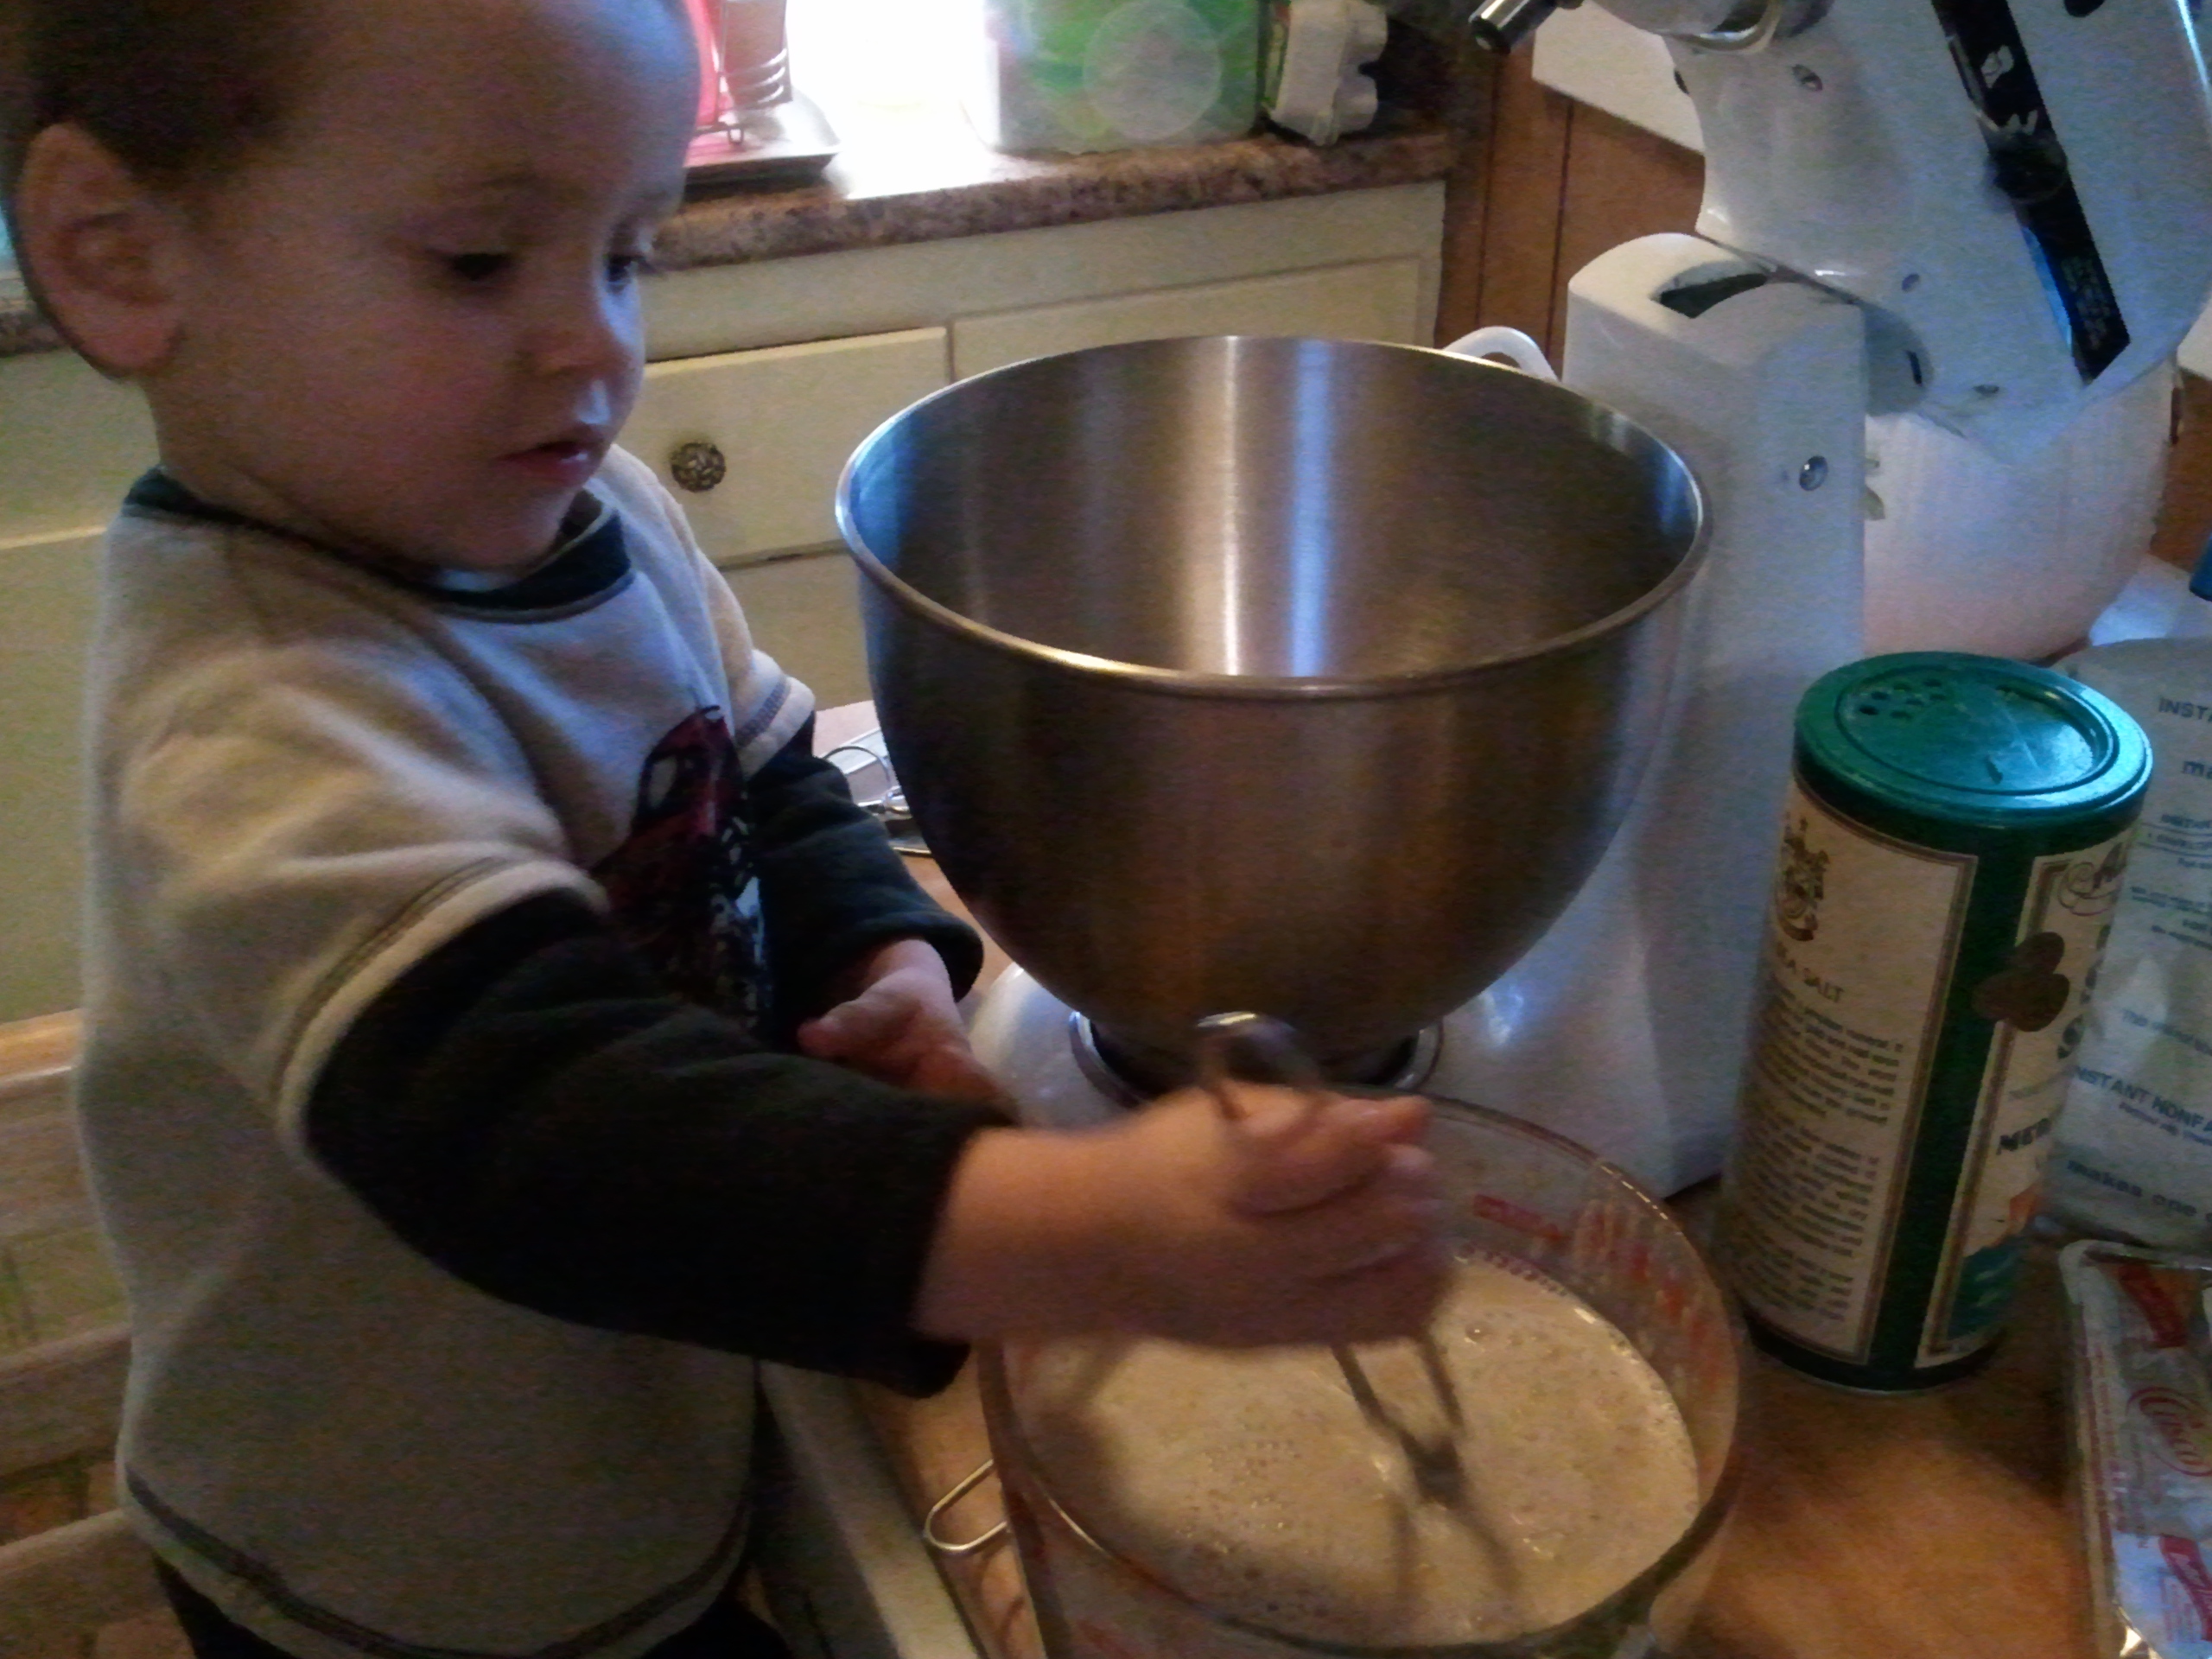
Pour in the yeast mixture. 

The mixer's really full, so start on the lowest setting. (I made it go really fast, and it was very funny.)

The mixer’s really full, so start on the lowest setting. (I made it go really fast, and it was very funny.)

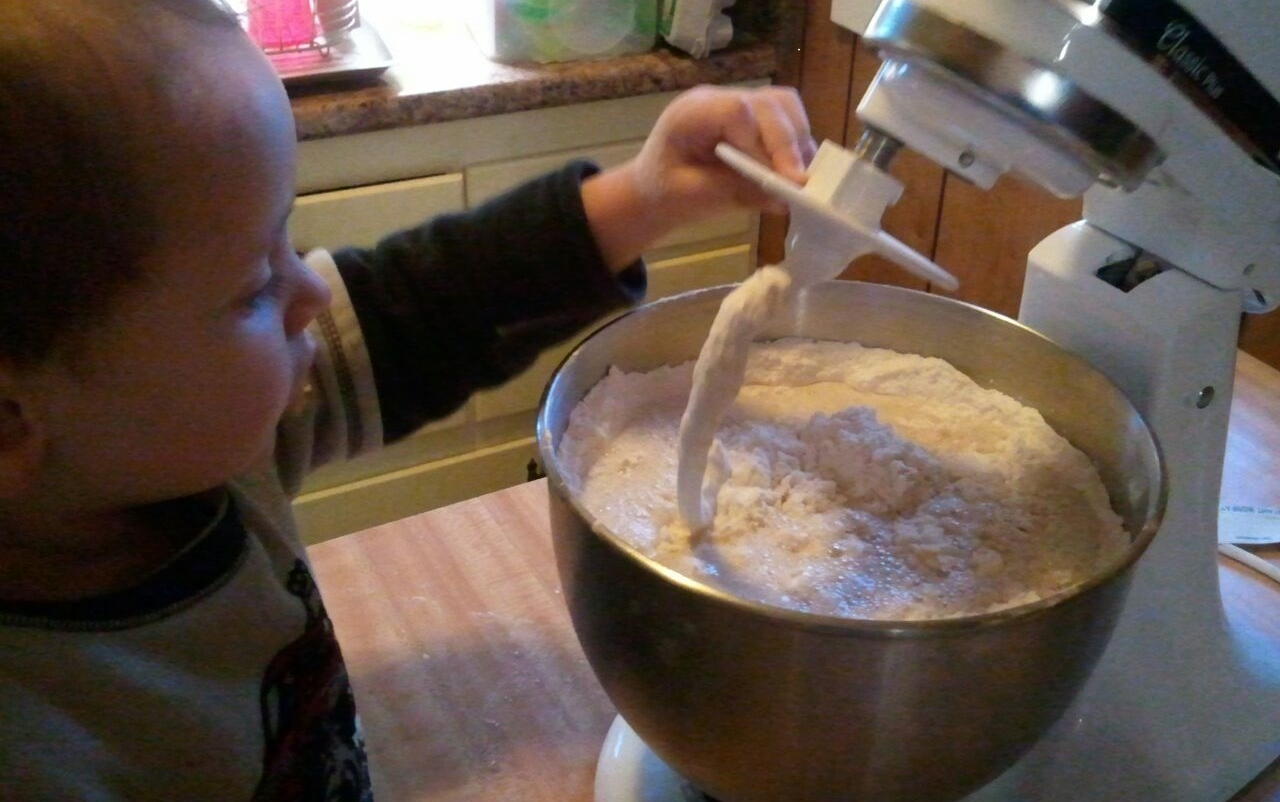
With the dough hook attachment, mix the dough on low setting until dough forms, 5–8 minutes. Stop the mixer and pull out a small chunk of dough. Stretch it. The dough should thin to the point of breaking, but not readily tear apart (a small hole is okay). This is called the gluten window. If the dough pulls right apart, return it to the mixer and continue mixing another 2 minutes, then recheck the dough. Mama says it’s important that you don’t overmix your dough, or you’ll overdevelop the gluten, and you’ll have tough bread. (Remember our bread pudding?)

The dough was a little frightening as it flopped around the bowl.

The dough was a little frightening as it flopped around the bowl. Mama didn’t get a picture of the gluten window. (I really couldn’t see it anyway.)

Lightly grease a large bowl or cookie sheet with cooking spray or vegetable oil. Place dough in/on it, then cover with a clean dishtowel. Let it set out on the counter until it doubles in size, 1–2 hours. This is called proofing.

Holy proof!

Holy proof!

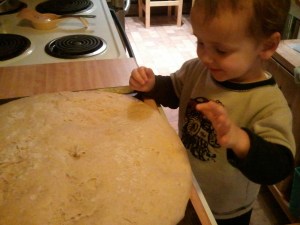
Once the dough has finished proofing, punch it down and give it a few more kneads with your hands to get out any air bubbles. This was my favorite part! Divide the dough in half.

Lightly grease 2 standard-size (9″ x 5″) bread loaf pans and set aside.

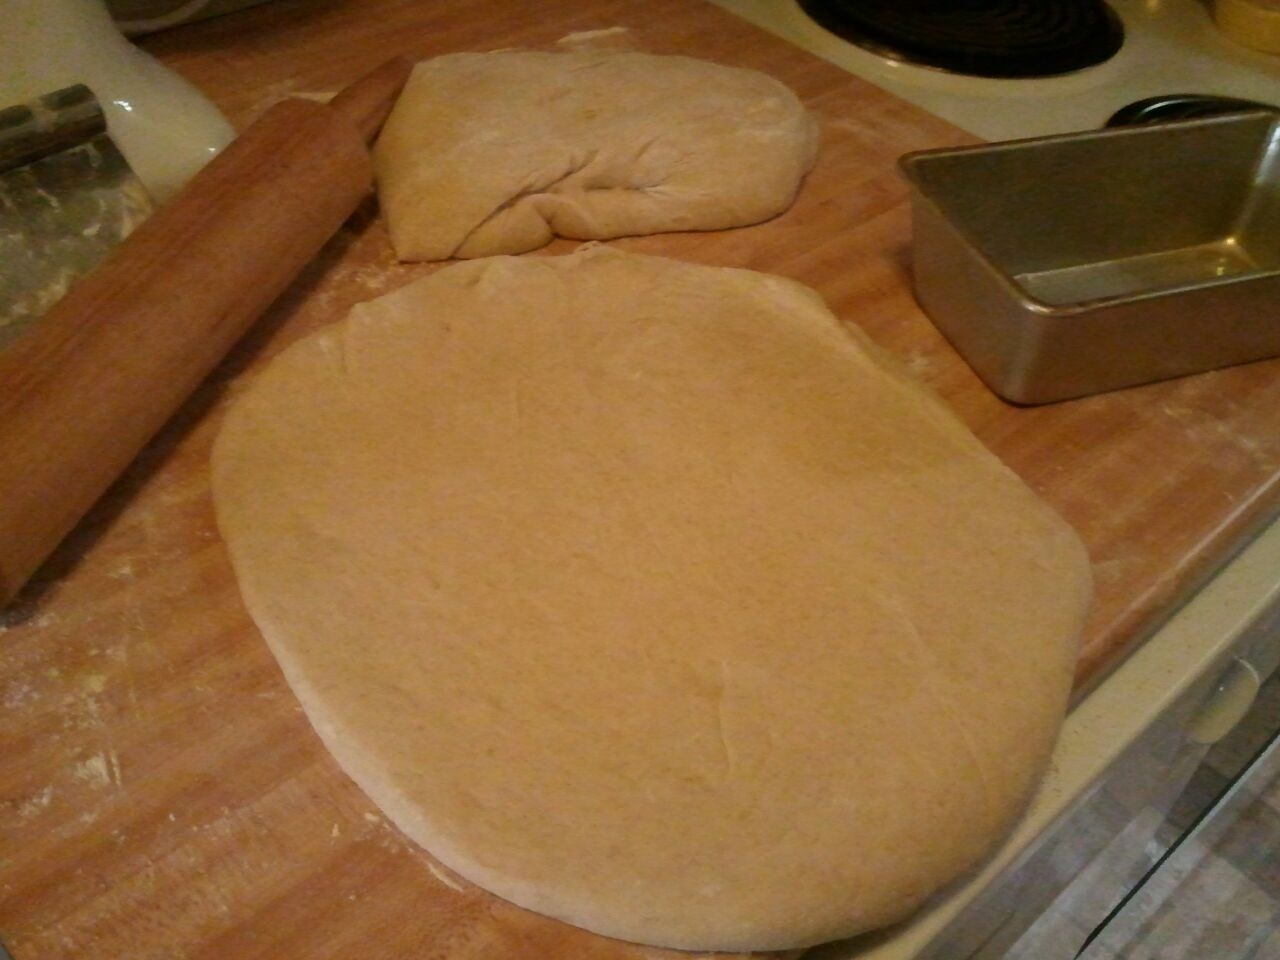
Lightly flour a work surface and, using a rolling pin, roll the dough to about the length of the loaf pan.

The dough is really soft, so it doesn't take but a few quick rolls to stretch it out.

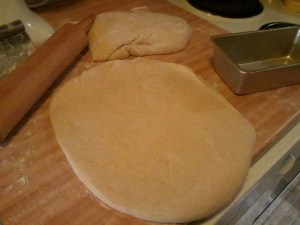
The dough is really soft, so it doesn’t take but a few quick rolls to stretch it out.

With your hands, roll the dough like a jellyroll then place it in the loaf pan, seam side down. (Mama says if you wanted to add a flavor to your dough, like roasted garlic or herbs, lay them on the dough before you roll it, then your flavors will be swirled in the bread.) With a sharp knife, cut a slit, about ½ inch deep, down the length of the loaf, across the top. Repeat with second loaf. Cover the pans with the dishtowel and set aside to proof a second time.
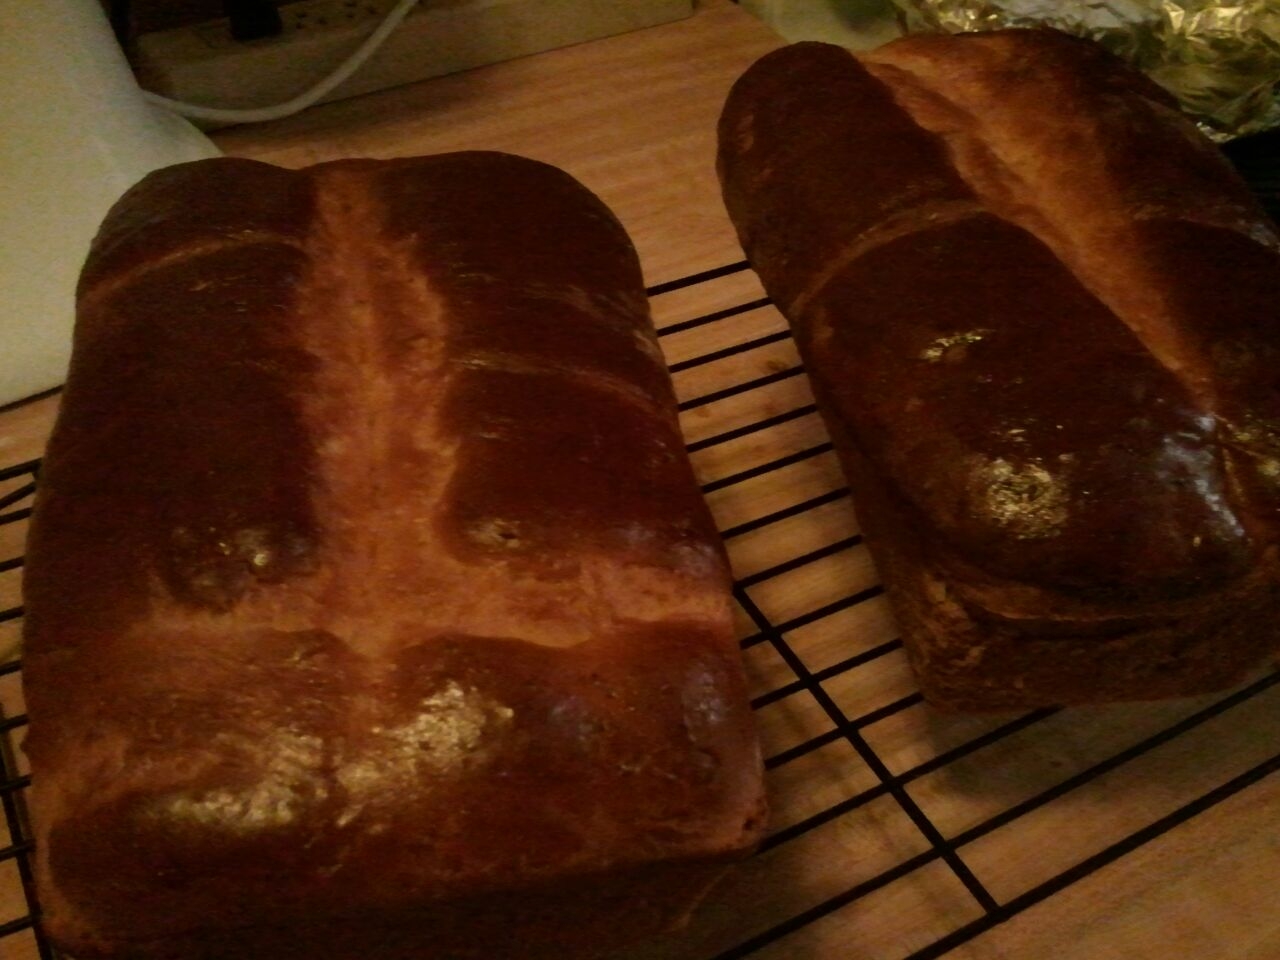
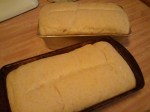
Heat the oven to 350°F. When the loaves are again doubled in size, lightly brush them with egg wash (1 egg, beaten with about 1 tablespoon of water or milk). This will give them a nice golden color. Bake in the center of the oven until an internal temperature reaches 190°F (about 50 minutes). You can see that ours got a bit dark. This was all Mama’s fault, since I’m not allowed near the oven. If your bread is getting too dark, too quickly, tent foil over it for the remainder of the bake time.

Unmold the loaves within 5 minutes of taking them out of the oven, and set on a rack to cool completely before cutting. The waiting is the hardest part, but Mama says you’ll crush all the lovely airiness of your bread if you cut it while it’s warm.

Mama says they're a little dark and a little lopsided, but neither one of us care.

Mama says they’re a little dark and a little lopsided, but neither one of us care.

Mama declared the loaves imperfect, but still a terrific freshman attempt on my part, even though I took a nap somewhere during all that proofing.

Love, Jude

Wheat Bread

3 ¼ cup + 2 tablespoons water, 105–110F°
1/3 cup + 2 teaspoons yeast
3/4 cup whole-wheat flour
7 cups bread flour
2 tablespoons sea salt
1/2 cup sugar
4 ounces (1/2 cup) shortening
3/4 cup dry milk

Makes 2 (9″ x 5″) loaves

Note: Mama tried really hard to convert her weighted measurements to cuppage. To get as close as you can to Mama’s measures, spoon your flours into your measuring cups, rather than dipping your cups into the flour.


4 Comments

I want more broccolini!

Yes, dear reader, I really did say this. Many times. I eat regular broccoli by the stalk, but I really liked its funny little cousin. Mama steamed it for all of 2 minutes, lightly salted it, and served it with a small pat of butter. If you haven’t tried this tender veggie alternative, consider picking some up.

As much as I would’ve been perfectly satisfied with just the broccolini, Mama did actually make dinner in the form of quesadillas. You might recall that I am a fan of a local eatery’s cheesey version (usually after swimming lessons, rather than visits to the E.R.). I had no idea they were so simple to make at home. Much like a pepper, you can stuff just about anything into a quesadilla, and it’s a great way to clear out the veggie bin. But you must not skimp on the cheese. (Did you know queso means “cheese” in Spanish?)

Mama sauteed sliced peppers, onion, and shiitake mushrooms. She tossed in some leftover lentils at the end. Separately, she sauteed sliced chicken breasts. To assemble the quesadilla, she heated a whole-wheat wrap in a frying pan, flipped it over, sprinkled half of it with shredded cheese, then layered on the pepper mixture (and the chicken for Papa). She topped with some arugula then more cheese, folded the wrap in half, and cooked it until the bottom browned. She flipped it and cooked until that side was brown. Remove from the pan, slice into wedges, and serve with salsa and sour cream, if you have it.

Mama actually made me a cheese quesadilla and served some of the stuffin's on the side. You can see how quickly I'm eating the broccolini.

Mama made me a cheese quesadilla and served some of the stuffin’s on the side. You can see how quickly I’m eating the broccolini–my hand is just a blur.

I’m not going to lie. I prefer the quesadillas that Mama buys, but this wasn’t all bad. Did I mention the broccolini?

Love, Jude


2 Comments

Breakfast Worth Waiting For

Yesterday, Mama showed me how to make bread (I’ll tell you all about it some day). She thought we’d have French toast today, but last night, she had other designs. She cut one of the loaves into cubes, laid them in an 8 x 8 baking pan, added cranberries, and poured a mixture of egg and milk over it. Then this morning, she baked it. It took a really long time, but it was really yummy. (I had some after I’d had my oatmeal.) Parts of it were kind of crunchy, and parts were soft and creamy. Then there was the tart zing of cranberry.

Baked cranberry goodness

Baked cranberry goodness

I can get used to mornings like this.

Love, Jude

Cranberry Bread Pudding

This one’s really easy:

1 cup bread cubes + 1 cup heavy cream (or whole milk) + 1 egg (increase as necessary)

Added fruits, nuts, flavorings

Generously grease a baking pan. Add cubed bread (day-old works best). Mix in blueberries, cranberries, bananas, dried apricots, walnuts, pecans, or whatever suits your fancy. In a separate bowl, mix together cream/milk and eggs. Add vanilla, cinnamon, brown sugar, maples syrup, and any other flavorings as desired. Mama says you can even put bourbon in it, whatever that is. Pour over bread cubes, making sure all the bread is submerged. Cover and refrigerate overnight.

In the morning, uncover and bake at 350°F until set and puffy. (Ours took about 1 hour, 10 minutes. You can see why I needed to eat my oatmeal first.) All you have to do is peek at the center. If it’s still liquidy, it’s not ready. If your bread is browning too fast, tent foil over it for the remainder of your bake time. You can also start with the foil for the first half hour, then remove it for the last half hour.


3 Comments

Stock Up on Stock

We’ve used stock in a lot of our recipes, from soup to risotto. Mama often makes vegetable stock, but on occasion, she makes chicken (or turkey) stock or seafood stock. Just like roasting a chicken, making your own stock is super simple—and the end product, at least according to Mama, is far superior to anything you’ll buy at the grocery store. (The only real drawback is having to plan ahead to use it, since you have to thaw it.)

Mama explains that there are stock purists out there who believe there’s an art to making a good stock. While Mama does lend credence to this conviction, she also feels that a down-and-dirty stock can be equally flavorful. Let’s start with a vegetable stock.

Always start with mirepoix. (Isn’t that a funny word?) It consists of carrots, celery, and onion. (And of course, these should all be organic—especially the celery.) This is the basis of all great soups and sauces. The nifty thing about a stock is that you’re going to strain it, so you don’t have to bother with all the peeling and trimming you’d normally do for something like a vegetable soup. Just rough chop about equal portions of these three vegetables, say 1 onion, 2 stalks celery, and 2 large carrots. Or thereabouts. (You really can’t screw this up…but if you’re going through the minimal trouble of making a stock, why not use a whole bag of carrots, a bunch of celery, and a few onions?)

Add a bay leaf, a few peppercorns (no salt), and a few sprigs of parsley. If you don’t have these, don’t worry about it. Mama always cuts a whole head of garlic in half and throws that in. If you have fennel or leeks or parsnips, go ahead and add them, as well. (Go easy on the fennel, though, or your stock will have a slight anise taste. You also might want to avoid beets, but hey—this is your stock.)

Put everything in a large soup pot and cover them with cold water. This is where Mama sides with the purists. Warm water leaches minerals from the pipes. Or so they say. Bring it up to a simmer—never a boil, otherwise your stock will turn cloudy. Partially cover the pot so all the yumminess doesn’t evaporate as steam, and let the stock simmer for as long as you can tolerate that delicious aroma. It’s certainly possible to do a quick stock in 30 minutes or so—it’s very easy to do this with mushroom stems for a mushroom stock or shrimp shells for shrimp stock. But for maximum flavor punch, let the stock do its thing for at least 2 hours. You won’t be sorry.

Strain the vegetables out then cool and store in the freezer. Some people use ziptop plastic bags; some use glass jars. If you’re really being thrifty, use these veggies for a second go-around. Repeat the process with a little less water and simmer for a bit longer. This second stock, or remouillage, will taste a little weaker, but what a great way to get utmost veg usage! You can always use this weaker stock when you cook rice or couscous, etc.

Mama tossed a few leeks in this stock.

Mama tossed a few leeks in this stock.

If you’re keen on making chicken stock, break down your bird, trimming as much of the fat and skin from the carcass as you can. (Fat makes your stock cloudy and skuzzy.) Put the bones in the pot along with your mirepoix, and proceed as above. (If you happen to be deboning a fresh chicken, it’s perfectly fine to use raw bones, as my friends Ty and Tora’s mama does, but it’s more likely you’re going to use roasted chicken bones.) It’s even more important with a meat-based stock to use cold water and a gentle simmer. Cold water helps draw out all the yummy goodness from the bones, and a simmer will keep it from getting cloudy. (Your stock should always be clear.) Mama lets this go anywhere from 3 to 4 hours. If the top of the water begins to get scummy, simply skim it off and discard. If your stock winds up very fatty, strain it then refrigerate it overnight, and the fat will solidify at the top—and then you can easily remove it.

For a fish stock, use the fish bones, or go with crustacean shells. You can get away with simmering these for 2 hours.

For a beef stock, you definitely want to roast your bones first. This is where you’d get bones from a butcher or farmer specifically for stock. Roast them in the oven (400°F) for about half an hour, add your mirepoix, and put it back in the oven for another half hour. Since this is going to yield a brown stock, you should add some sort of tomato product–paste is generally your best bet. Take the bones and veggies out of the roasting pan and put them in the soup pot. But before you do anything else, deglaze that roasting pan with a bit of cold water or red wine. Scrape up all those browned bits of goodness, then add them to the stock pot. Add water to cover, along with your herbs. Simmer for 4–6 hours, then strain.

As you can see, making stock isn’t such a big deal. Usually, all that gets in Mama’s way of making stock is….well, me!

Love, Jude


2 Comments

Don’t Let a Little Chicken Intimidate You

Ina Garten, “the Barefoot Contessa,” has said she makes a roast chicken for her husband every Friday. Mama doesn’t cook one chicken a month, let alone every week, but she should. She says they’re supereasy to prepare and can be made very flavorful very simply. We got a 3-pound chicken from my friend Walter’s mama. It was so fresh, it was barely cold from their refrigerator!

First, Mama rinsed the chicken, inside and out, then patted it dry. Just because. Then, the easiest way to add flavor to your bird, according to Mama, is to let it cook in fat. This means you should keep the skin on it while it bakes (remove the skin before you eat the chicken, and you take all that fat with it, believe it or not). But Mama adds more flavor by rubbing olive oil all over the skin and sprinkling it with a lot of kosher salt and pepper. Sometimes she puts a few pats of butter under the skin, massaging it into the breast meat. And that’s all you have to do! Mama always puts aromatics inside the chicken, too, such as a halved head of garlic, a quartered onion, a halved lemon, and whatever whole herbs she has on hand. You won’t eat these, so you don’t even have to peel them.

Mama tied the chicken’s legs together with kitchen string and tucked the wings under where its neck would be. Doing this keeps these extremities close so they don’t burn (or worse, dry out), but you certainly don’t have to do it. Mama says to bake your chicken on a rack set in a roasting pan (or on a bed of preferred veggies) at 425°F for 15–20 minutes per pound. To test if it’s done, you can temp it in the thigh (careful not to touch the bone) to 165°F, or you can wriggle the leg. If it seems like it might come out of the socket easily, and the juices from it run clear (not pink), then it’s done. If you think it’s not quite done, but the skin is getting very crispy and dark, tent some foil over it.

A tidy little roast dinner.

A tidy little roast dinner.

This little guy took about an hour to cook. You can see that Mama took advantage of that time by roasting some asparagus and pumpkin. Not really a seasonal match, but my folks like asparagus, and I can’t say no to orange food, especially one roasted with rosemary and Parmesan. The Cinderella pumpkin, as Mama called it, roasted with the chicken, and the asparagus cooked while the chicken rested. (Don’t forget to let your bird rest before you slice into it, Mama says, or your bird will lose its juiciness.)

I skipped the asparagus, and even after all that roasting and resting, the chicken didn’t really appeal to me. Papa ate a pretty good dinner, though, and he said the chicken was very juicy. But what to do with all the chicken leftovers? Mama has chicken salad and quesadillas in mind. I don’t know what a chicken “salad” is, but I sure do love quesadillas. And before the carcass was even cold, Mama had it in a pot on the stove for stock. (I’ll tell you about that another time.)

So the moral of the story is don’t be a chicken about a little…er…pullet. If Mama, a vegetarian, can do it, so can you!

Love, Jude


Leave a comment

These are not pancakes!

As I learned when I picked up one of these golden patties and put it in my mouth. It was a crab cake! Mama kept it simple and followed the recipe on the side of the can, but she said you have to pick through the crab just to be sure there are no bits of shell. She fried them in oil, and while they were frying, she made tartar sauce: mayo, capers, relish, Worcestershire sauce, salt & pepper (all to taste). “Oooh, capers!” I said, as I dipped my crab cake in it. It probably wasn’t my favorite thing to eat, but I ate almost the whole thing…until my tartar sauce ran out.

That's me, pilfering a grape.

That’s me, pilfering a grape.

While the cakes cooked, I helped Papa make a salad of Boston lettuce, grapes and raisins, pine nuts and hazelnuts, topped with poppyseed dressing. I liked the dressing fine (and of course the grapes and raisins), but I haven’t yet come around to eating lettuce. I can’t eat everything, you know.

Love, Jude


3 Comments

Jude Appleseed

I am not a baby who doesn’t know where food comes from. I’ve found eggs at the homes of some of my friends, and I’ve picked strawberries and blueberries and raspberries, as well as peaches and apples. We grew peas and tomatoes last summer, too, but (as Mama will be quick to point out), I kept picking them off the vines before they were really ready to eat. And then there was the mint that grew so out-of-control that I could have played hide-and-seek in it.

In the fall, Mama took me to an organic apple orchard not too far from our house. I knew just what to do. And, aside from the branches still being wet from that morning’s rain, I was really good at getting to the inside branches and picking big beautiful apples…each of which I, naturally, tried to take bites out of.

Mama can’t remember how many apples we picked that day, but it was definitely two full grocery sacks. And Mama says you can never have enough fresh apples in the fall. Why, for 1 pie alone, you need about 5 of them. And then consider applesauce. All that peeling and chopping cooks down to hardly anything! Let me show you.

But first, Mama pointed out that it’s very important to choose a sweet apple: honeycrisp, gala, fuji, pink lady, winesap, Cortland, jonagold, rome…the list is nearly endless. If you go to an orchard like we did, just ask the owners. They’ll be able to tell you! You want to avoid tart little numbers like grannysmith, otherwise you’ll have to add a whole lot of sugar. And you know how Mama feels about sugar. (Something else you can ask is whether they have any seconds–these are the apples that they’ve picked off the ground. It’s not as bad as it sounds–a wind could’ve just blown it off and caused a bruise, making it “unsuitable” for selling…but ideal for applesauce!)

Some folks choose to not peel their apples when making sauce. Some even toss the whole, roughly chopped apple in, seeds and all, choosing to strain the finished sauce. Do whatever works for you. Mama peels them, and Papa and I eat the peels. It’s win-win. There’s no formula for chopping or slicing the apples. Large chunks will take longer to cook down, but you also don’t have to make them itty-bitty.

Just lop off the apples "cheeks" for a quick way to core them.

Just lop off the apples’ “cheeks” for a quick way to core them.

Add the apple chunks to a large pot with a splash of water in it. (Mama says this keeps the apples from sticking initially.) She added a few cinnamon sticks and cloves, but she cautioned that it’s better to use cheesecloth that you can easily fish out, or just remember how many of these you put in the pot, as nobody wants to bite into a whole clove. (Alternatively, you can skip the spices, or use dried.)

The apples chunks don't have to be that small when you start.

The apples chunks don’t have to be that small when you start.

Turn the heat to medium to get everything going, and put a lid on the pot. Stir it occasionally. You don’t have to linger, but do keep an eye on things. Lower the heat a bit, and if the apples seem to be sticking or scorching, then turn it down some more, stir them, and maybe add another splash of water. (You shouldn’t have to at this point, but better to be safe than ruin a batch of applesauce.) Taste it, too, from time to time. Maybe you’ll want to add some brown sugar or other spices.

Here's what the apples look like after a little bit of cooking.

Here’s what the apples look like after a little bit of cooking.

Once the apples are supersoft, anywhere from 30 minutes to an hour, you have a couple options. If you prefer a chunkier sauce, then take a potato masher and go to work. That’s usually what Mama does, but this time she decided to use her immersion blender. You could also use a food processor, a blender, or a food mill to reach your desired consistency. Spoon the sauce into clean jars. If the jars are hot and the sauce is hot, Mama says you could get lucky and have them seal. But Mama just let the jars cool, then she stored them in the freezer. (Let them thaw in the fridge overnight.)

The apples are so soft they're practically turning themselves into sauce. Don't forget to fish out the cinnamon sticks and cloves!

The apples are so soft they’re practically turning themselves into sauce. Don’t forget to fish out the cinnamon sticks and cloves!

The applesauce was slightly spicy and very smooth. We ate it warm right from the pot, and it was the perfect snack on a crisp afternoon. Of course, it’s also good cold. Sometimes Mama mixes in raisins or adds it to oatmeal, but mostly I eat it straight. And what did we do with the couple dozen remaining apples we had? Stay tuned…

Love, Jude