When Mama was growing up, she told me she had an Italian plum tree and a sour cherry tree in her yard; later, there were apple trees. One by one, though, they began to die, but the plums and “sours” (as she calls them) continue to be among her favorite fruits. It’s probably how she came to pinch the cherries from the tree down the street from her, in the yard of an old woman whose tiny house was all that stood guard over the coveted summer crop.
It’s a wonder, then, that it took three summers before Mama noticed the wild raspberry bush in our neighbor’s yard…especially since the house has been vacant since before I was born. When she noticed the red gems glowing in the sunlight, she darted across our semi-private mountain road with me (after looking both ways, of course) and pointed out the very reddest…
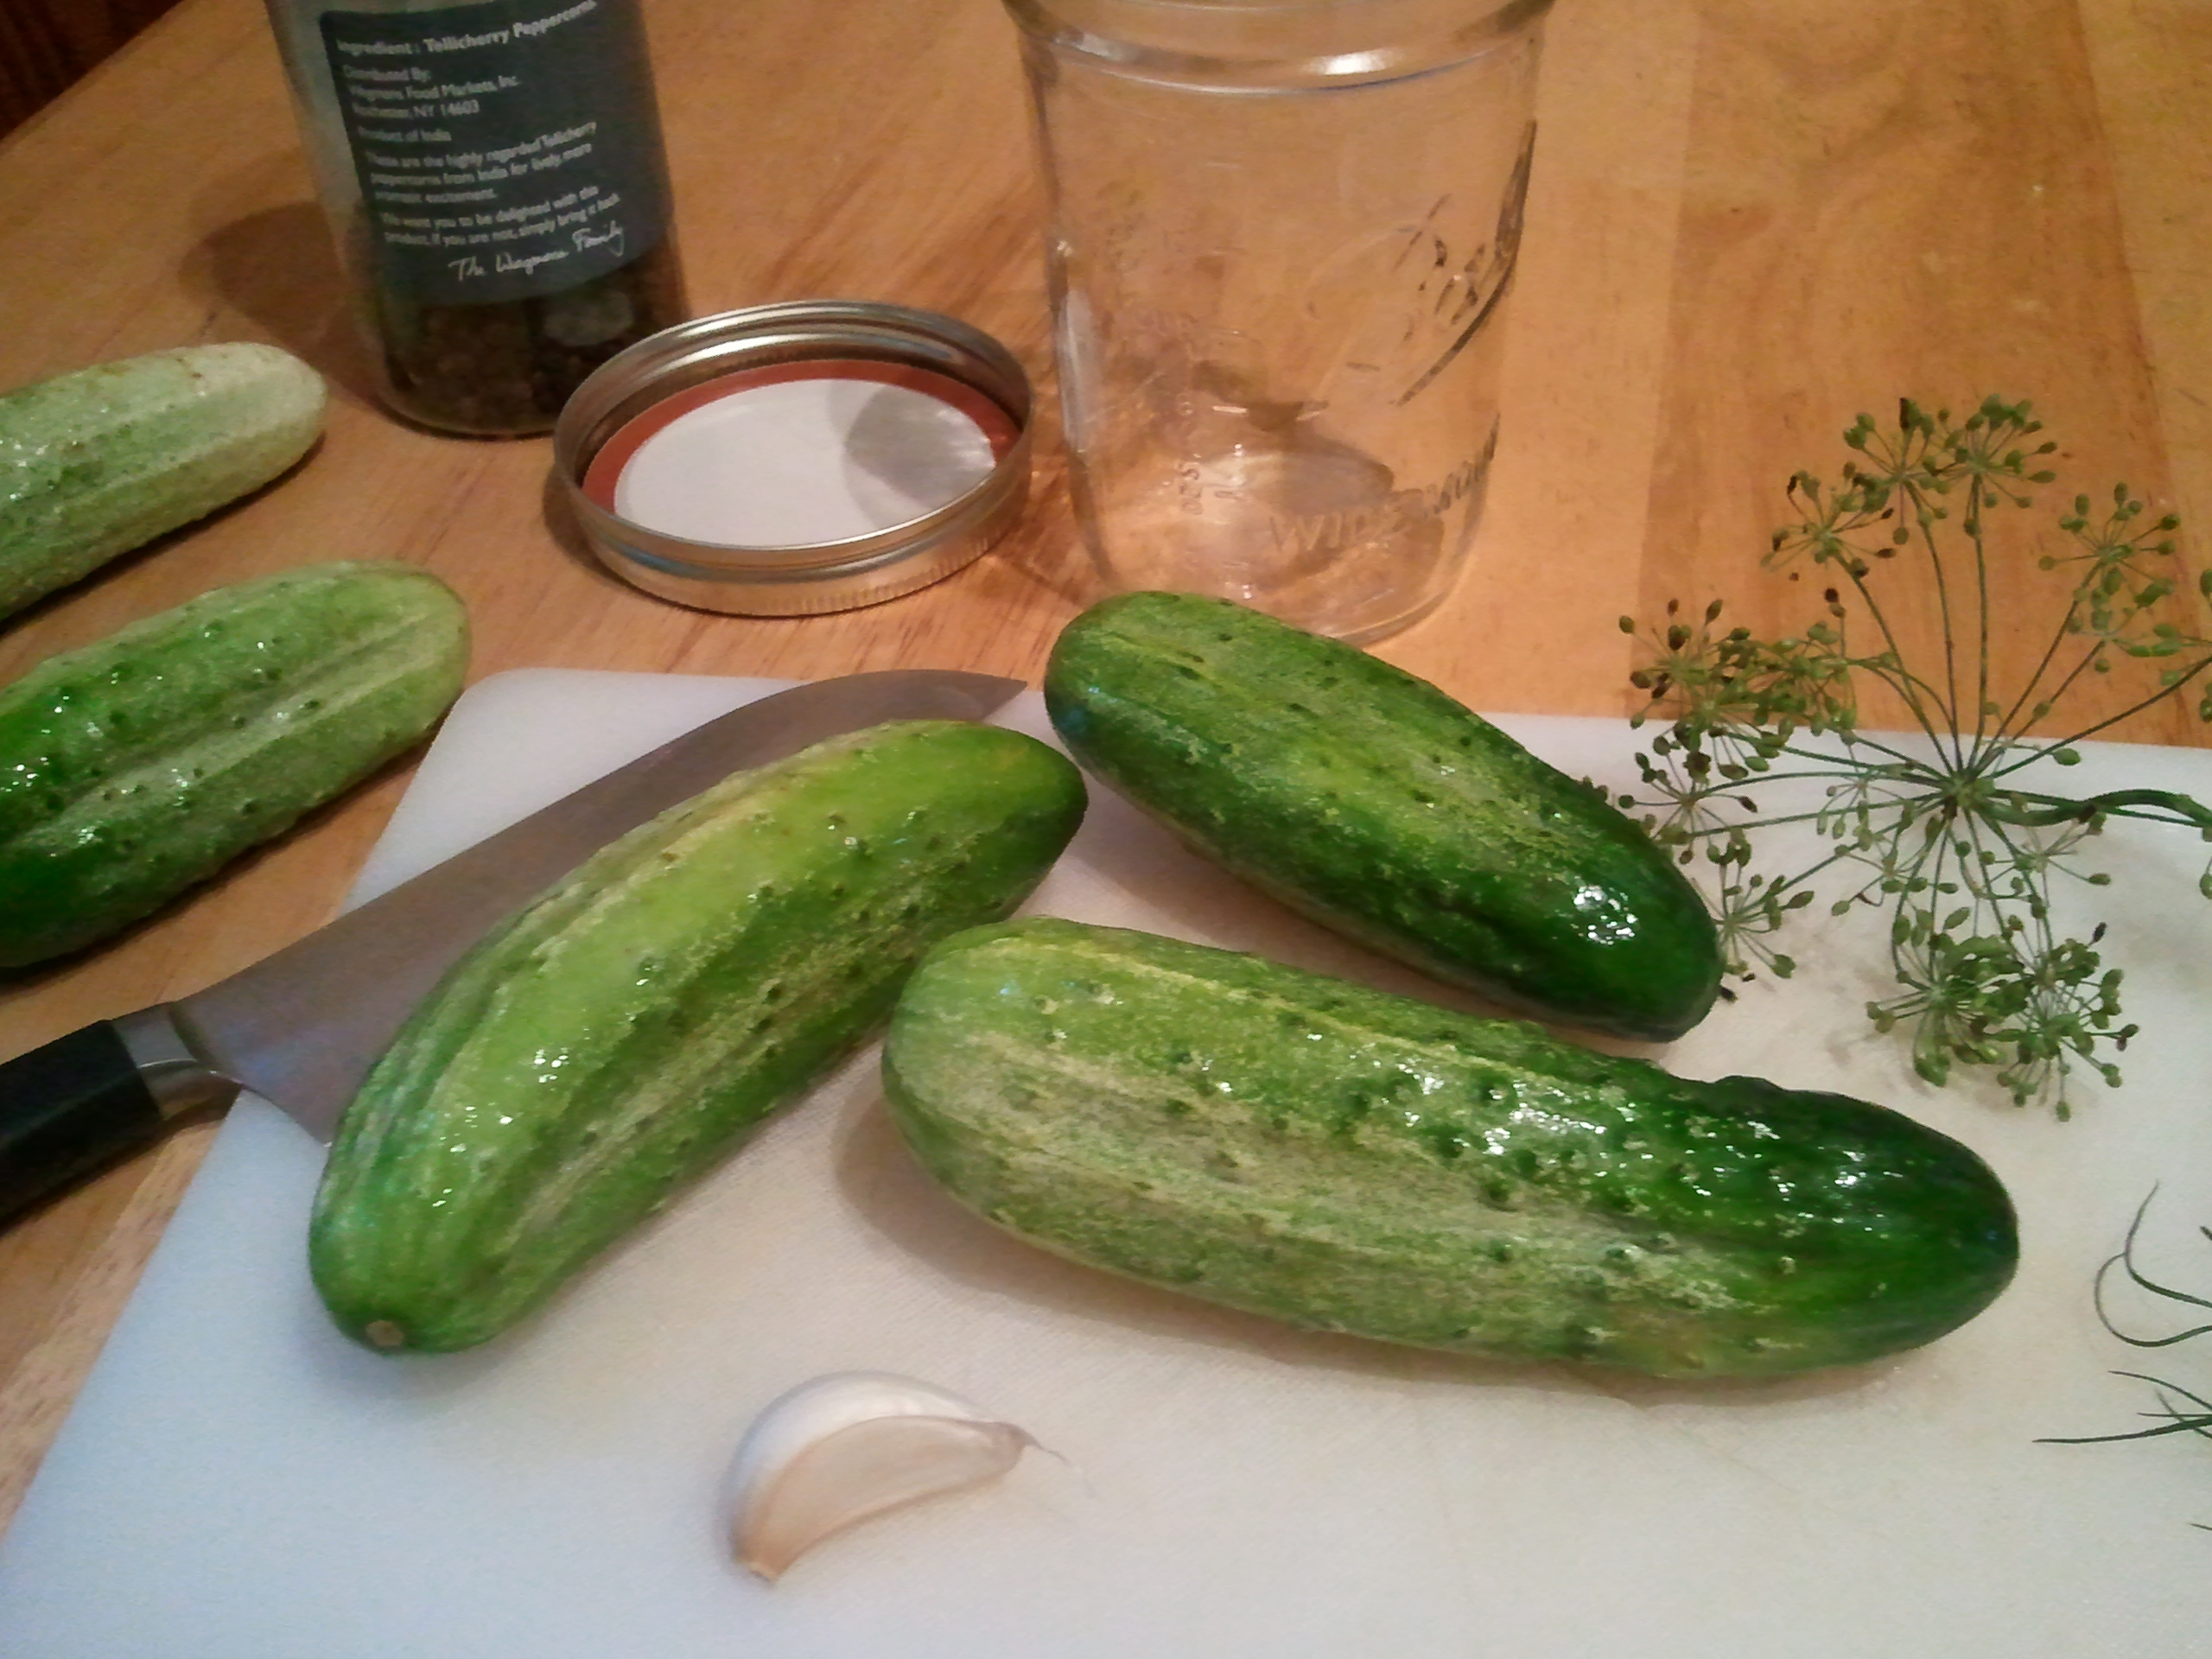
I sure love pickles. Not sweet or bread & butter pickles, mind you, but dill. I especially like when they’re crunchy.
I’ve made pickles before, and it’s really quite simple. Mama found a new recipe that she thought we could try, and it was a perfect chance to use the garden dill before it goes entirely to seed.
These little cucs are the perfect size for a pint jar.
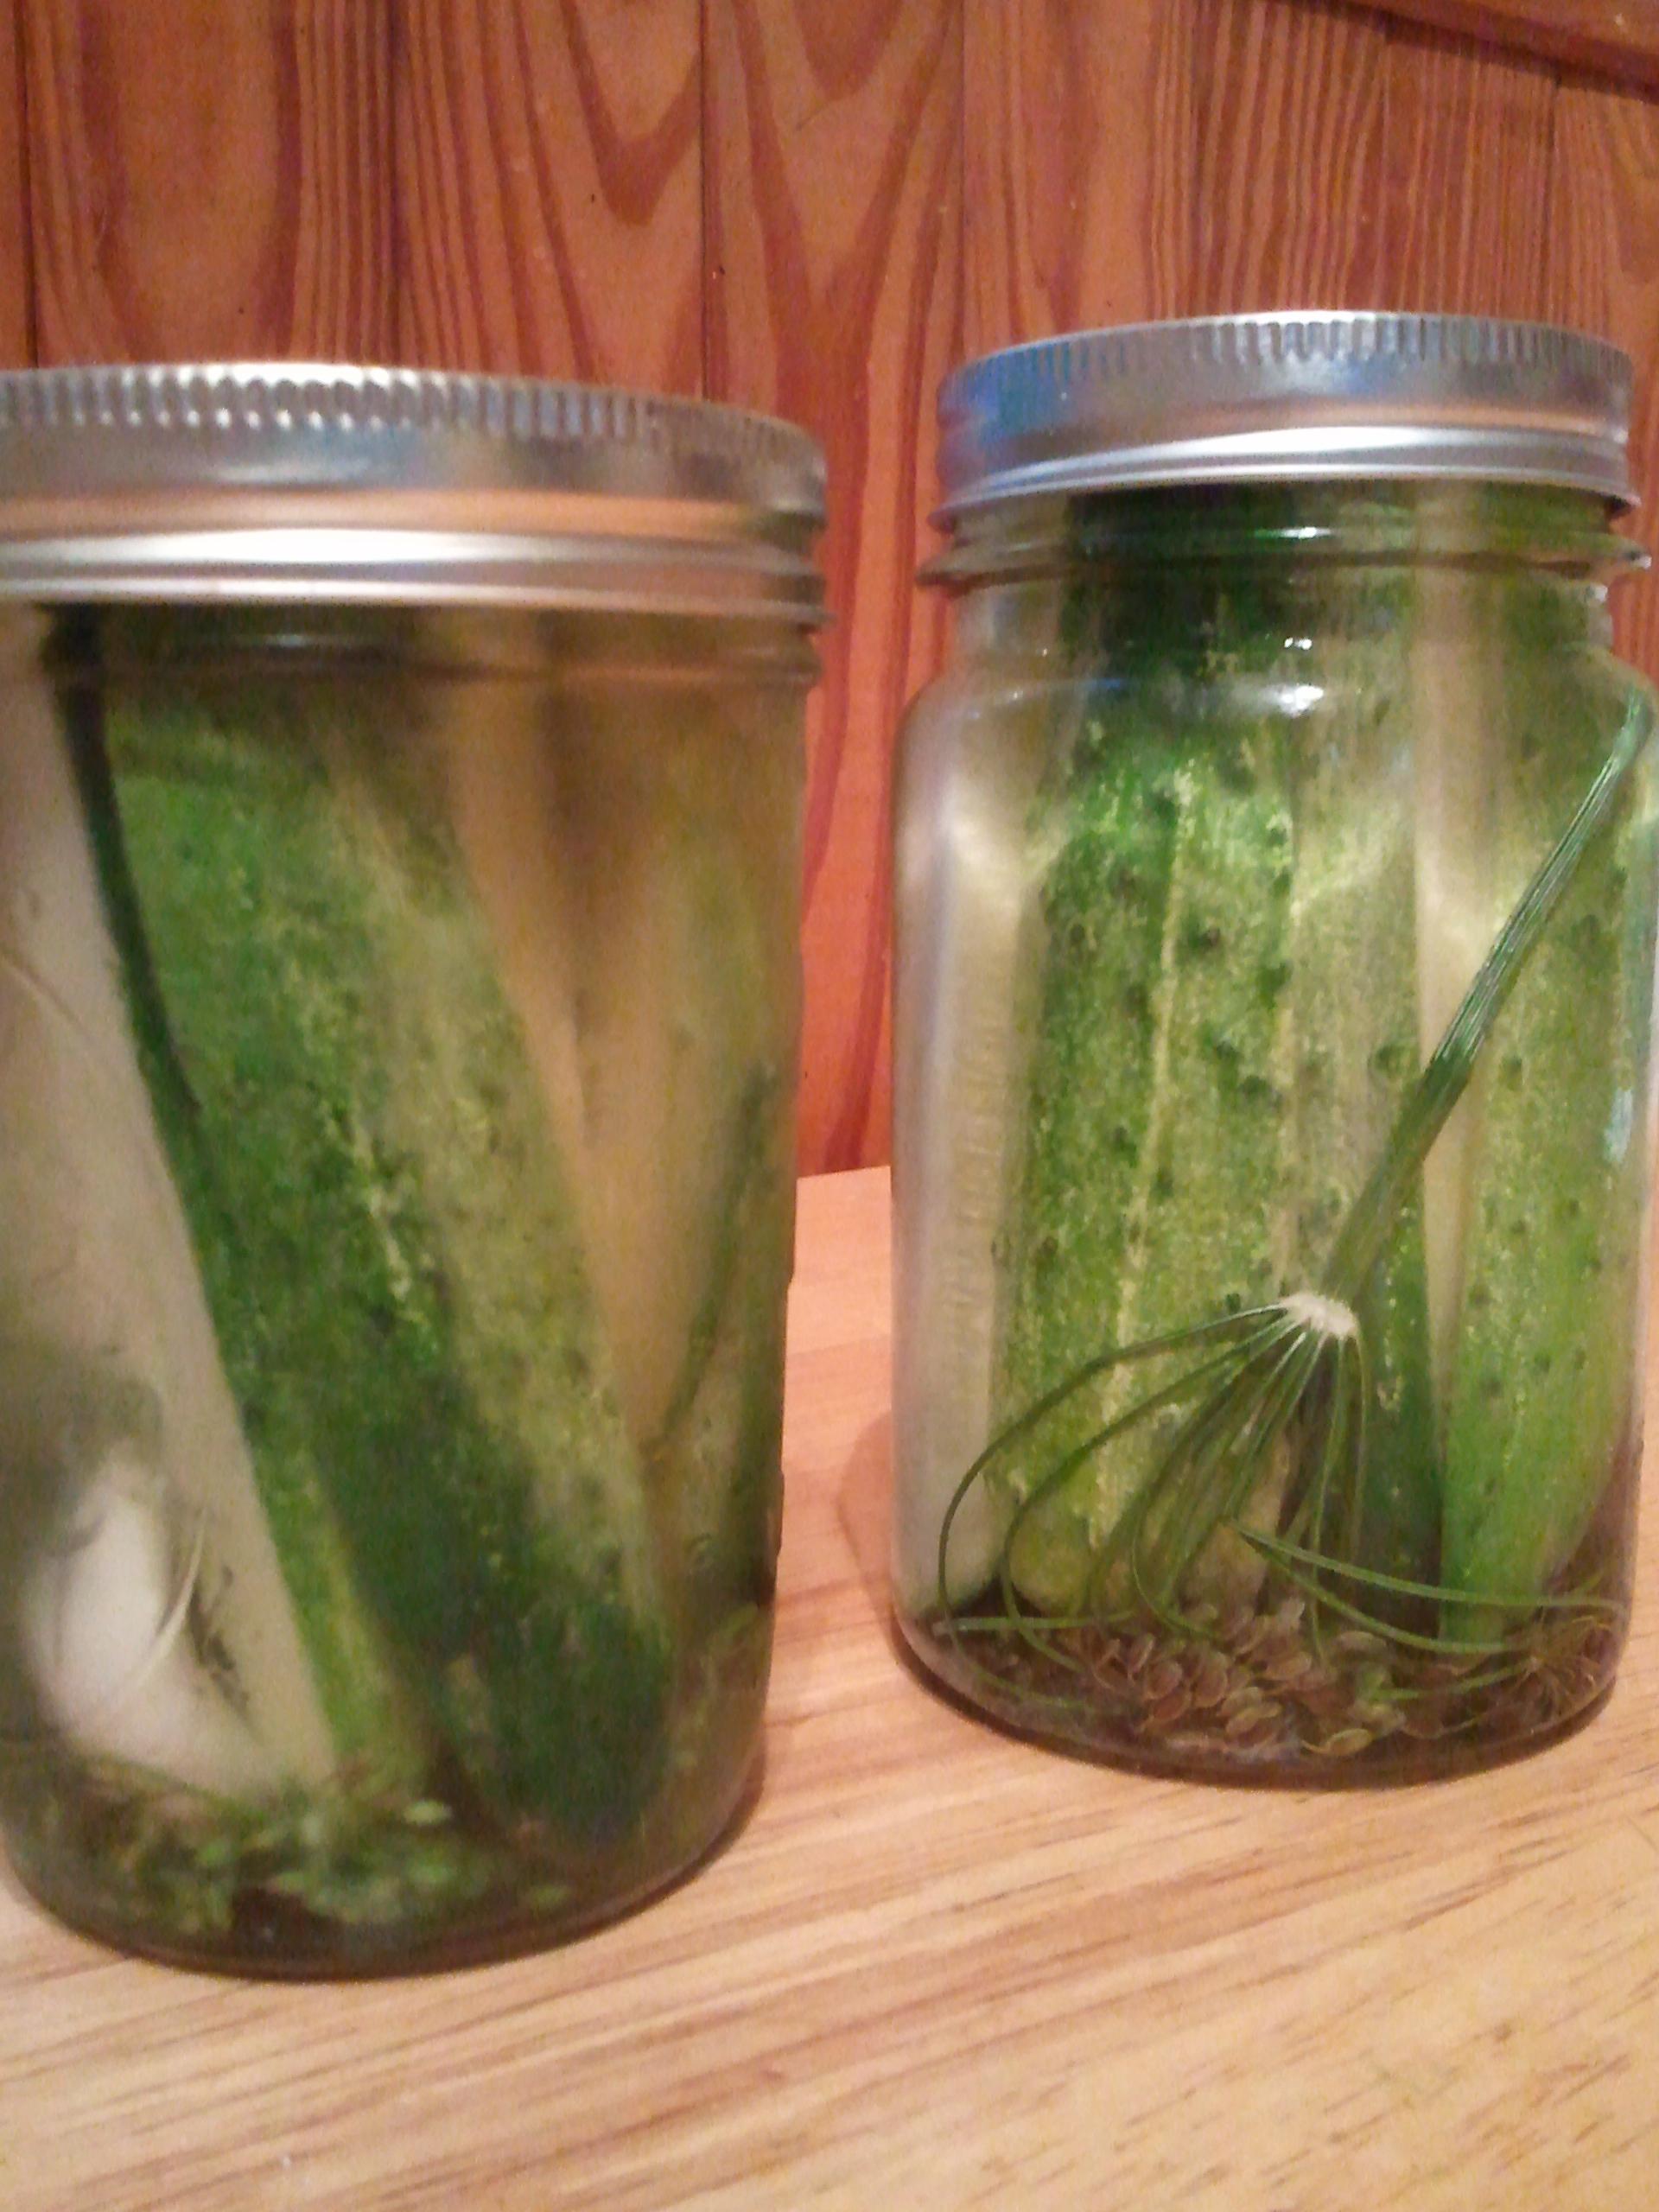
We have to wait a few days before we can eat them, but no doubt they’ll be worth it.
If your mouth’s not watering just looking at these, then… you mustn’t like pickles very much.
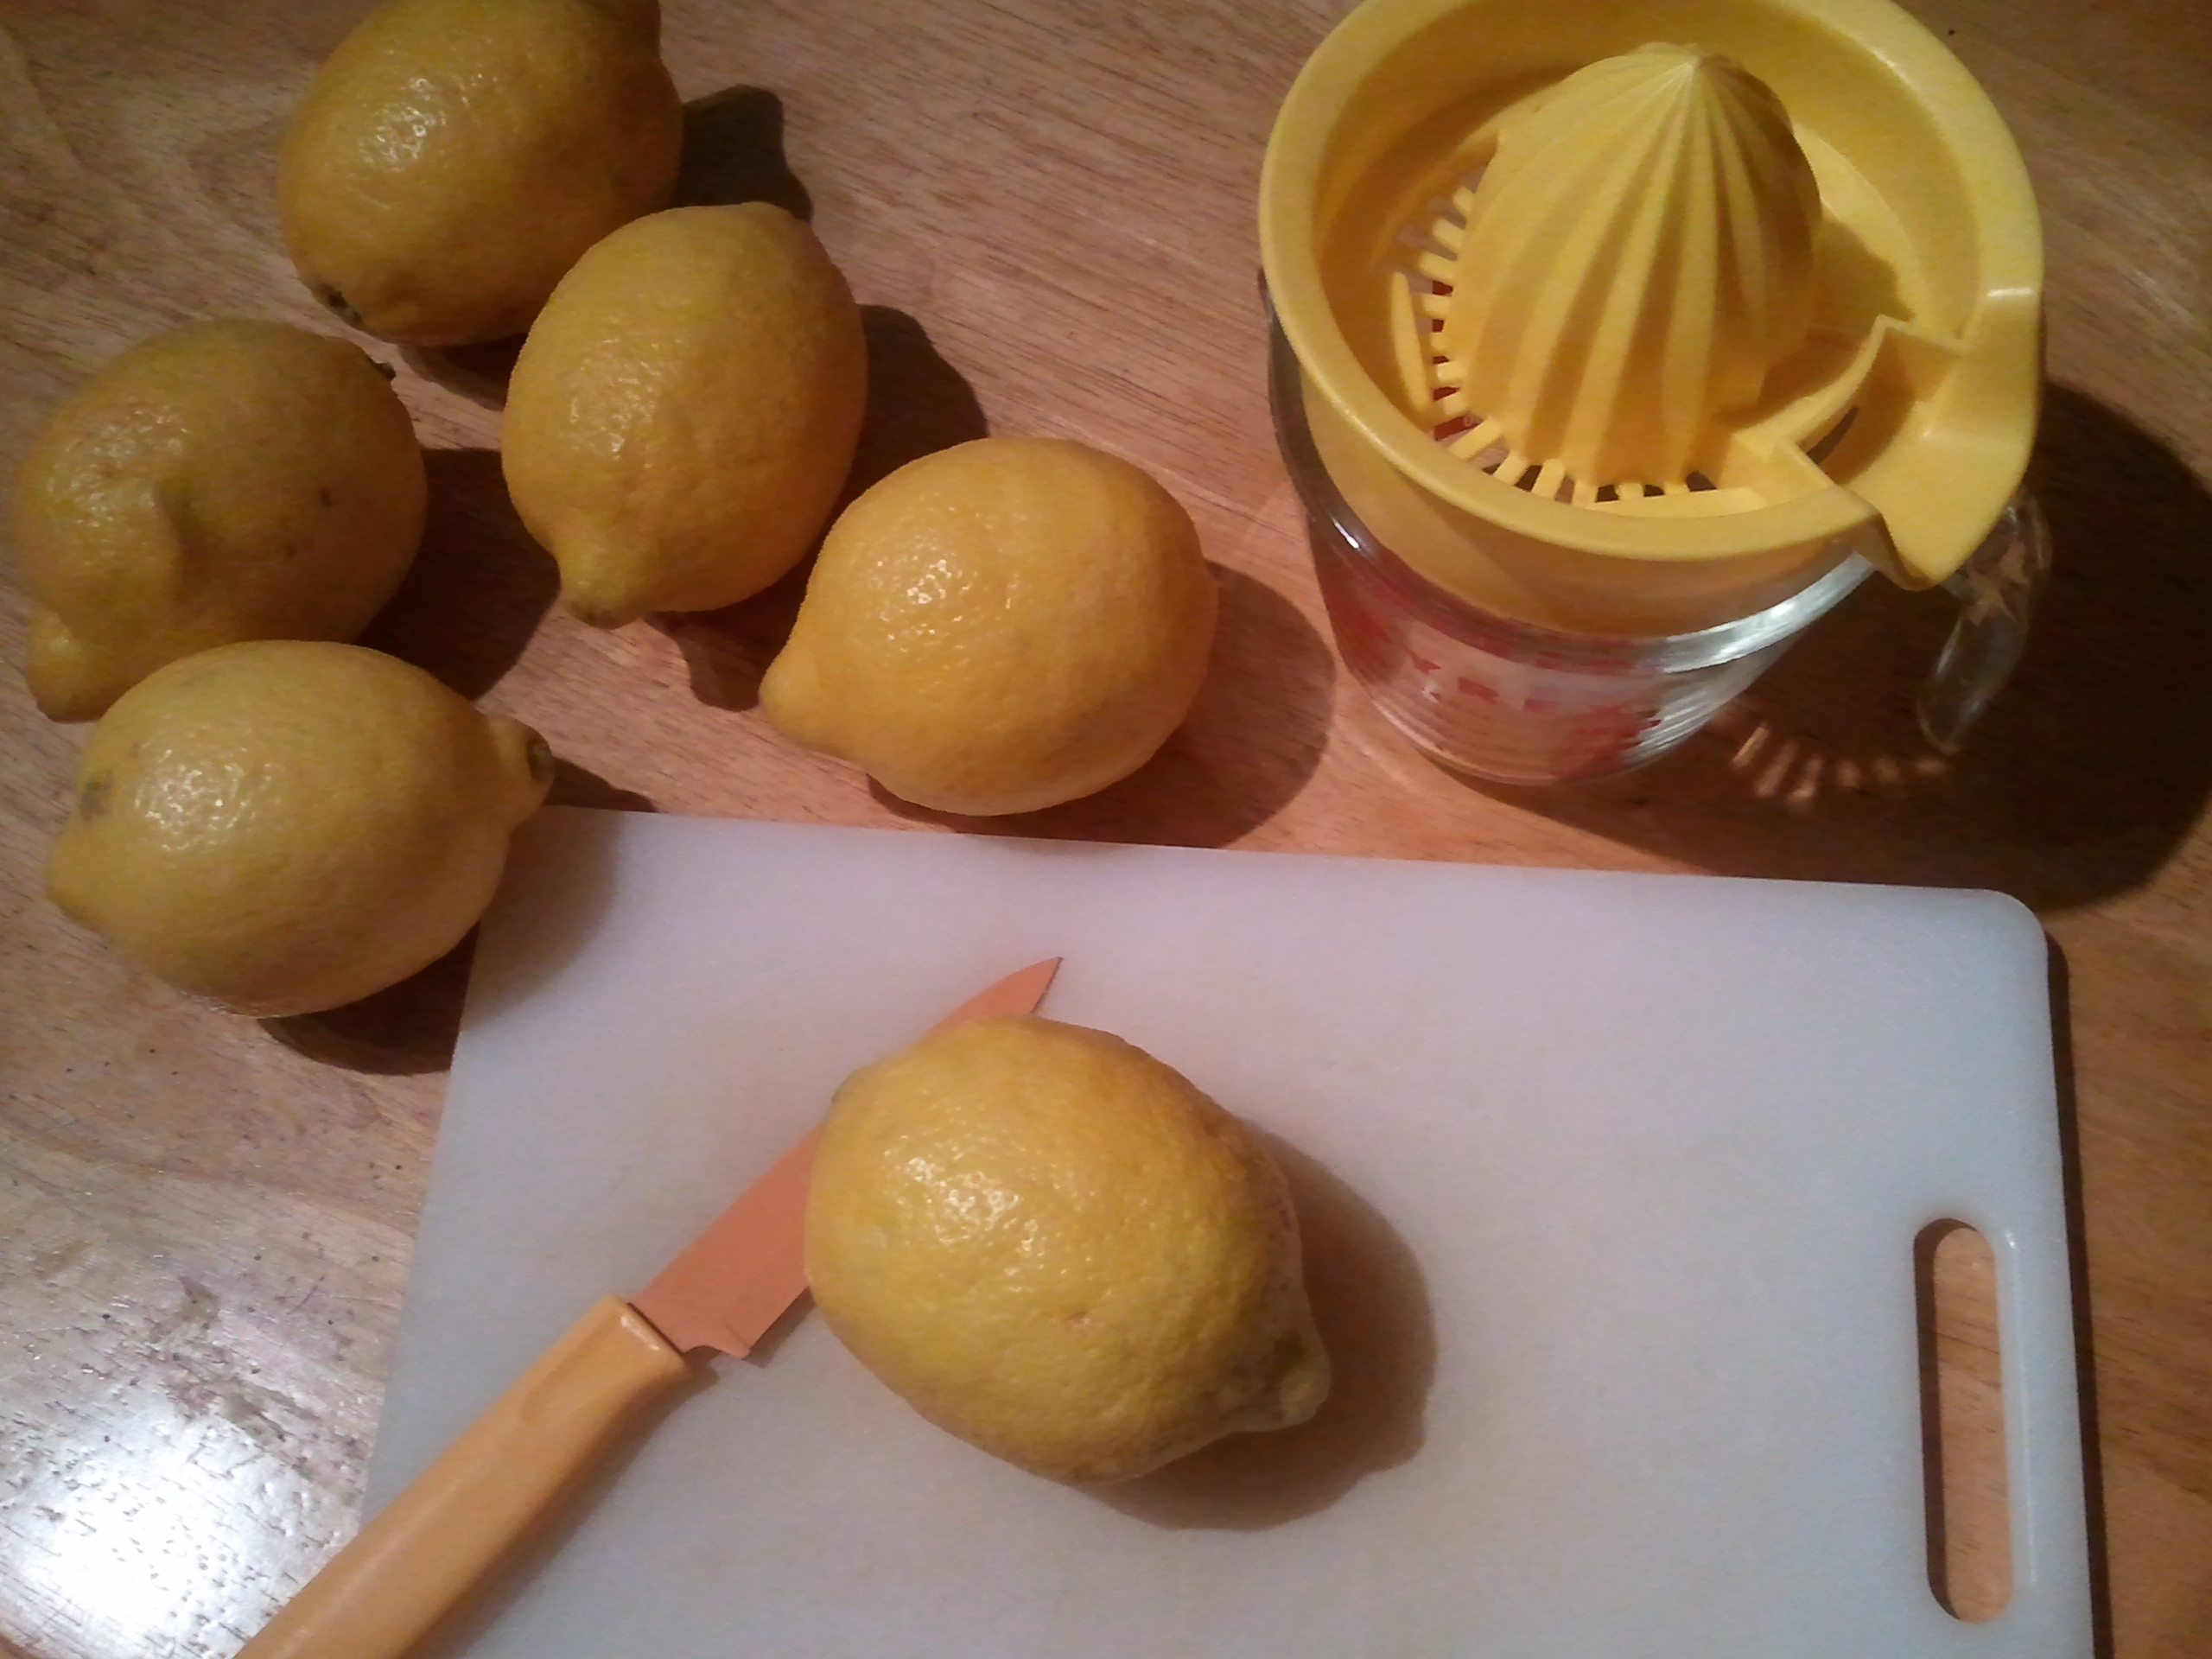
Well, the heat wave finally broke, but it’s still awfully hot. Mama decided it was time for some lemonade. You won’t believe how easy it is to make.
Get together your lemons, juicer or reamer, knife, and cutting board.
Since these were large lemons, Mama used a regular hand juicer rather than her electric one. She took out 6 lemons, as that’s about what it takes to get 1 cup of lemon juice. She ended up needing only 4 of them, though.
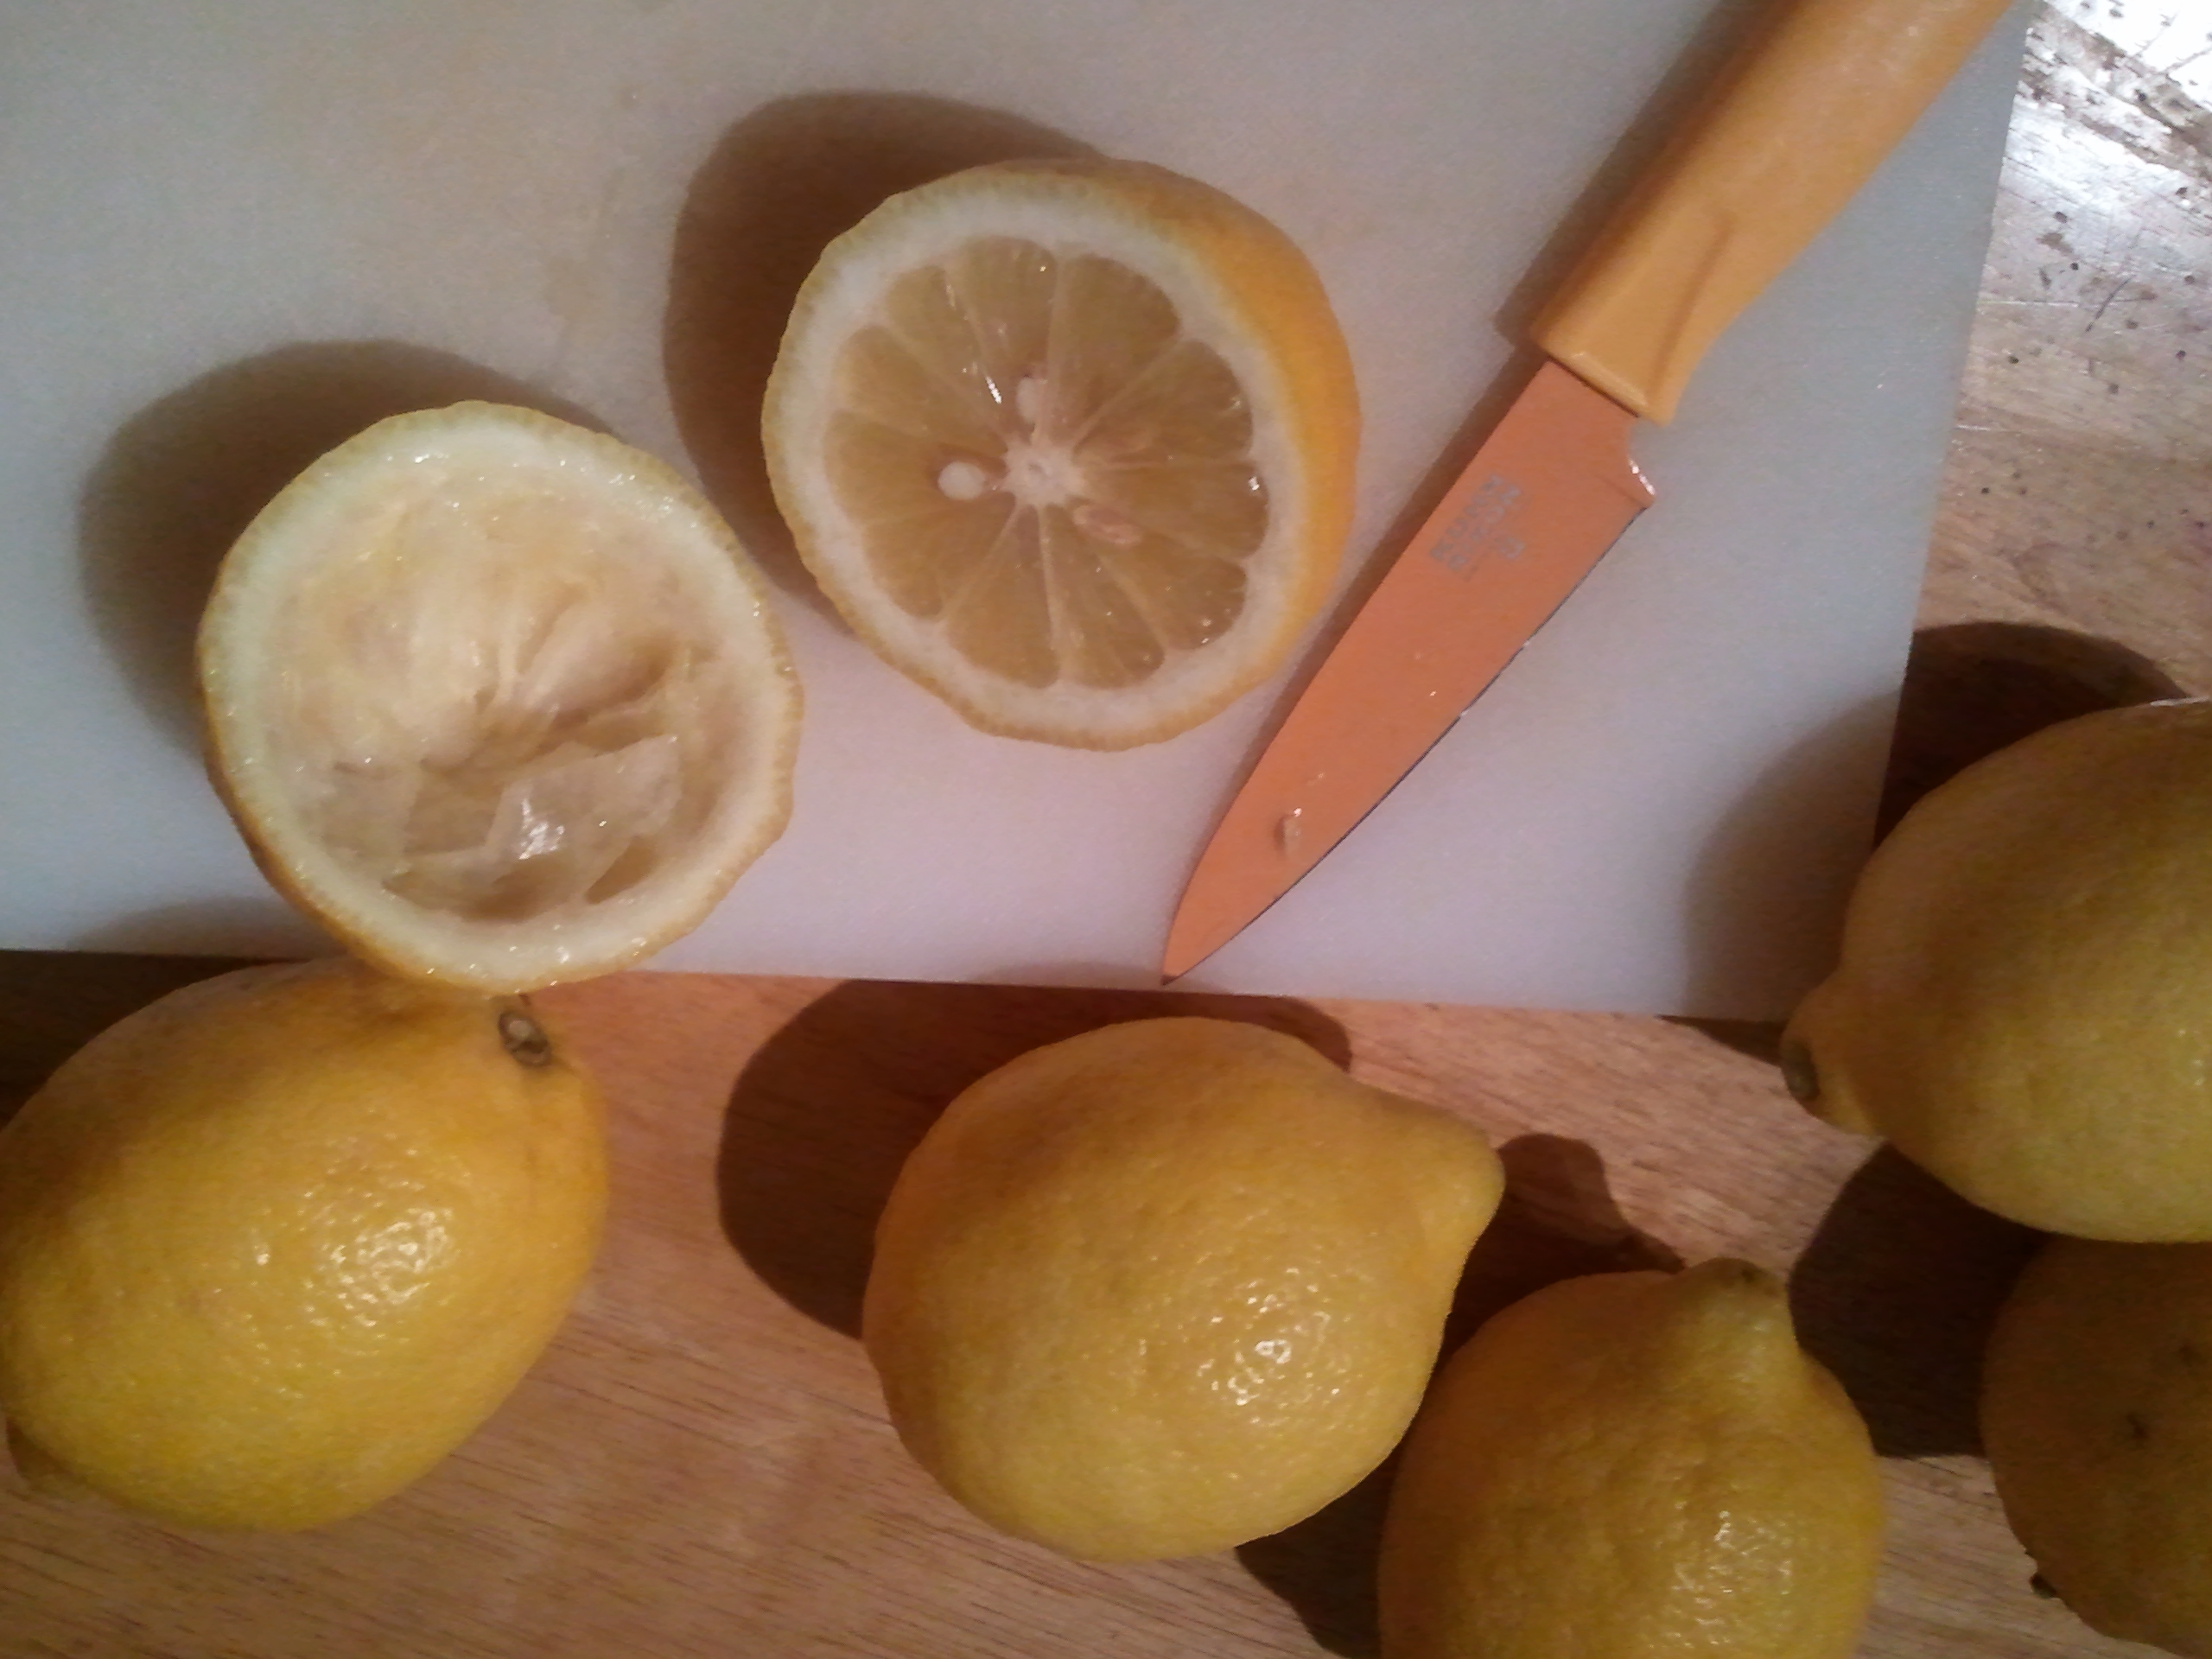
I tried juicing a lemon, but I could either press or twist, not both at the same time.
Juicing the lemons is probably the toughest part. After that, it’s a matter of combining everything, and choosing how you want to serve it. I like lemonade very much, especially the way it makes my face pucker. Mama likes making it herself because she can control the sweetness. And really, it’s not an expensive drink to make, even if you get a hankering for the stuff once the heat wave passes.
Love, Jude
Lemonade
Juice of 4 to 6 lemons (1 cup)
1 cup sugar (or more or less, to taste)
6 cups cold water
In a pitcher, combine the lemon juice and sugar. Stir to start dissolving the sugar. Add the water, then stir until the sugar dissolves. Serve straight, over ice, or with a pick of frozen fruit for garnish.
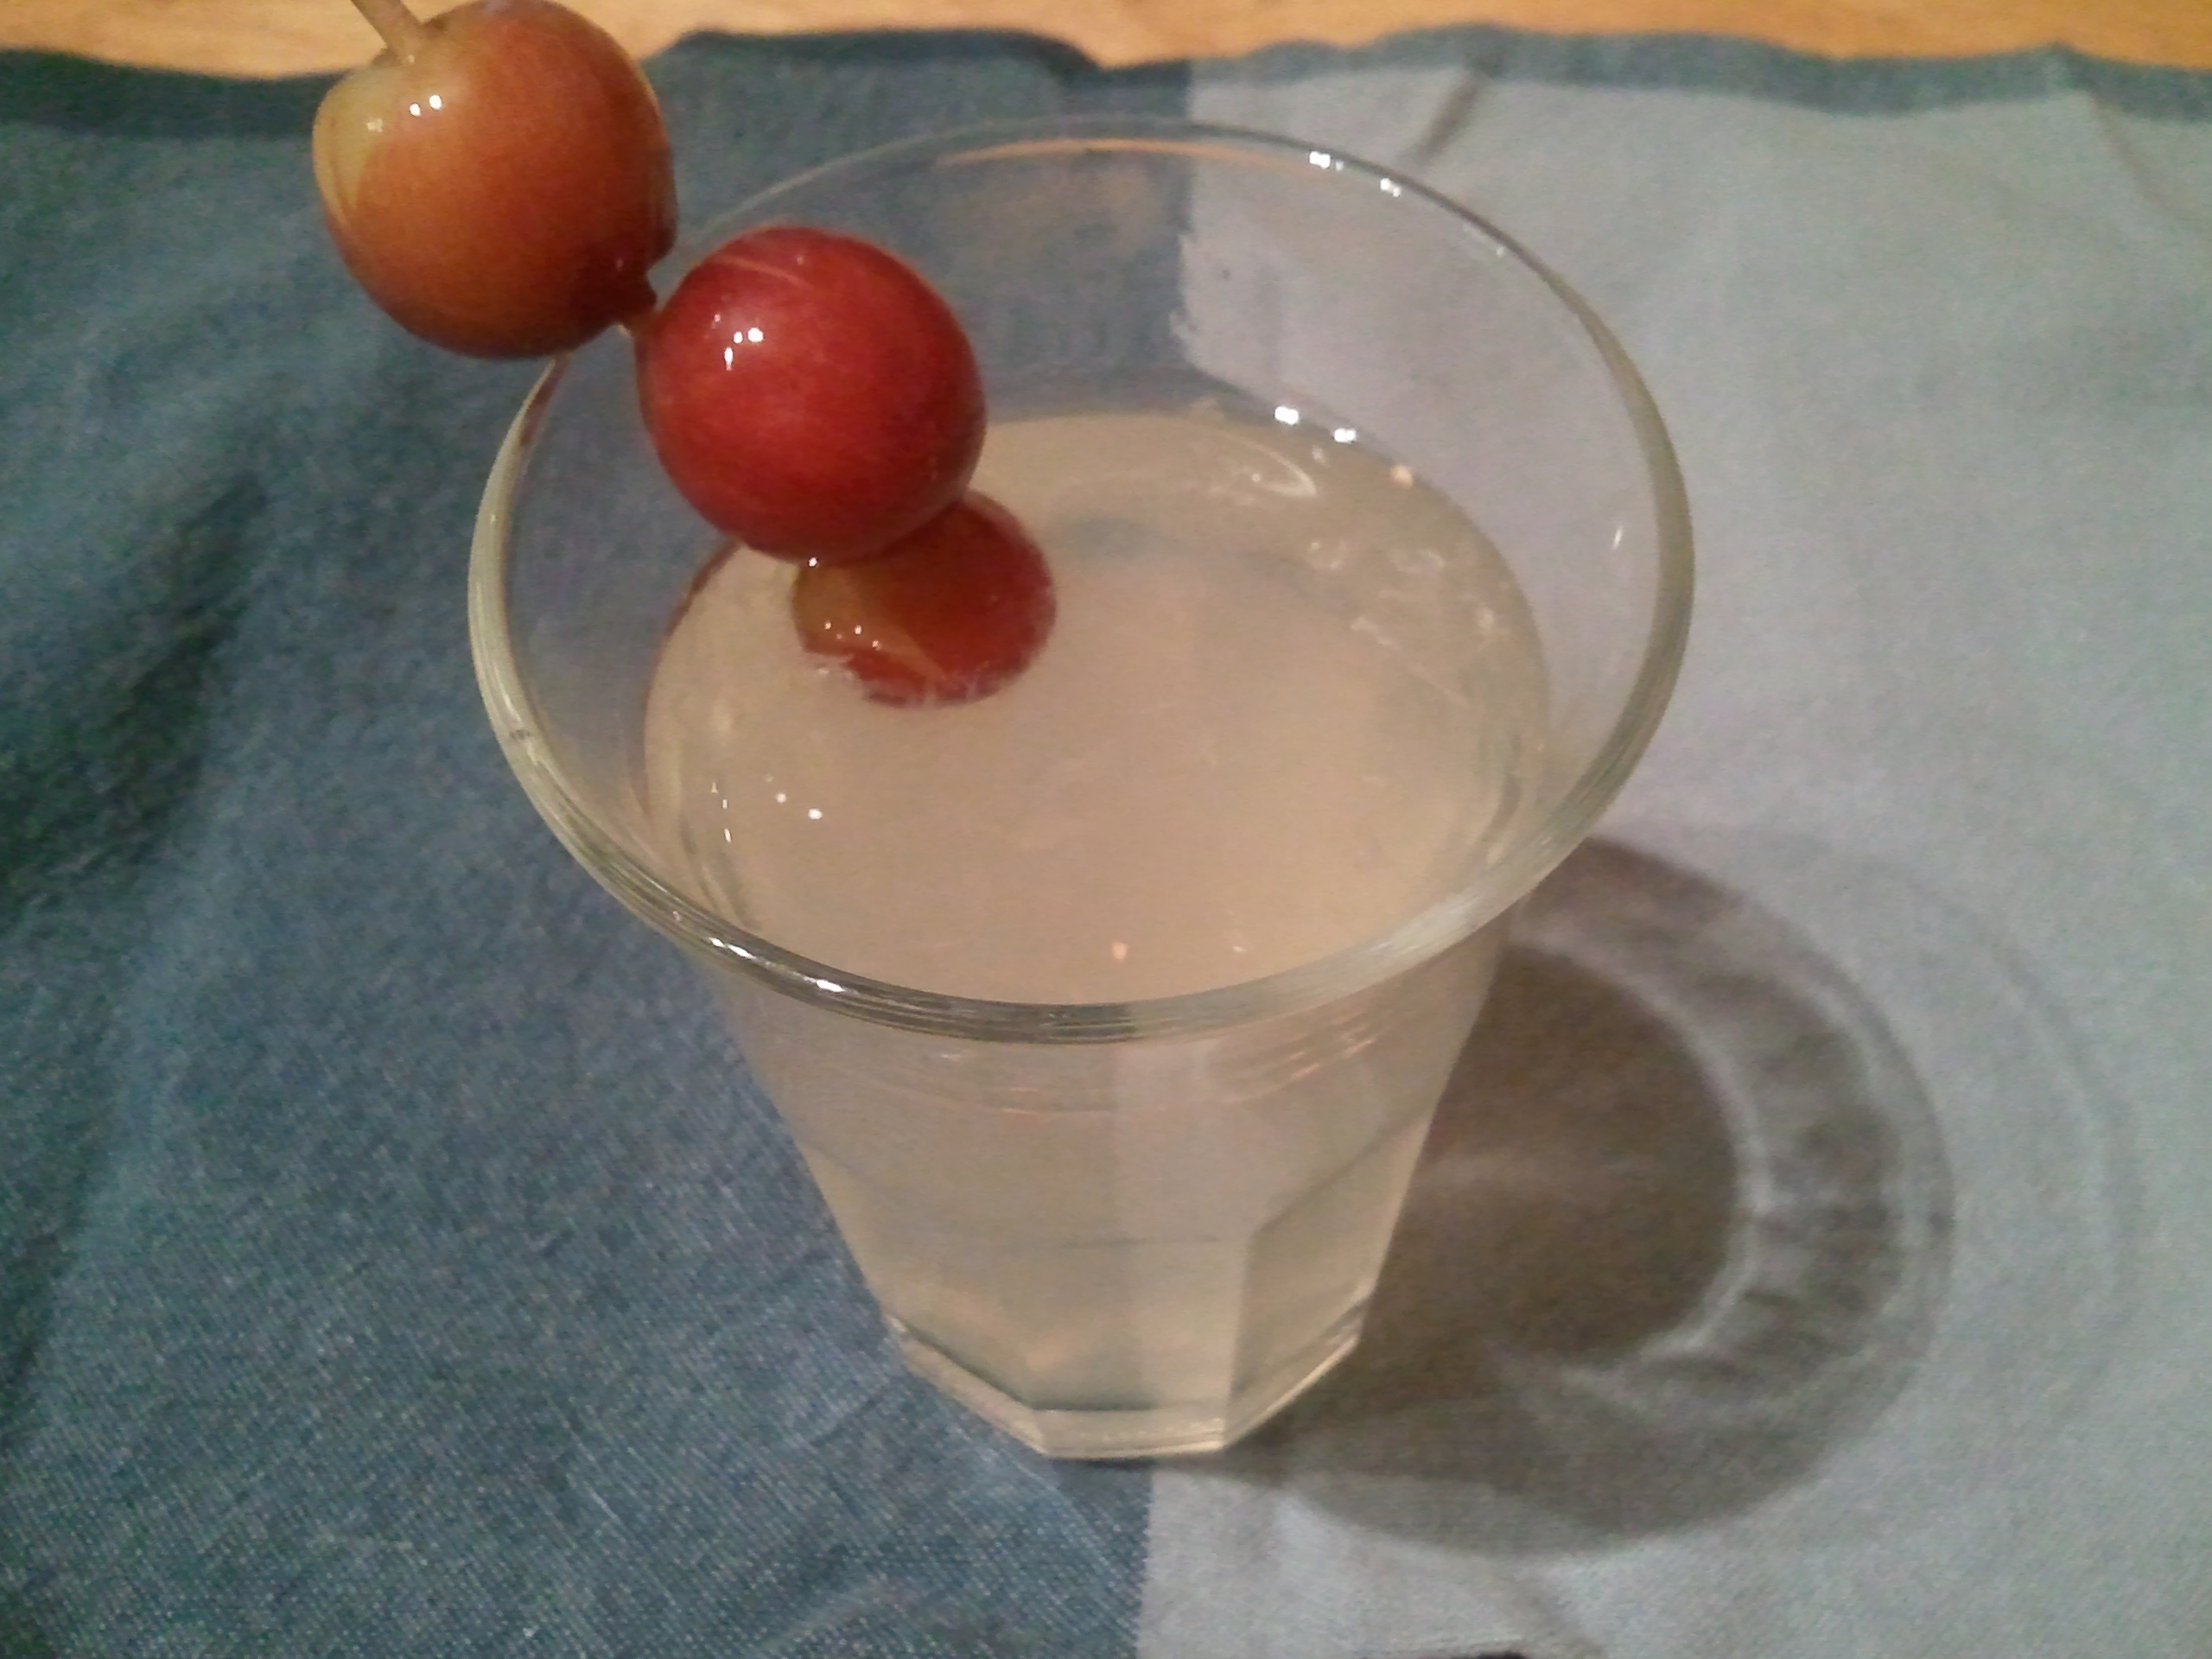
These frozen grapes make a terrific and refreshing complement to the lemonade.
Makes about 7 cups.
Variations: Instead of a pick of frozen fruit, toss a handful of strawberries, raspberries, or blueberries into the lemonade as it sits in the fridge. Or add a few sprigs of mint, thyme, basil, or lemon verbena. Instead of mixing the sugar with the lemon juice, pulse it in a food processor or coffee grinder with 2 Tbsp lavender flowers until powdery, then add that to the lemon juice and water. (Alternatively, make a simple syrup by combining the sugar and 1 cup of the water in a saucepan over medium heat, until the sugar is melted. Add the lavender flowers and steep until the mixture cools. Discard the flowers, chill the syrup, then proceed with the rest of the recipe.) Or try two of Mama’s favorite ways to have this lemonade: as an Arnold Palmer (50/50 with unsweetened iced tea) or mixed with limoncello (she says it’s lemonade for adults).
Mama went and made that bluecherry pie, and the house has been hot ever since. She brought home some lovely, luscious apricots from a farm stand, and she decided it would be worthwhile to adapt a simple oven recipe to the grill (since she was using it to cook dinner anyway).
Apricots are at their peak right now. In fact, they’re probably on their way out in most places. Mama will be lucky if she can get any more this weekend (but she sure put up a heckofa lot of them). The little ones you get in grocery stores in early June don’t have anything on the sweetness and suppleness of those freshly picked from the tree. And they’re the perfect size for me to hold as I munch around the center stone, which actually comes out fairly easily. (But whether I throw said stone or give it to Mama to throw away is anyone’s guess.)
Mama says you can grill fruit directly on the hot grates. She lightly oils or sprays either the fruit or the grates. Sometimes she mixes a bit of honey with something sour like lemon or lime juice and brushes that on the cut side of the fruit. And that’s it. Grill it until it has grill marks on it and gets somewhat soft. If you want to push it until it’s very soft with deep grill marks, that’s up to you!
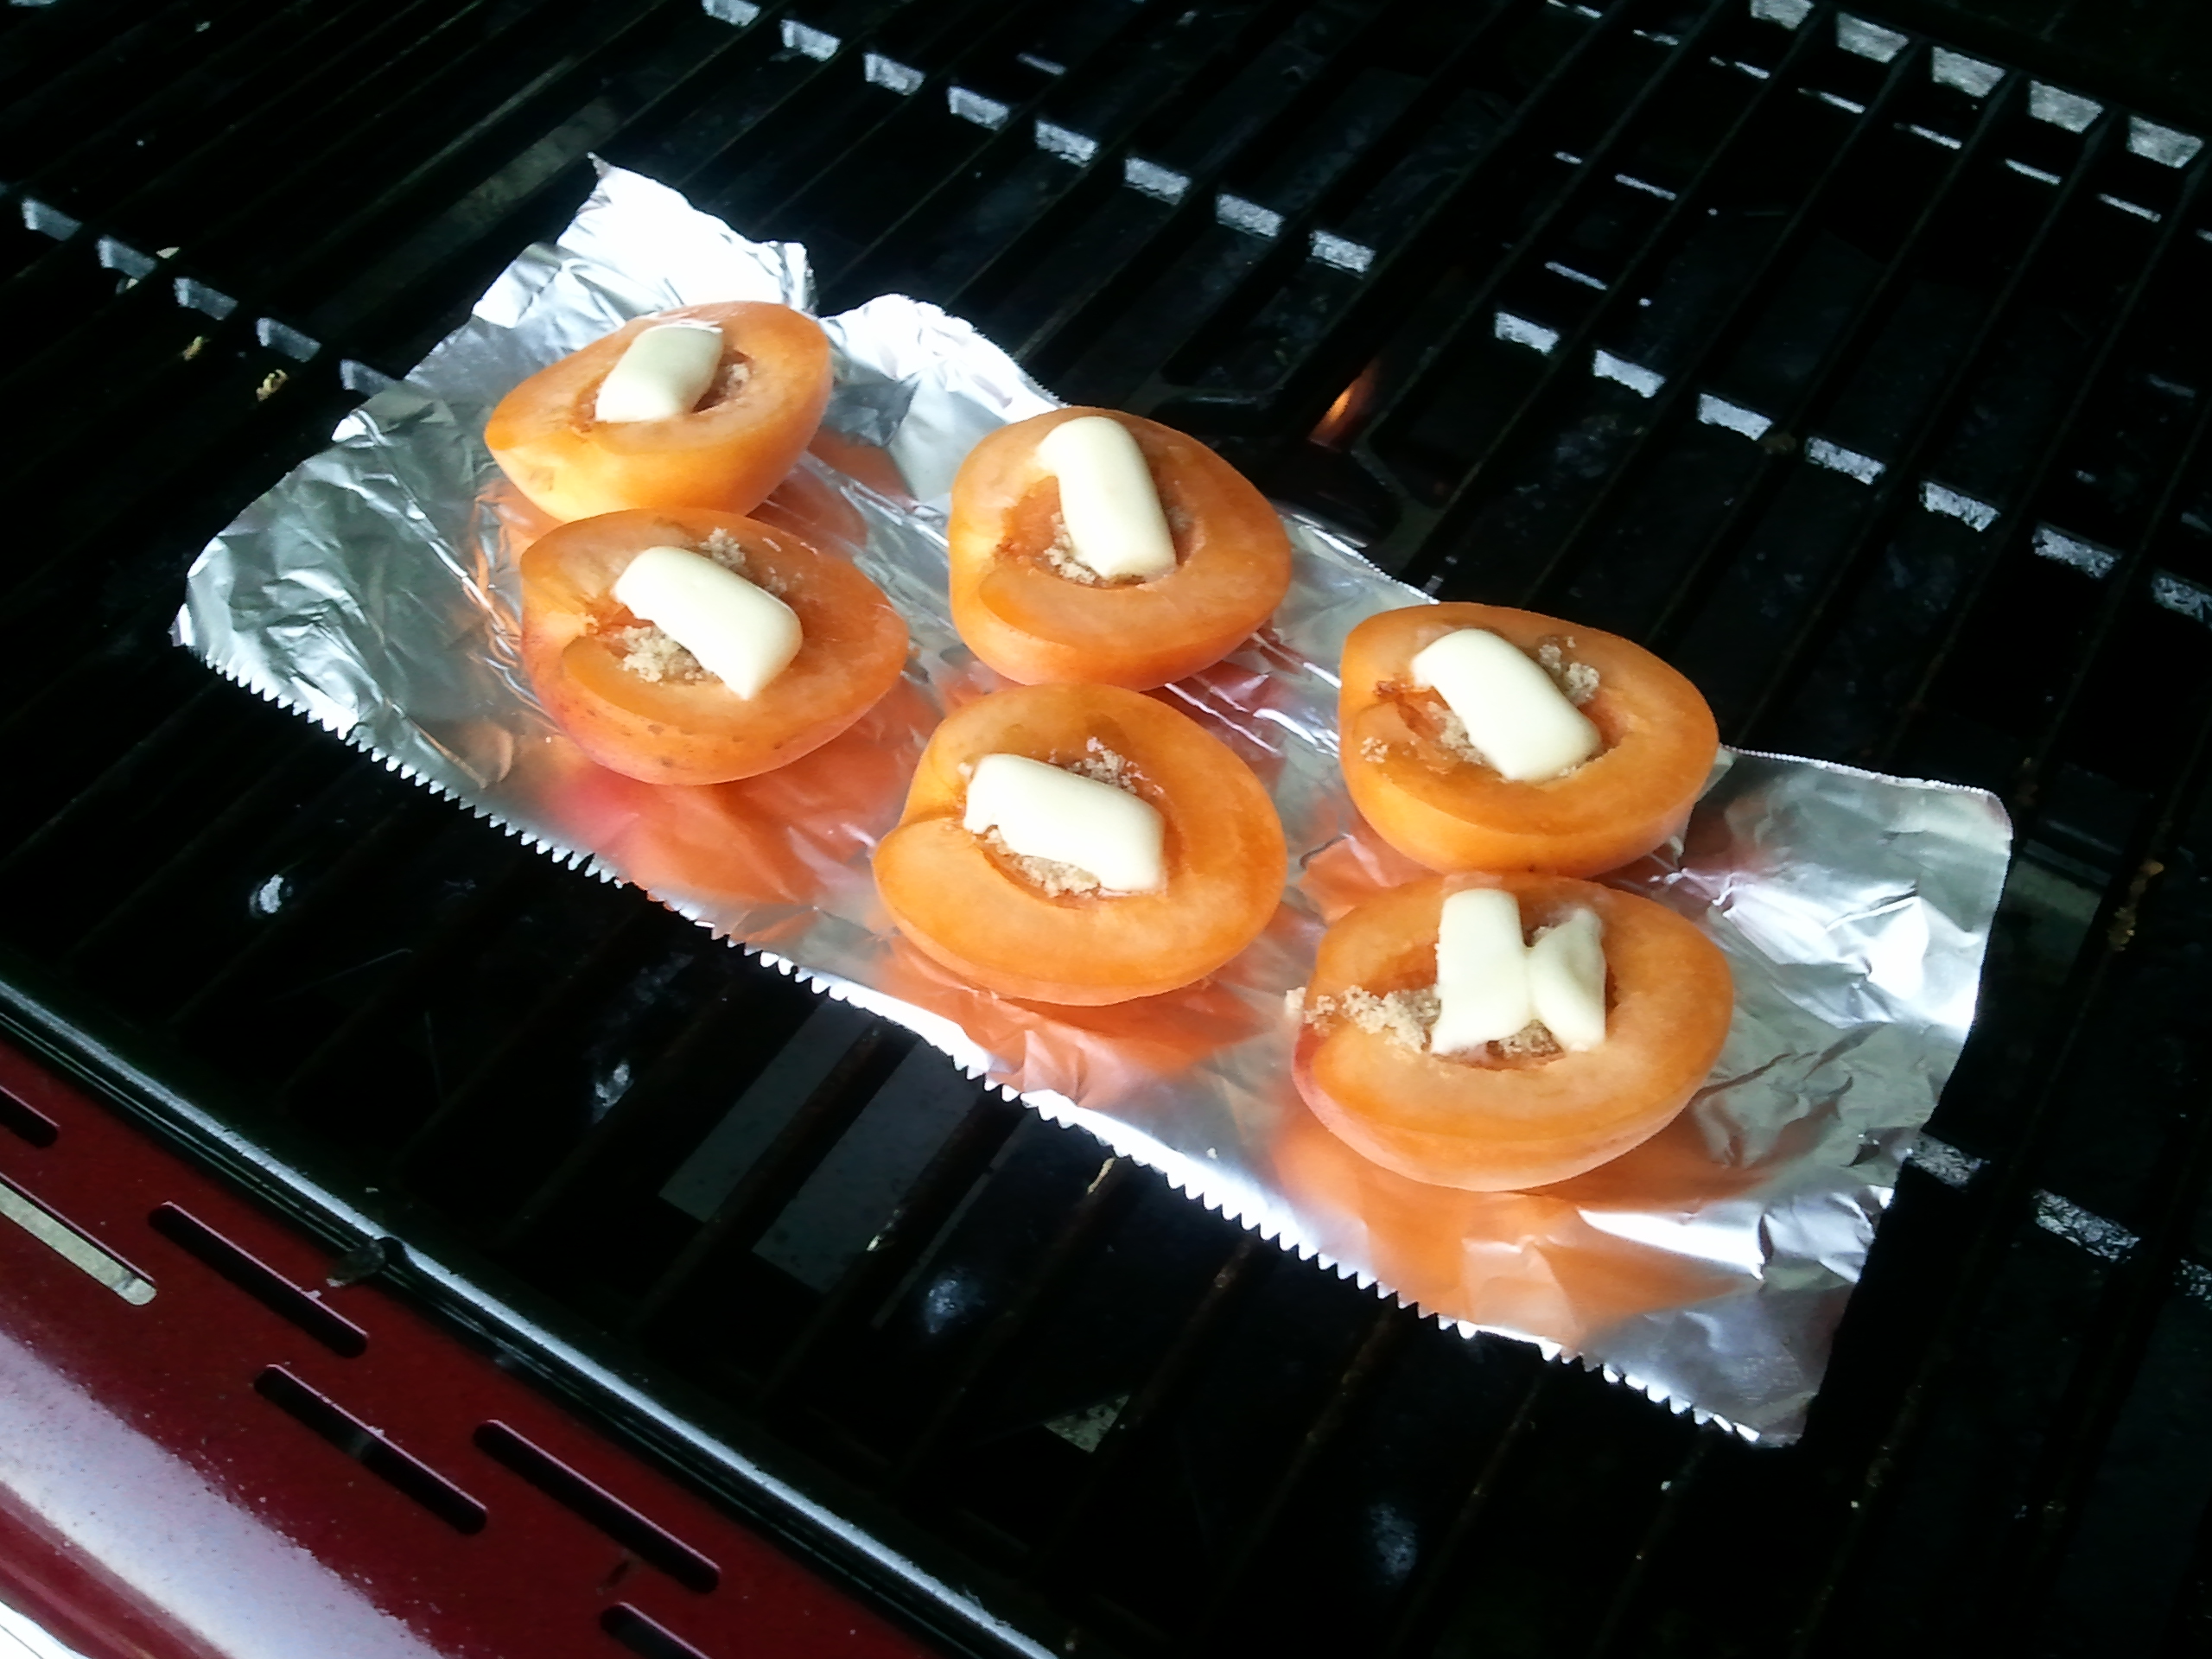
For this recipe, however, Mama used foil and closed the lid of the grill to simulate the inside of an oven. The foil caught the fruit juices, as well as the melted butter and brown sugar, so there was no mess to clean up afterward.
A pat of butter, a spoon of brown sugar, and a hot grill are all these little apricots need to become just a little more special.
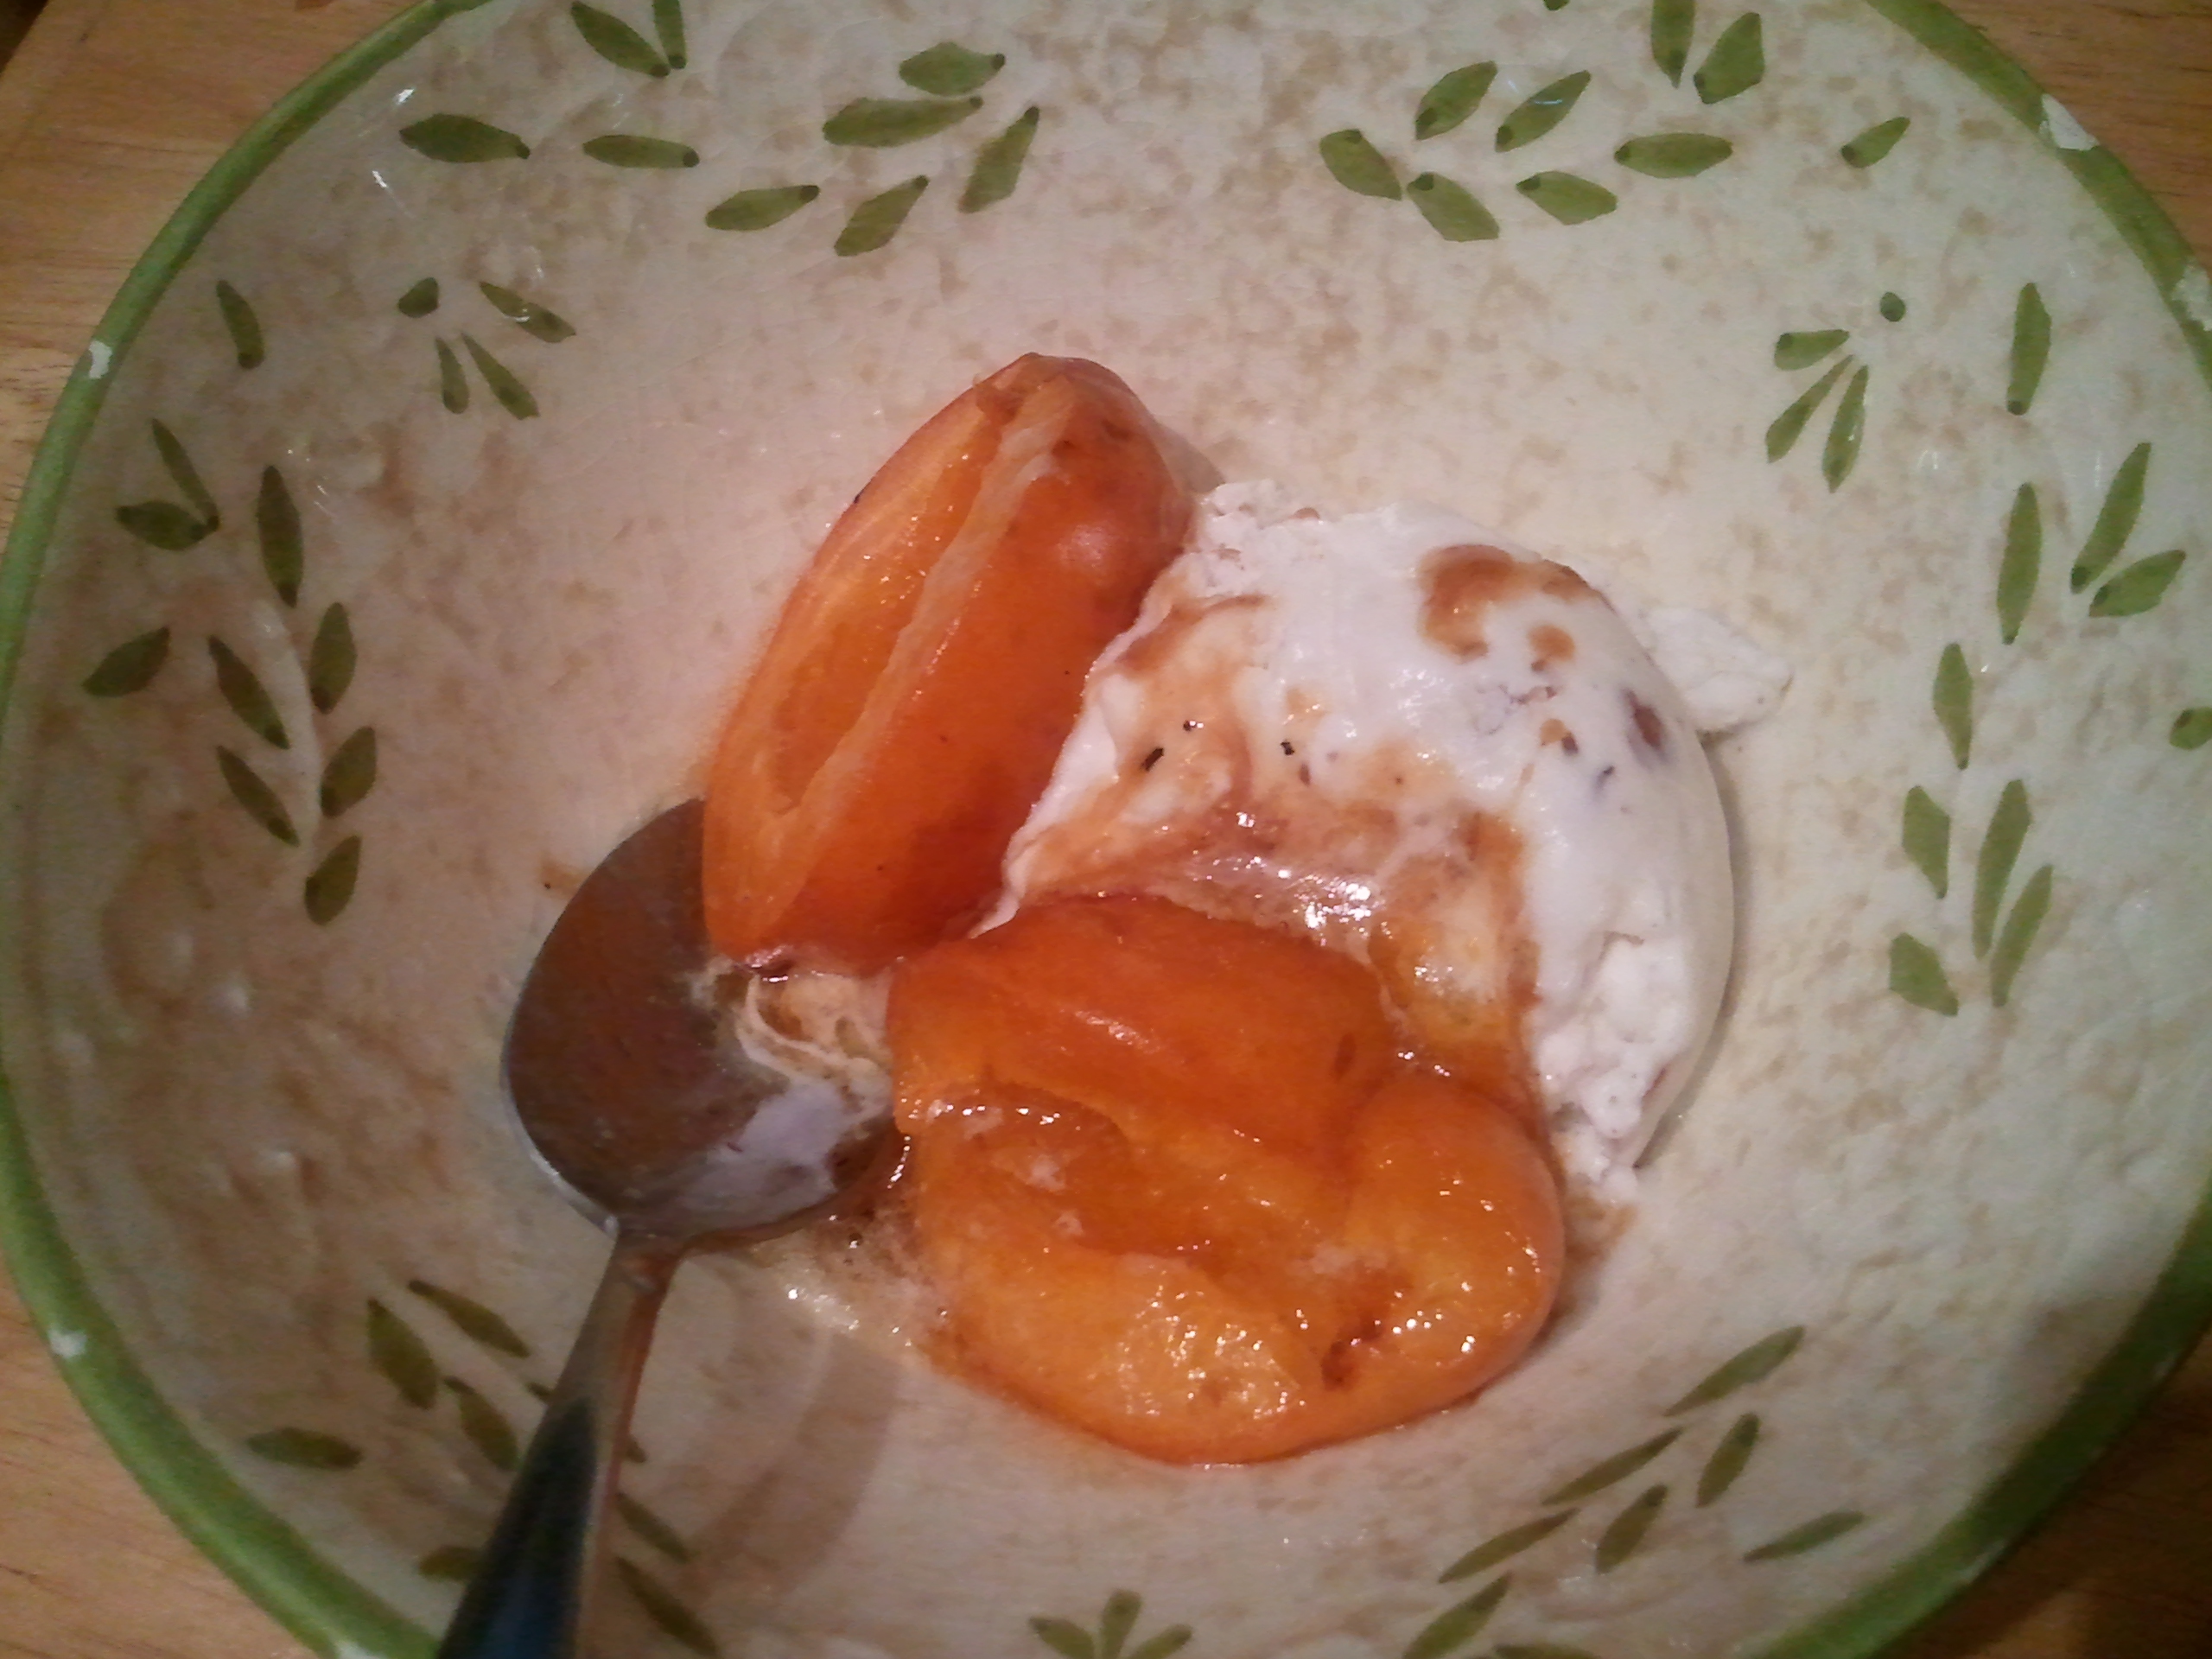
The good news: I got to enjoy these with ice cream!! (The secret news: I would’ve eaten them without it, they were so scrumptious.)
The warm apricots started melting the pecan ice cream. Mmm….
Go ahead an try this with any type of stone fruit–plums, peaches, nectarines. But don’t forget to try it with apricots.
Love, Jude
Grilled Sweet Apricots
3 apricots, halved & pitted
1 tablespoon butter, cut into 6 pieces
1 tablespoon brown sugar
Get your grill going. Ours is gas, and Mama had it on medium-low, but it still got up to about 400°F. Place apricot halves, cut side up, on a sheet of aluminum foil. (You can do this directly on the grill, as Mama did, or prepare them ahead of time and transfer the entire sheet of foil to the grates.) Add 1 piece of butter and ½ teaspoon brown sugar to the center of each apricot. Close the lid of the grill and cook until butter & sugar are melted and apricots are soft and gooey, 10–15 minutes. Perfect as a treat on their own, or even better with ice cream. Be sure you eat all those sugary, buttery juices, too.
Serves 3 people.
Note: You don’t have to be exact about the measurements, and clearly, you can increase and decrease the amounts for as many apricots as you like. If you want to make these in the oven, lightly spray your baking pan and bake at 350°F for 15 minutes, or until they’re soft and starting to turn golden.
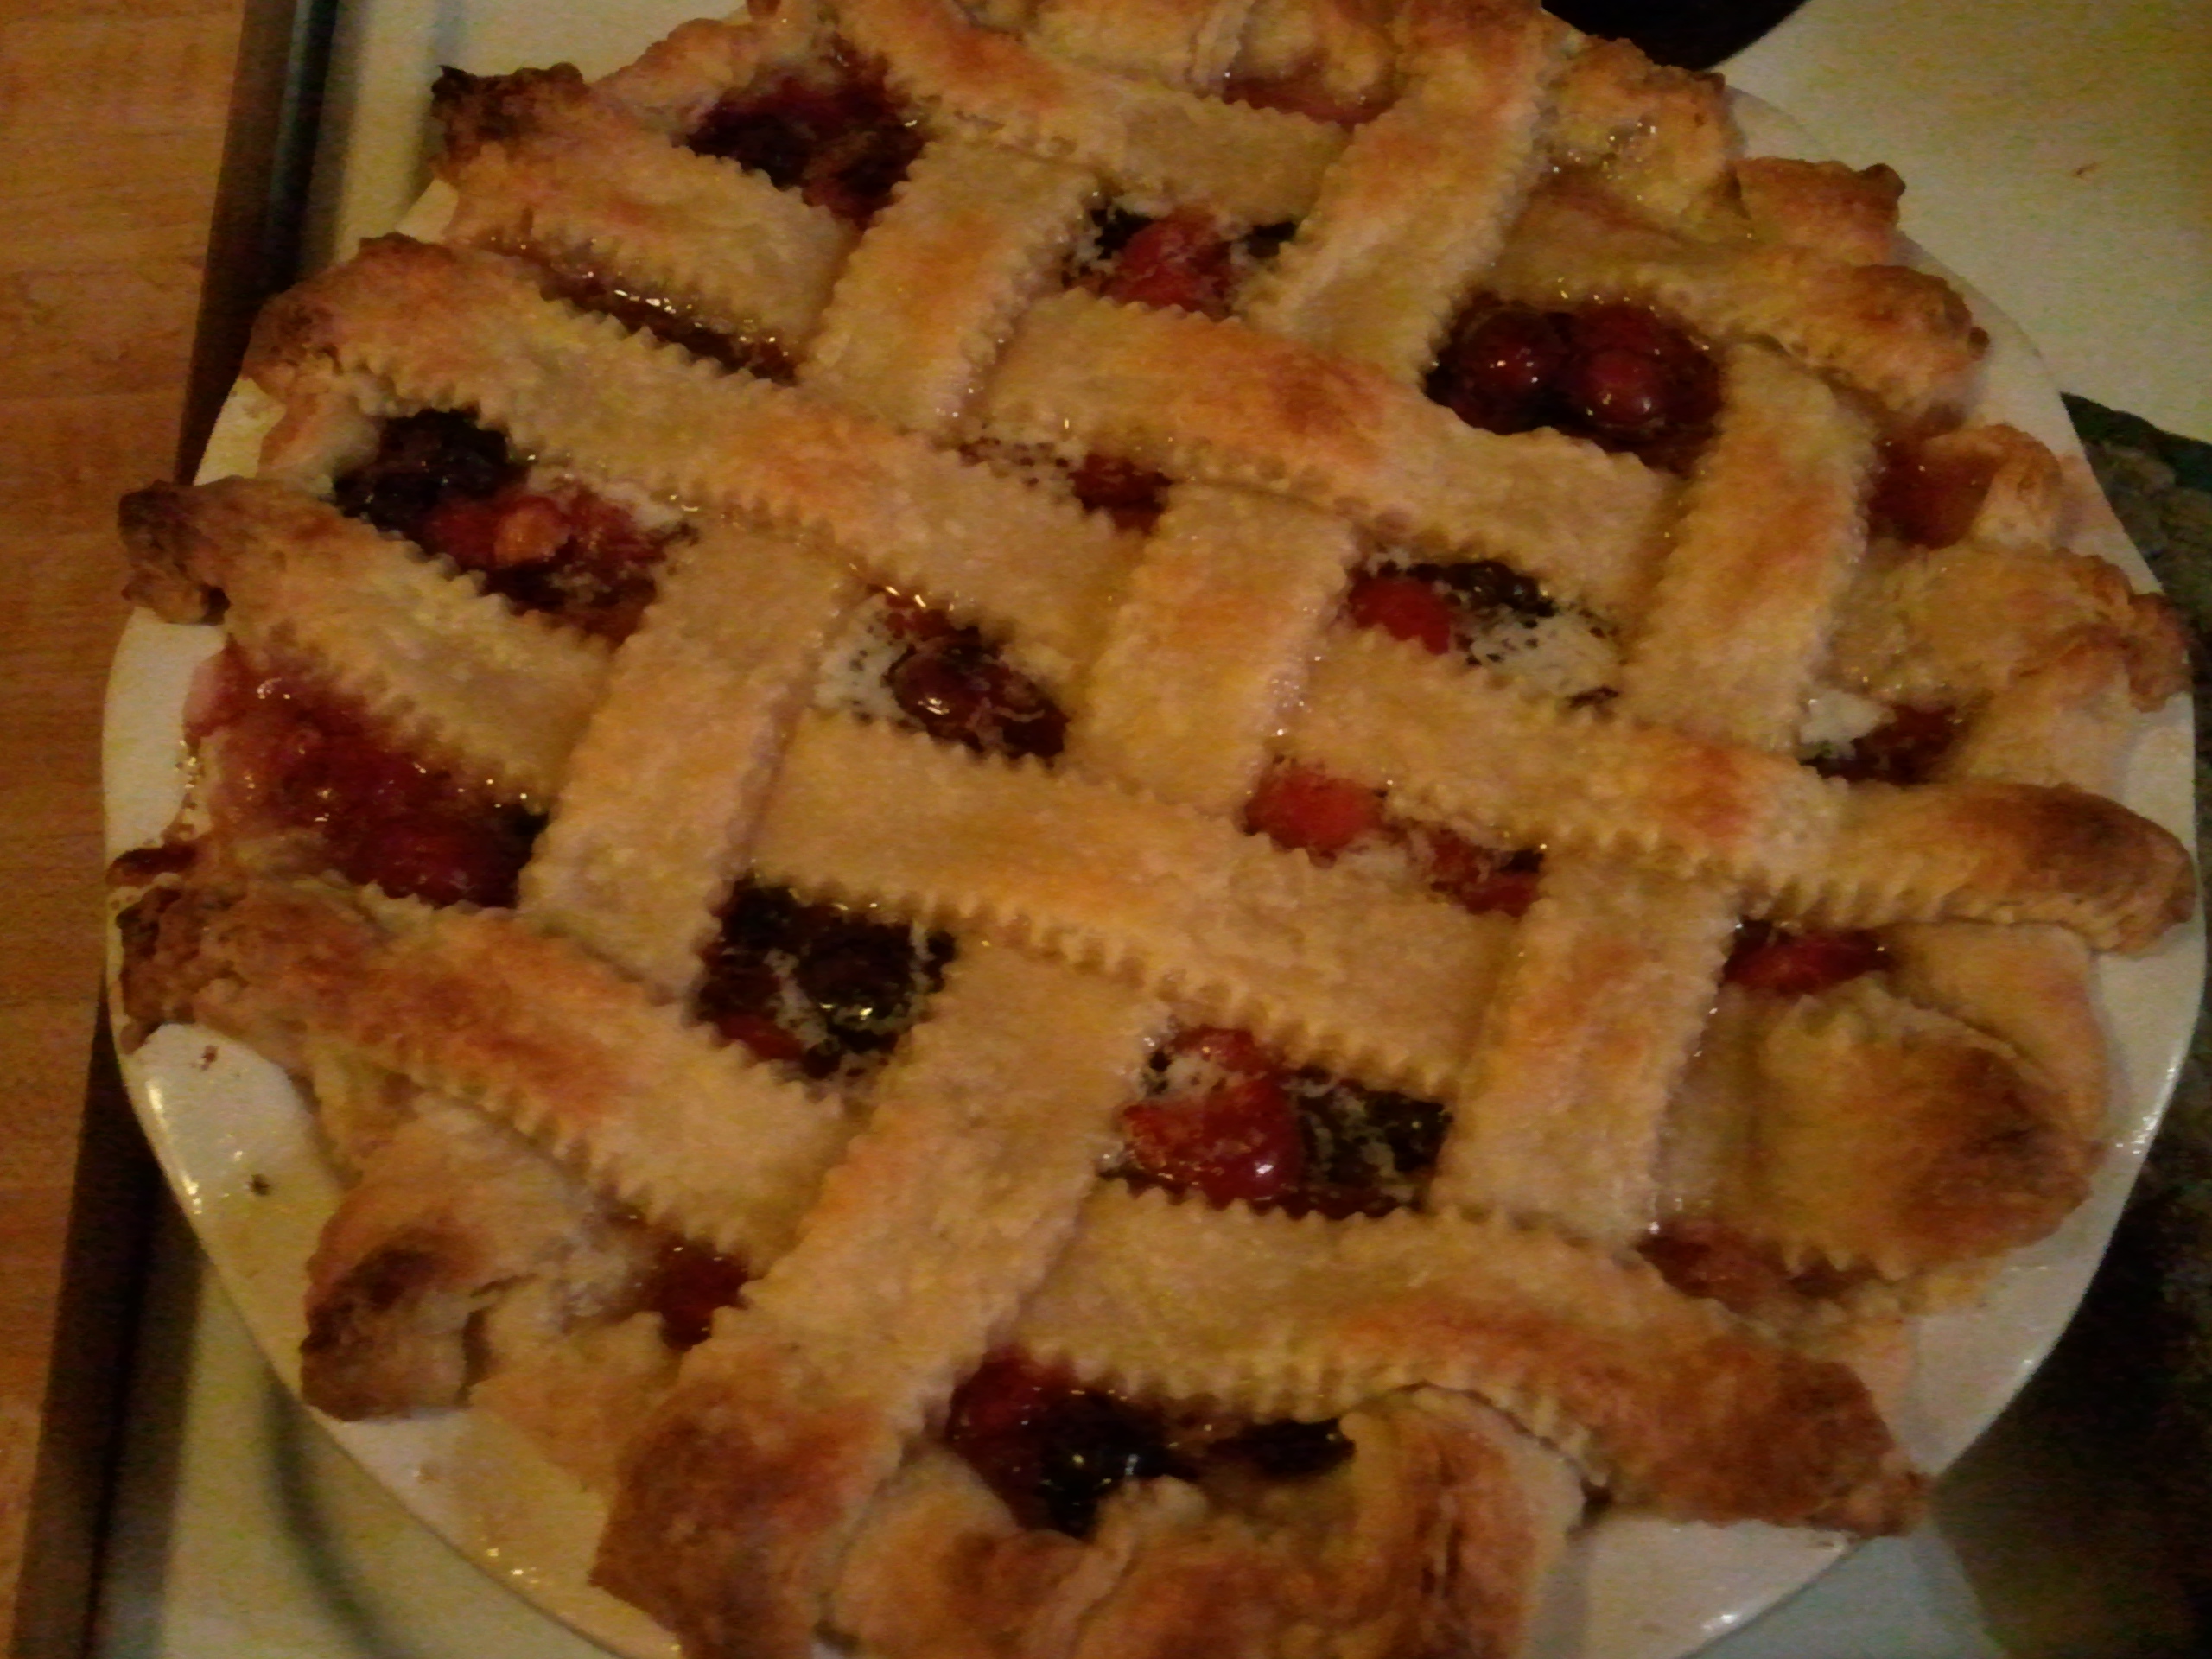
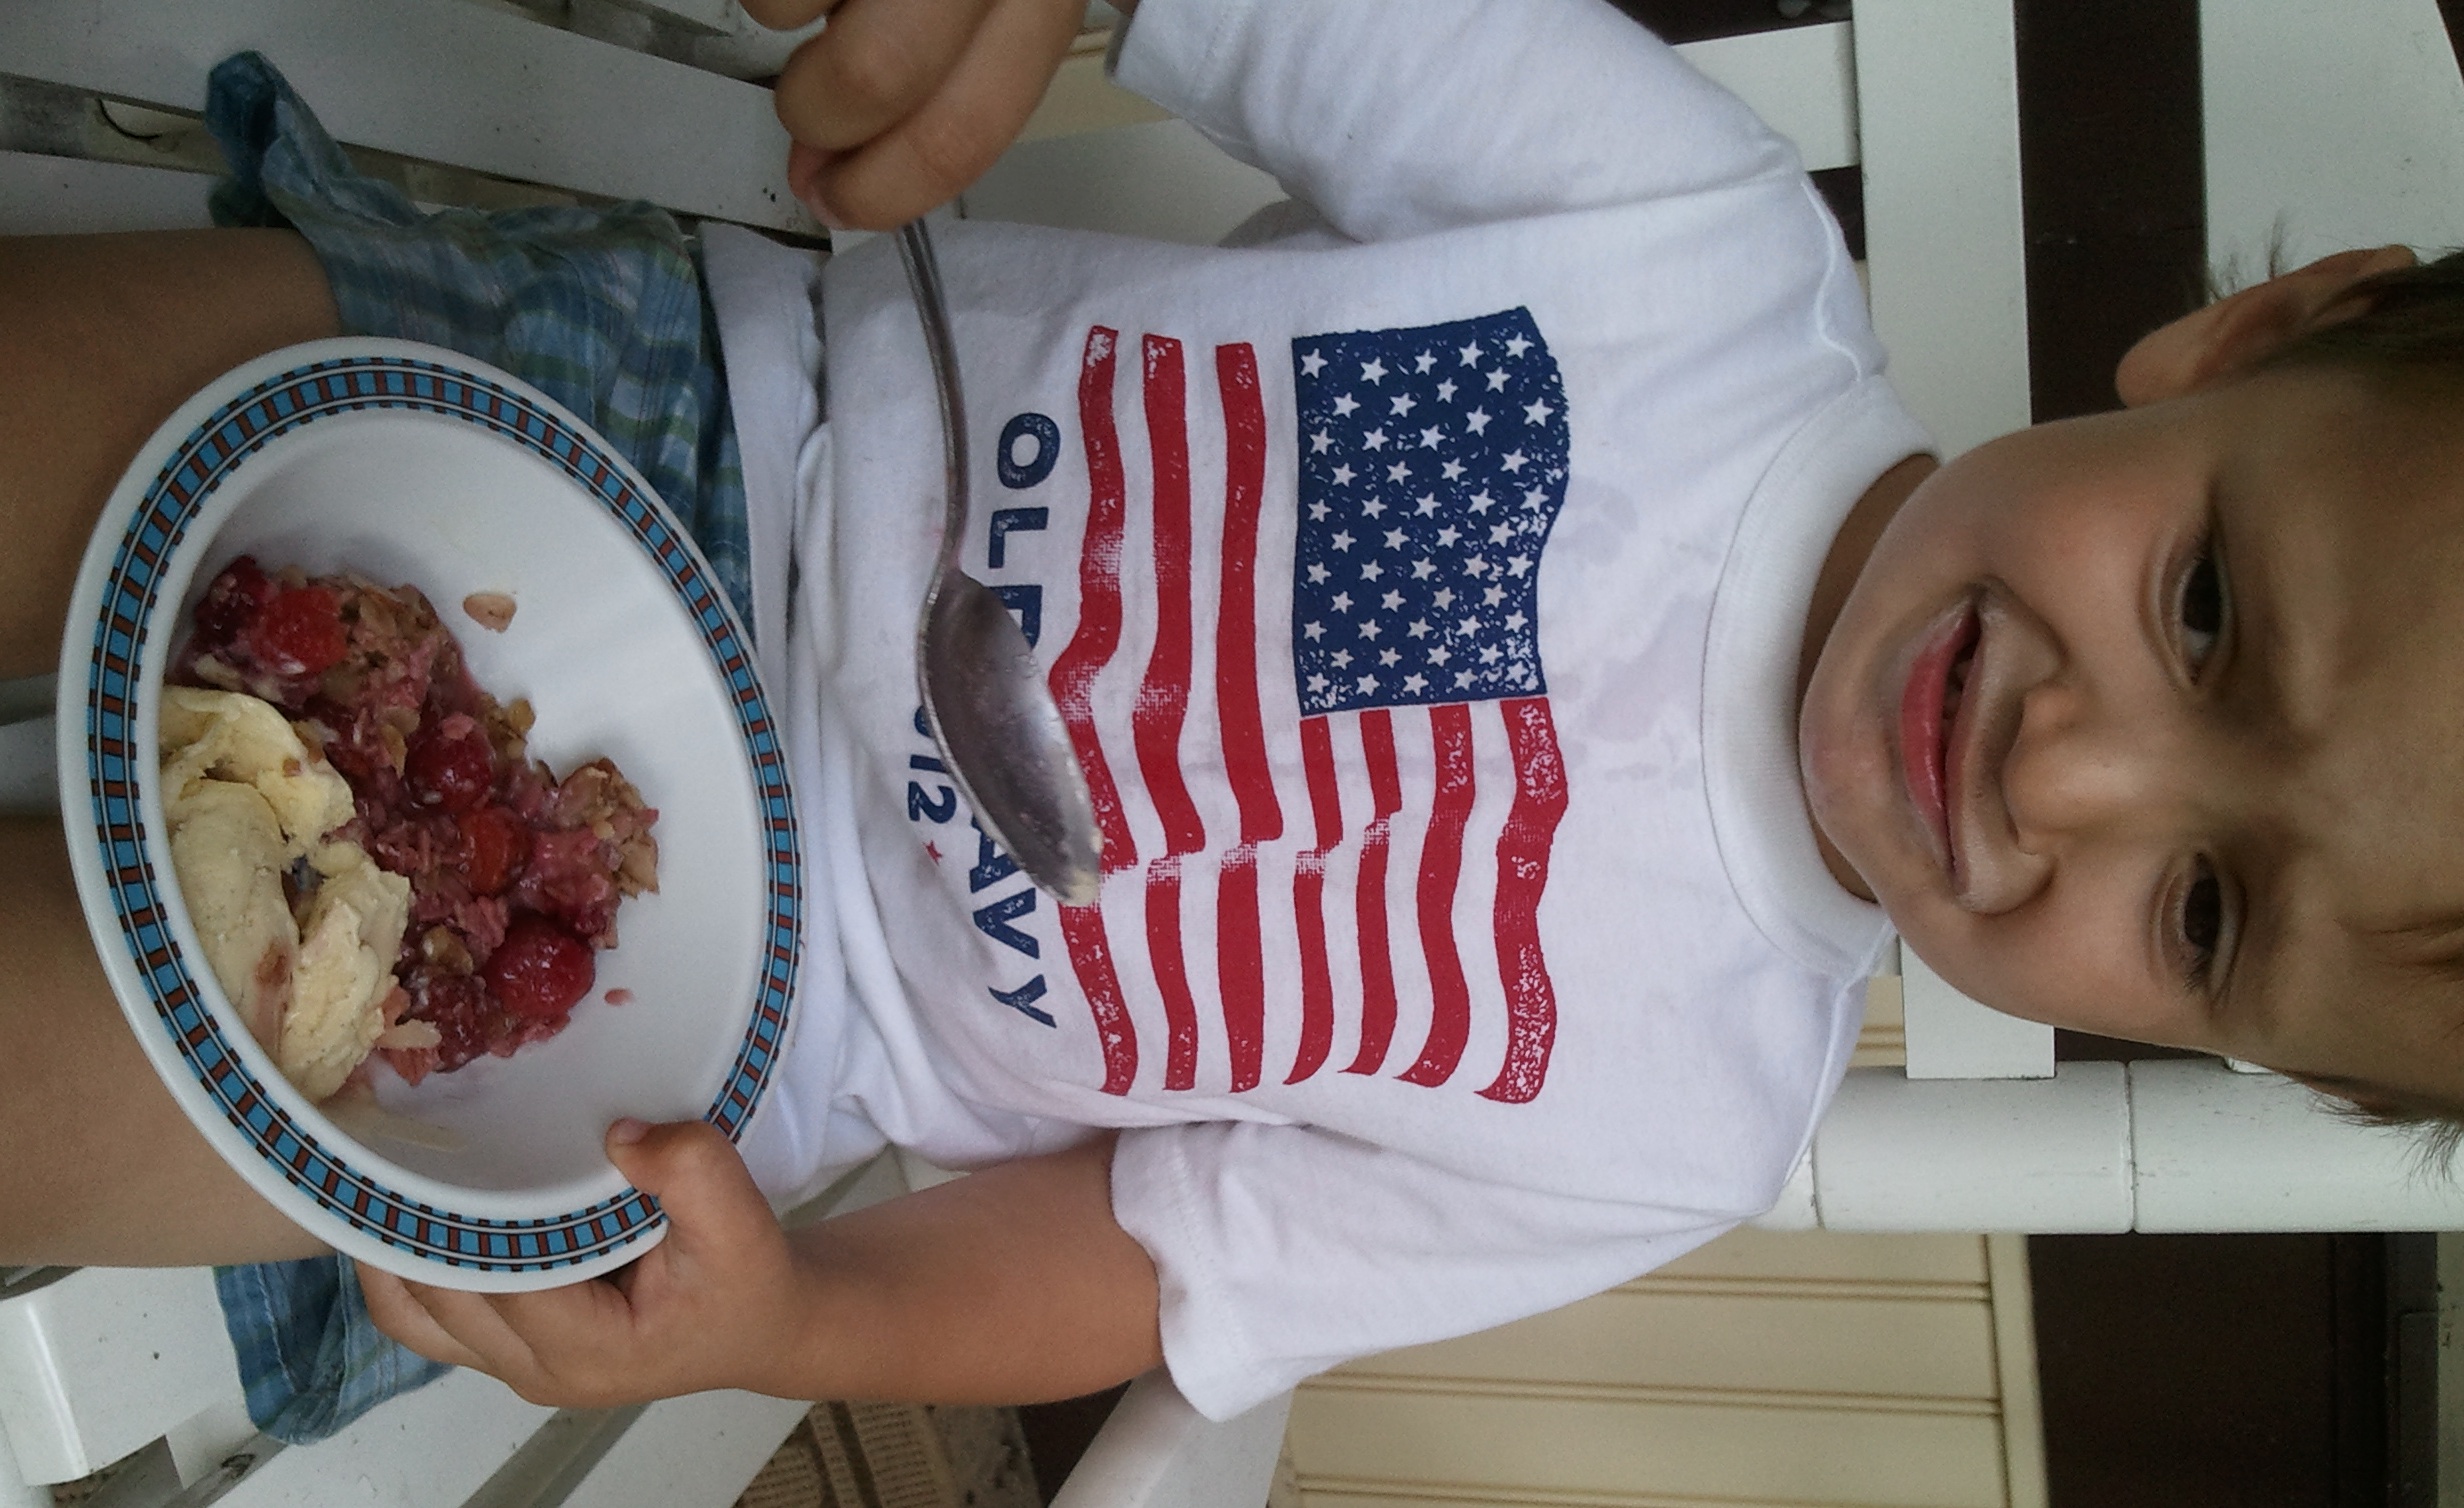
Because Papa just came home from two weeks abroad, Mama decided to treat him to one of his favorite pies—the sour cherry. And because she recently picked blueberries, she figured she’d toss a few of those in there as well. Behold: the “bluecherry” pie.
Pie recipes abound, particularly in the summer months, and they all seem to have their own recipe for what goes on the bottom. Whether you call it pâte brisée, pâte sucrée, pie crust, or pastry dough, Mama suggests finding a pie dough recipe that works for you and sticking with it. That way, you’ll always have it in your back pocket if you’re in the mood to make a pie. (I don’t know why you’d keep a recipe in your back pocket all the time; I’m just telling you what she said.)
A basic recipe is 3 parts flour, 2 parts fat, and 1 part cold water by weight. There’s no magic in the fat you use (butter, cream cheese, coconut oil, lard); it’s really just a personal preference. Mama likes the idea of an all-butter crust for its flavor and flakiness (and its naturalness, of course), but a 50-50 butter-shortening crust is a little easier to work with. Whatever you choose, keep your fat cold. Cube it then put it back in the refrigerator while you assemble the rest of your ingredients. Same with your water. You want that to be cold-cold-cold. Mama says this is because you don’t want your fat to melt before it goes into the oven. If it melts beforehand, it won’t have a chance to release steam as it melts—and the steam is what causes those heavenly layers of flakiness in any good crust. Do you think your croissant would be so light and airy if the baker used warm butter? Think again!
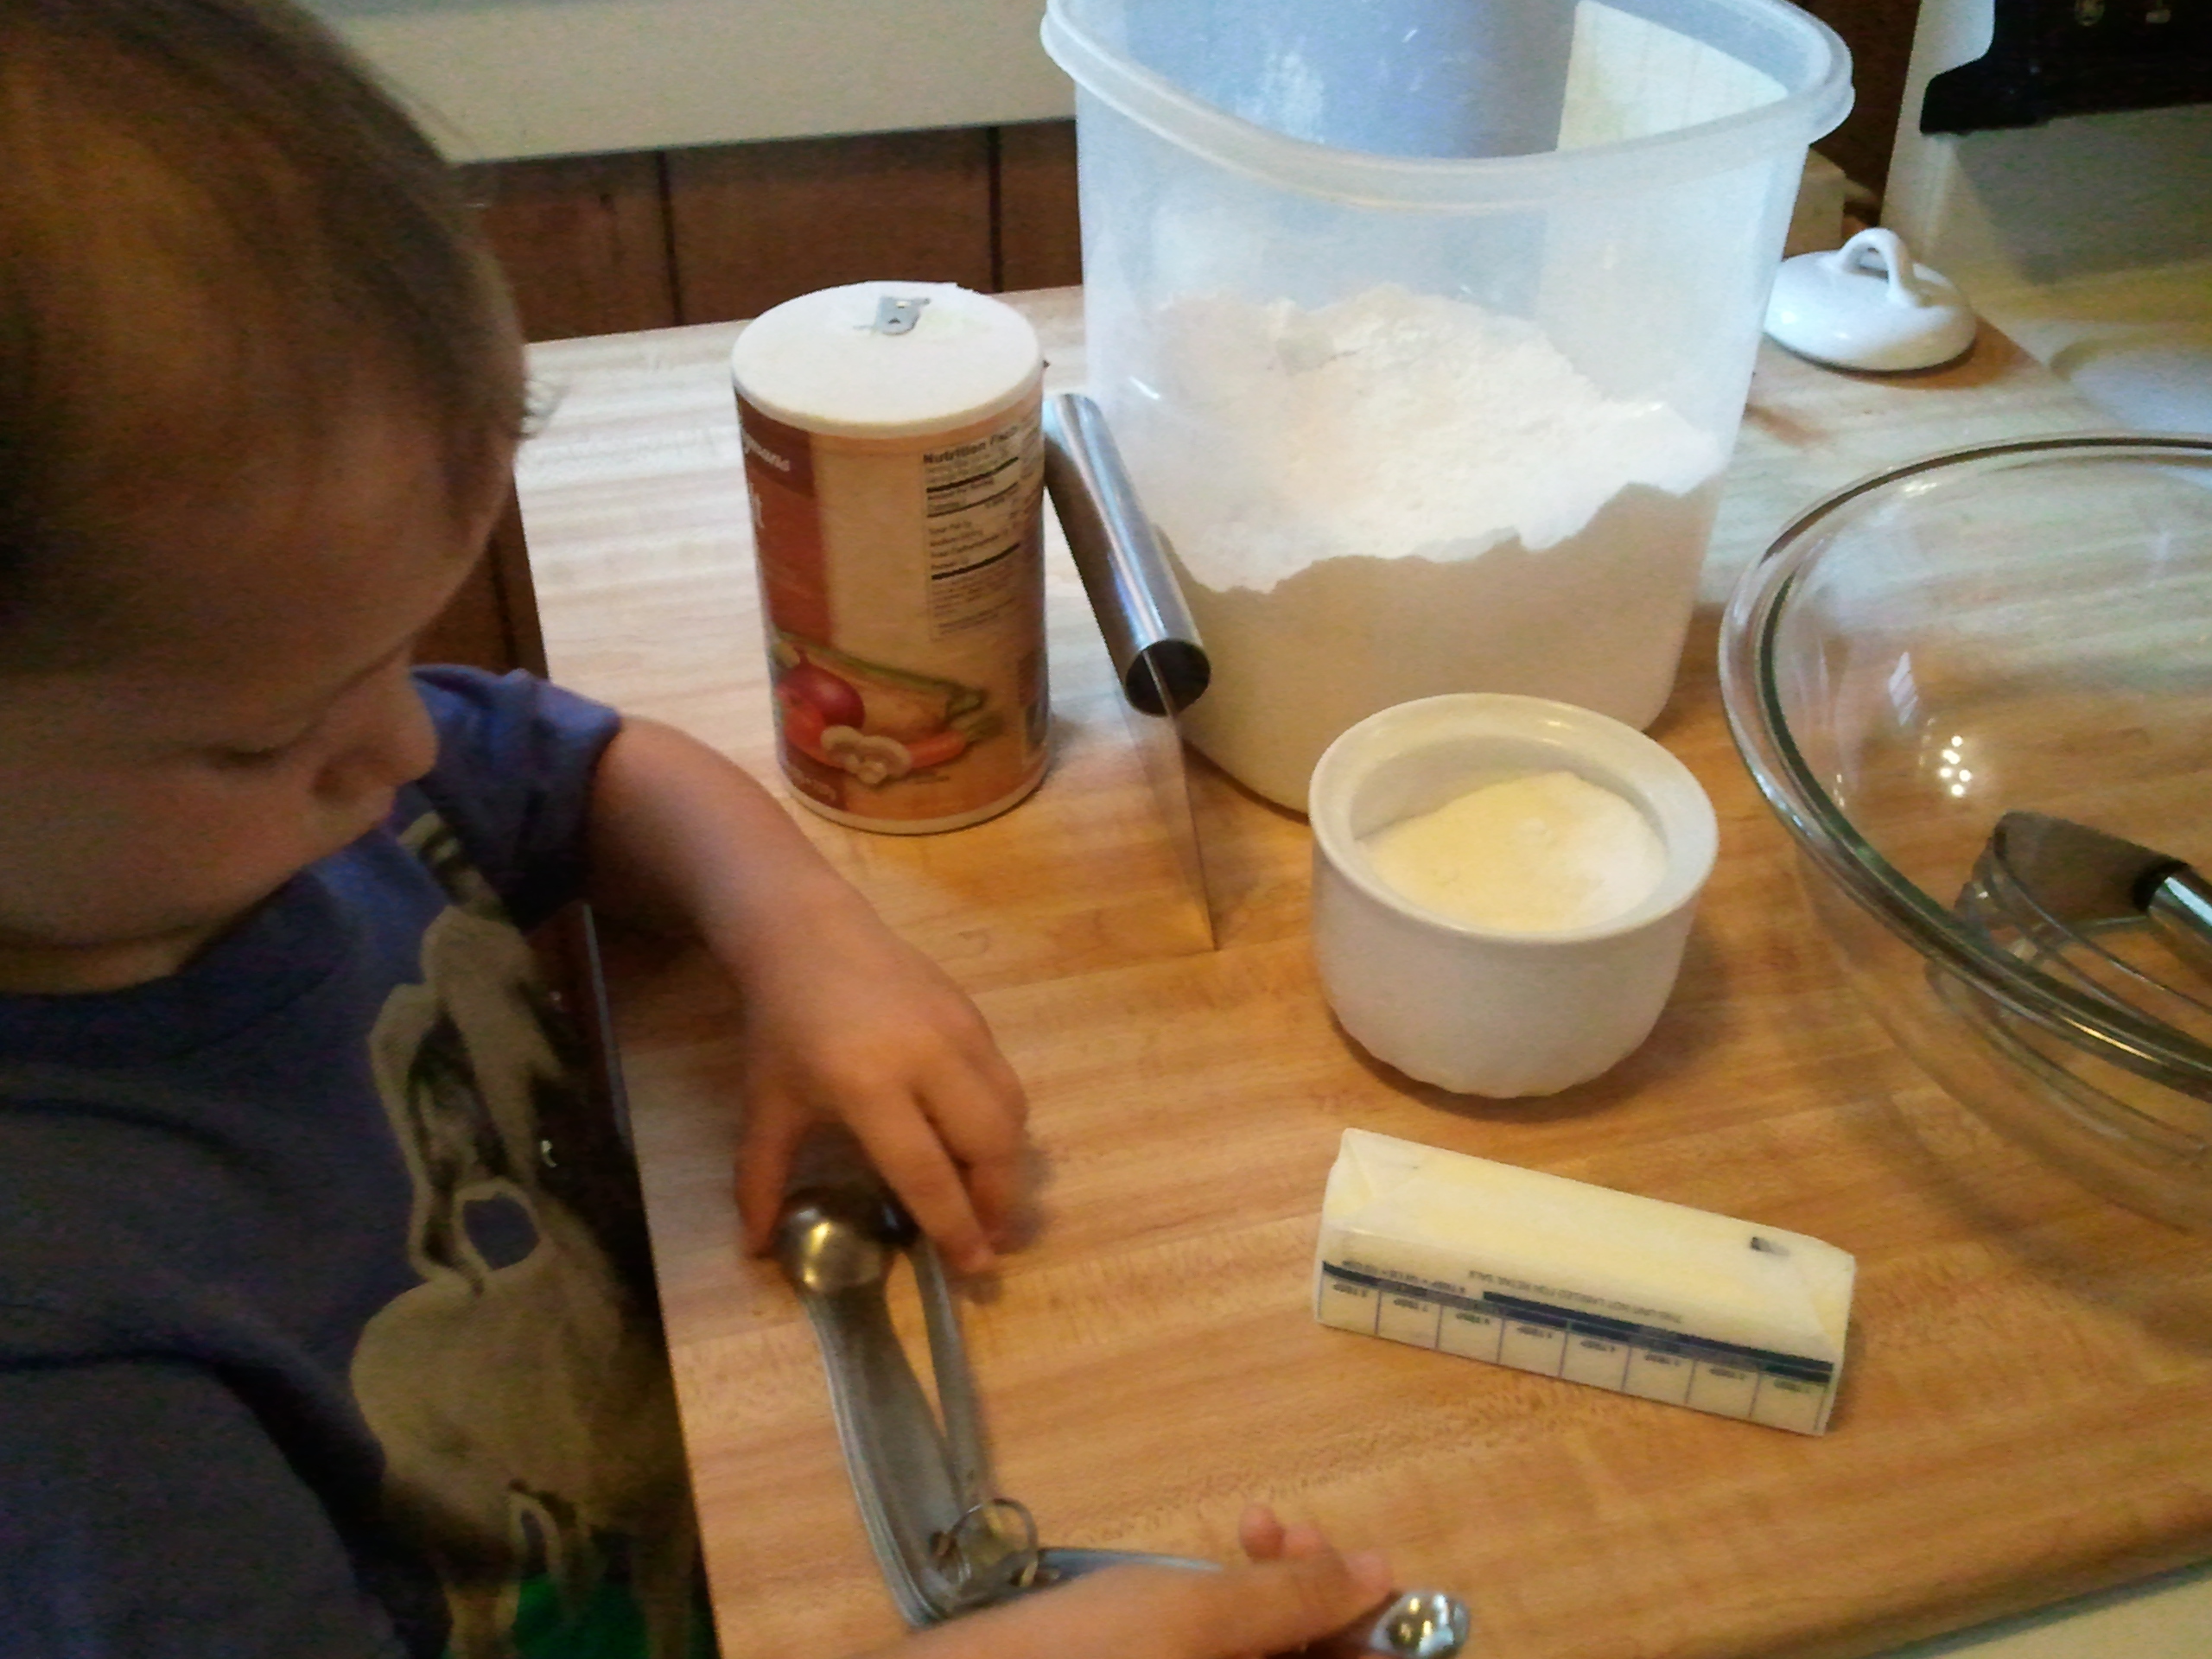
Before making your dough, gather your flour, sugar, salt, and butter–but get that butter back into the fridge as soon as you dice it.
You can make your crust by hand or in a food processor, which is easier, but then you have to clean it. Mama tends to make it by hand because she has better control over it. If you use the food processor, only ever pulse it—don’t run it! Combine your dry ingredients first. At its simplest, this would be just flour (or a combination of flours), but you really ought to add a pinch of salt for flavor, as well as a bit of sugar. If you’re making a savory crust, omit the sugar and experiment with some herbs.
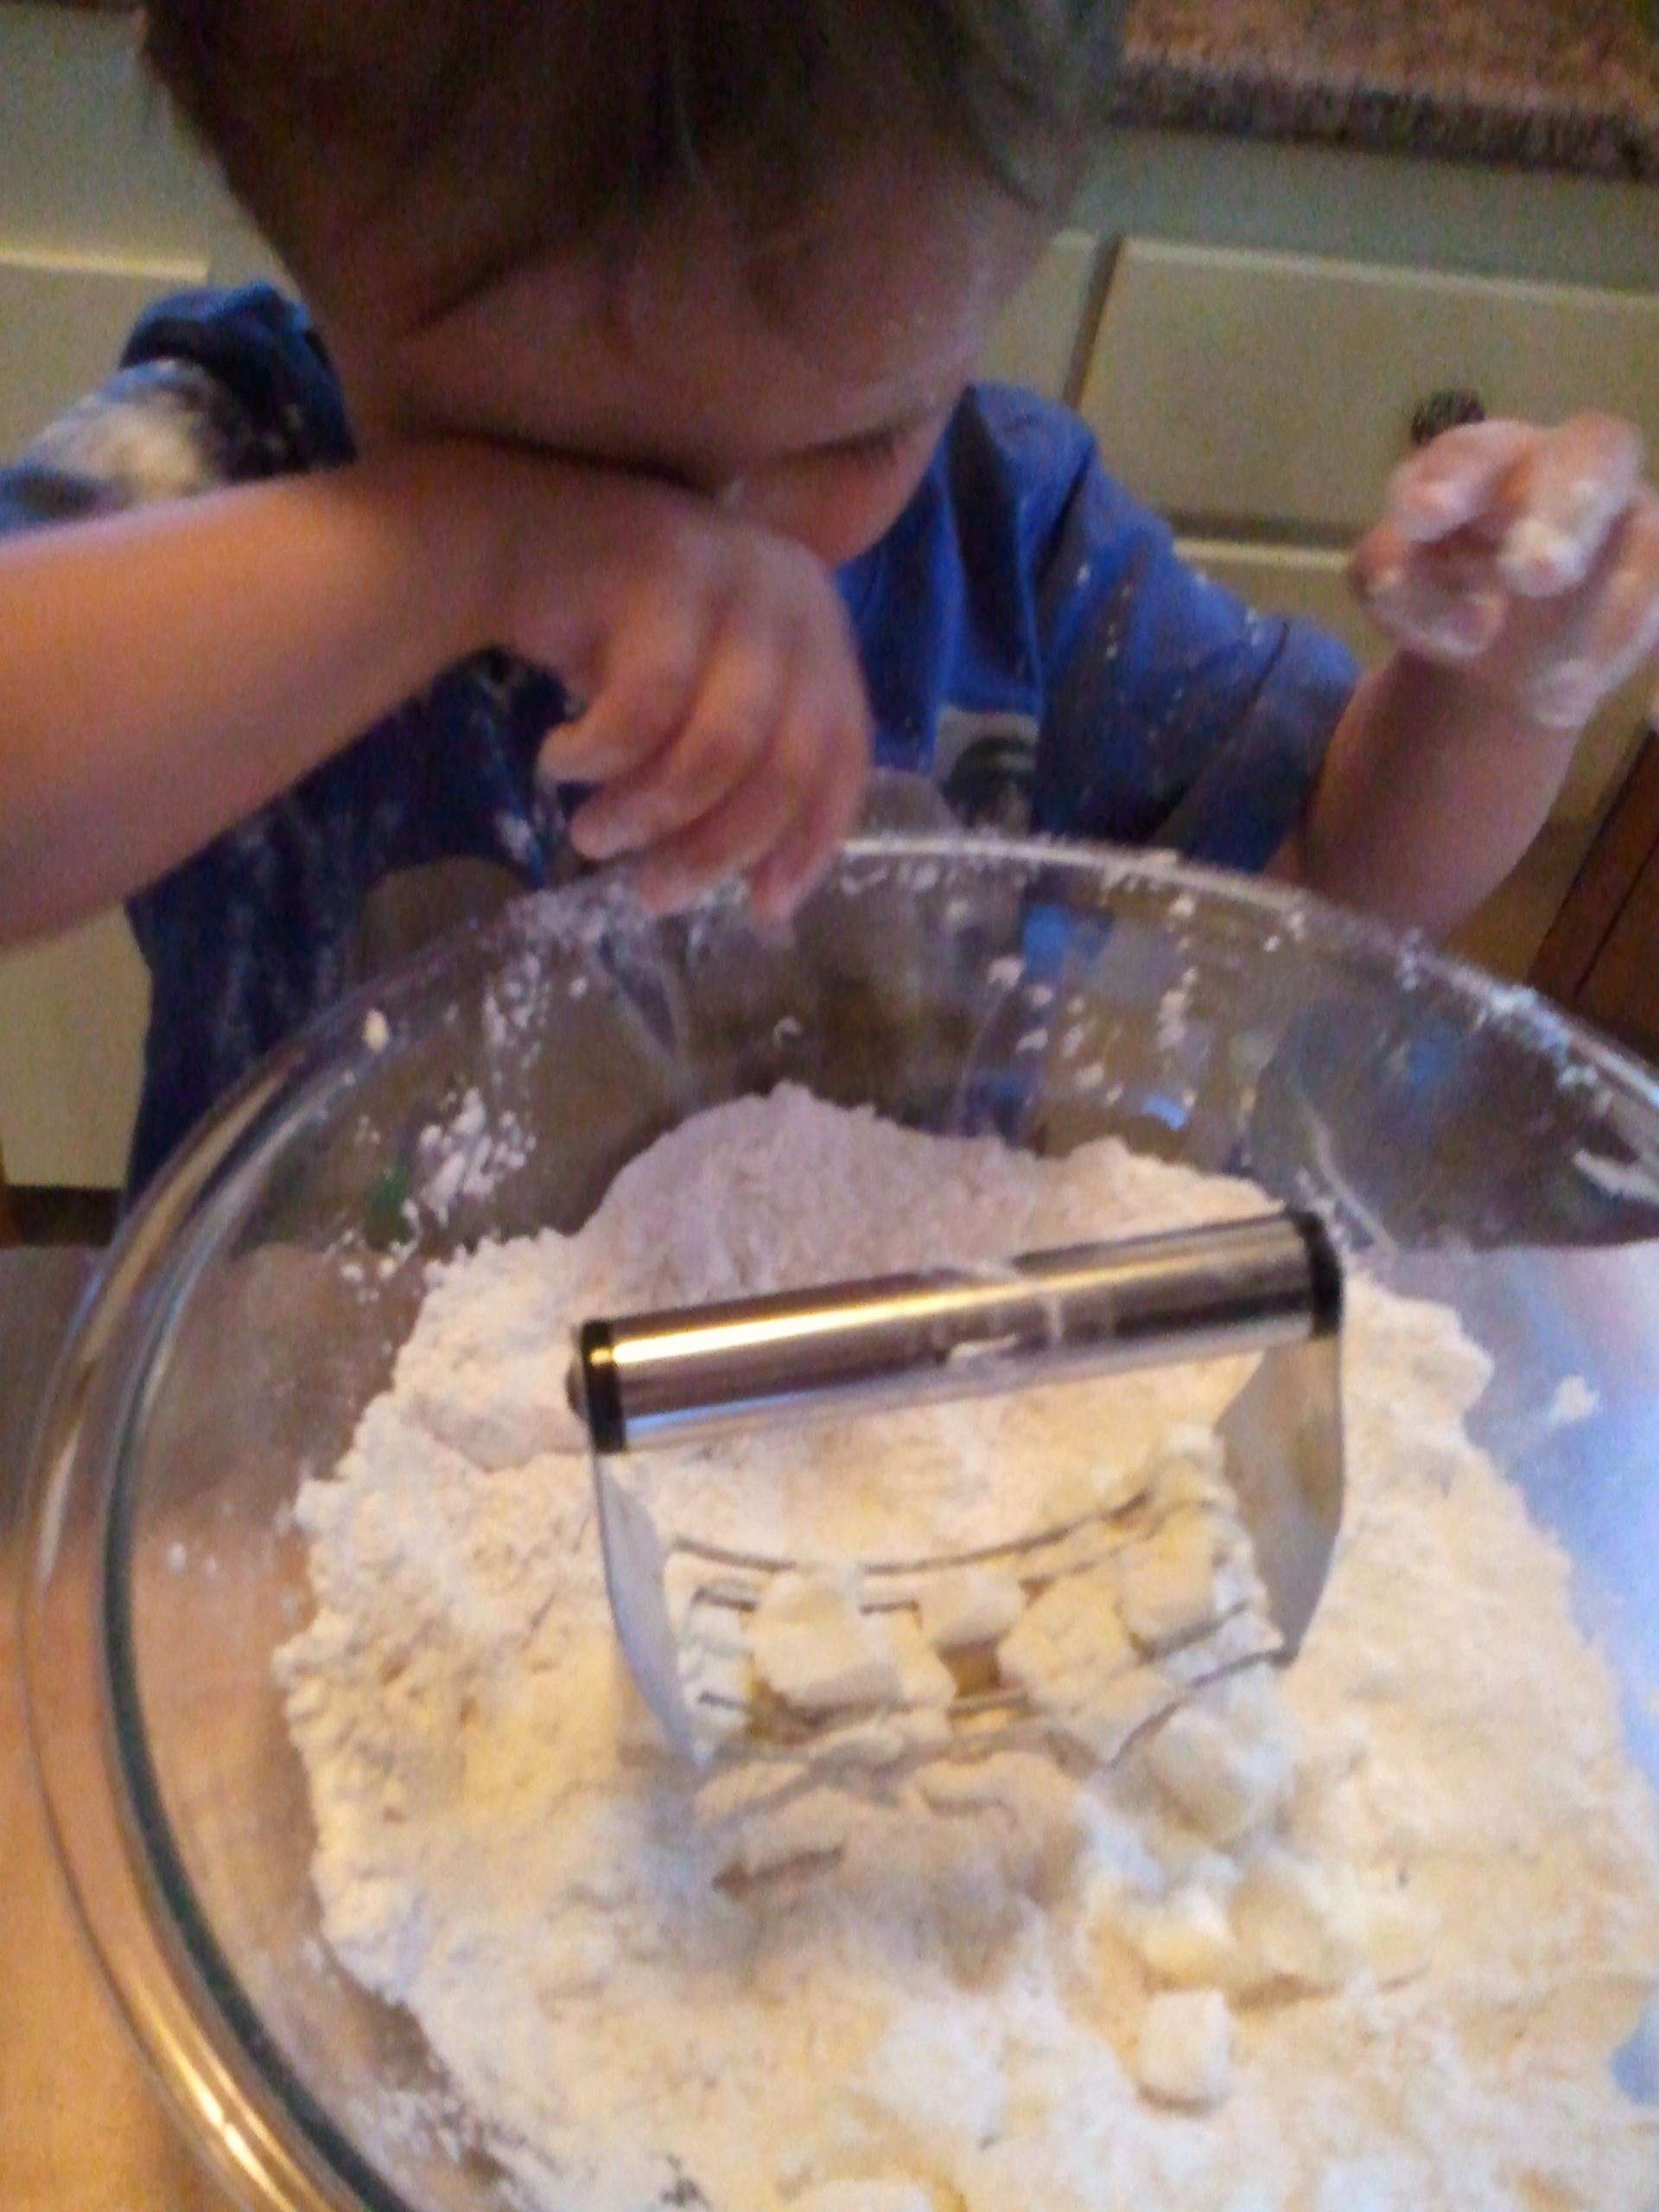
Add the fat (butter in this case) and cut it into the flour. You can use forks, two butter knives, or this handy pastry blender.
I was overzealous in cutting in the butter, and flour landed in my eye.
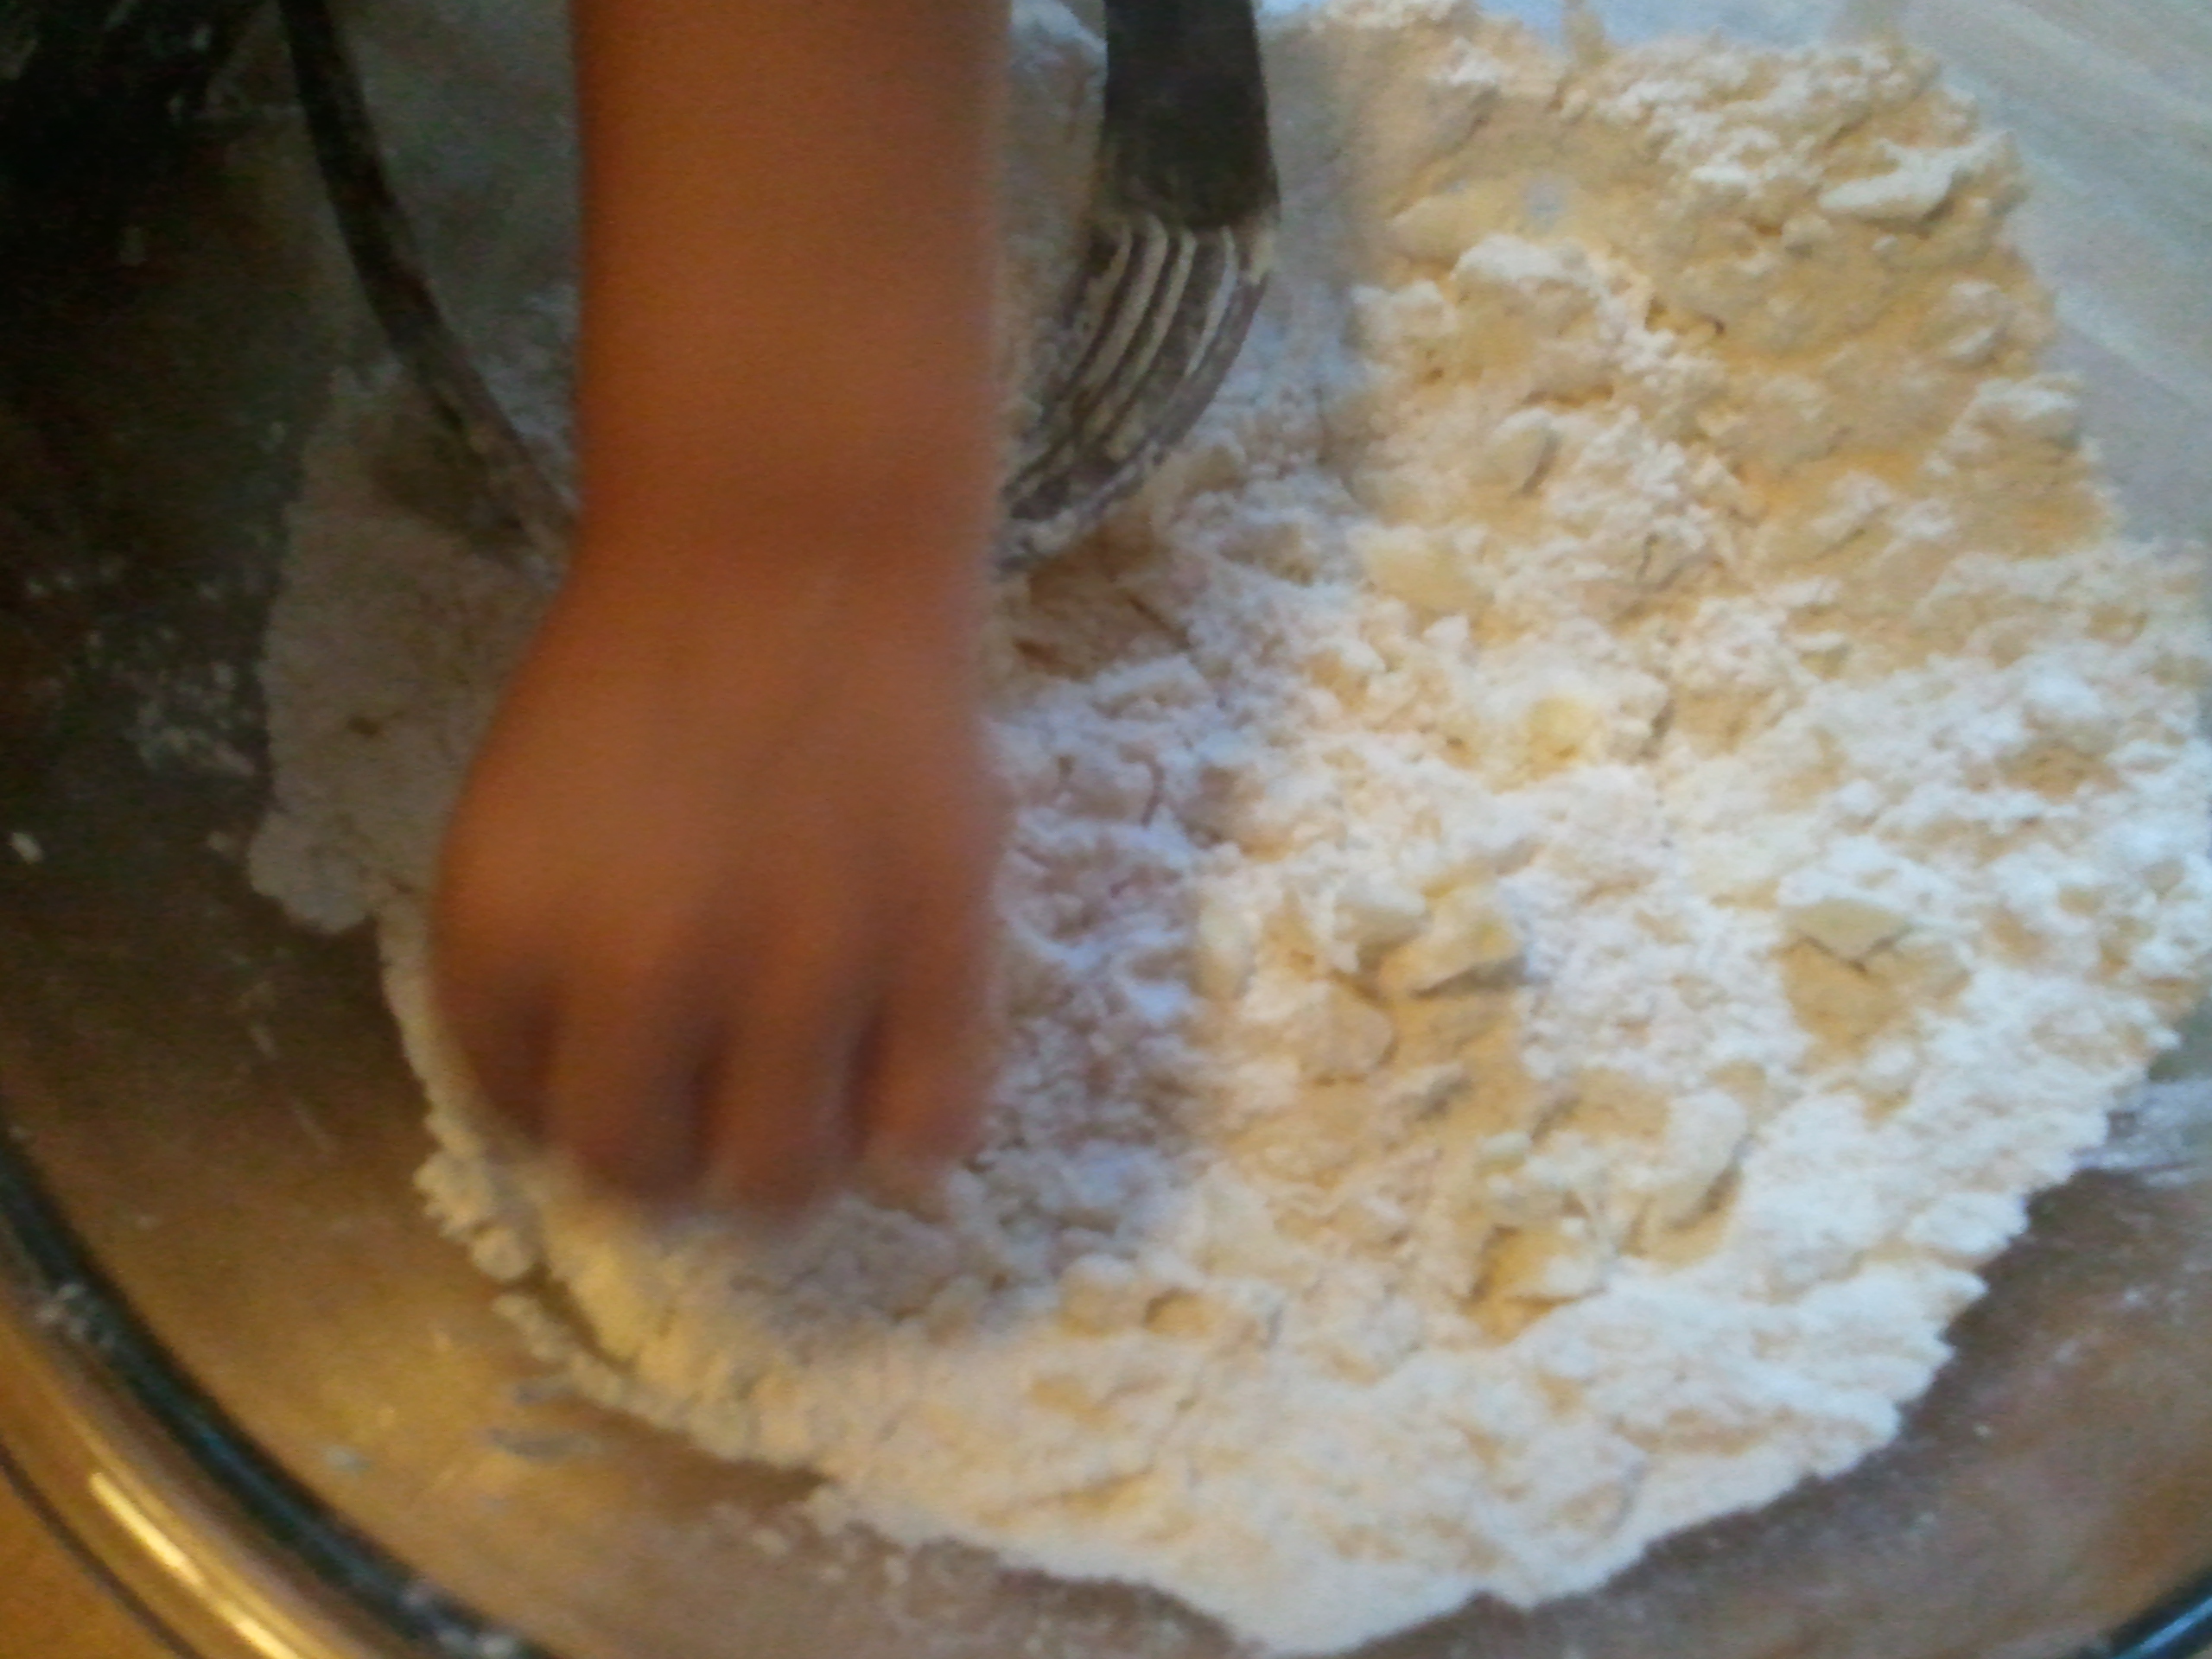
You want to break up the butter into smaller pieces while coating those pieces in flour. Some folks say it should resemble peas, but peas are green, and I just don’t see how this looks like peas.
This is what your dough should look like before you add the water. Do YOU see any peas in there?
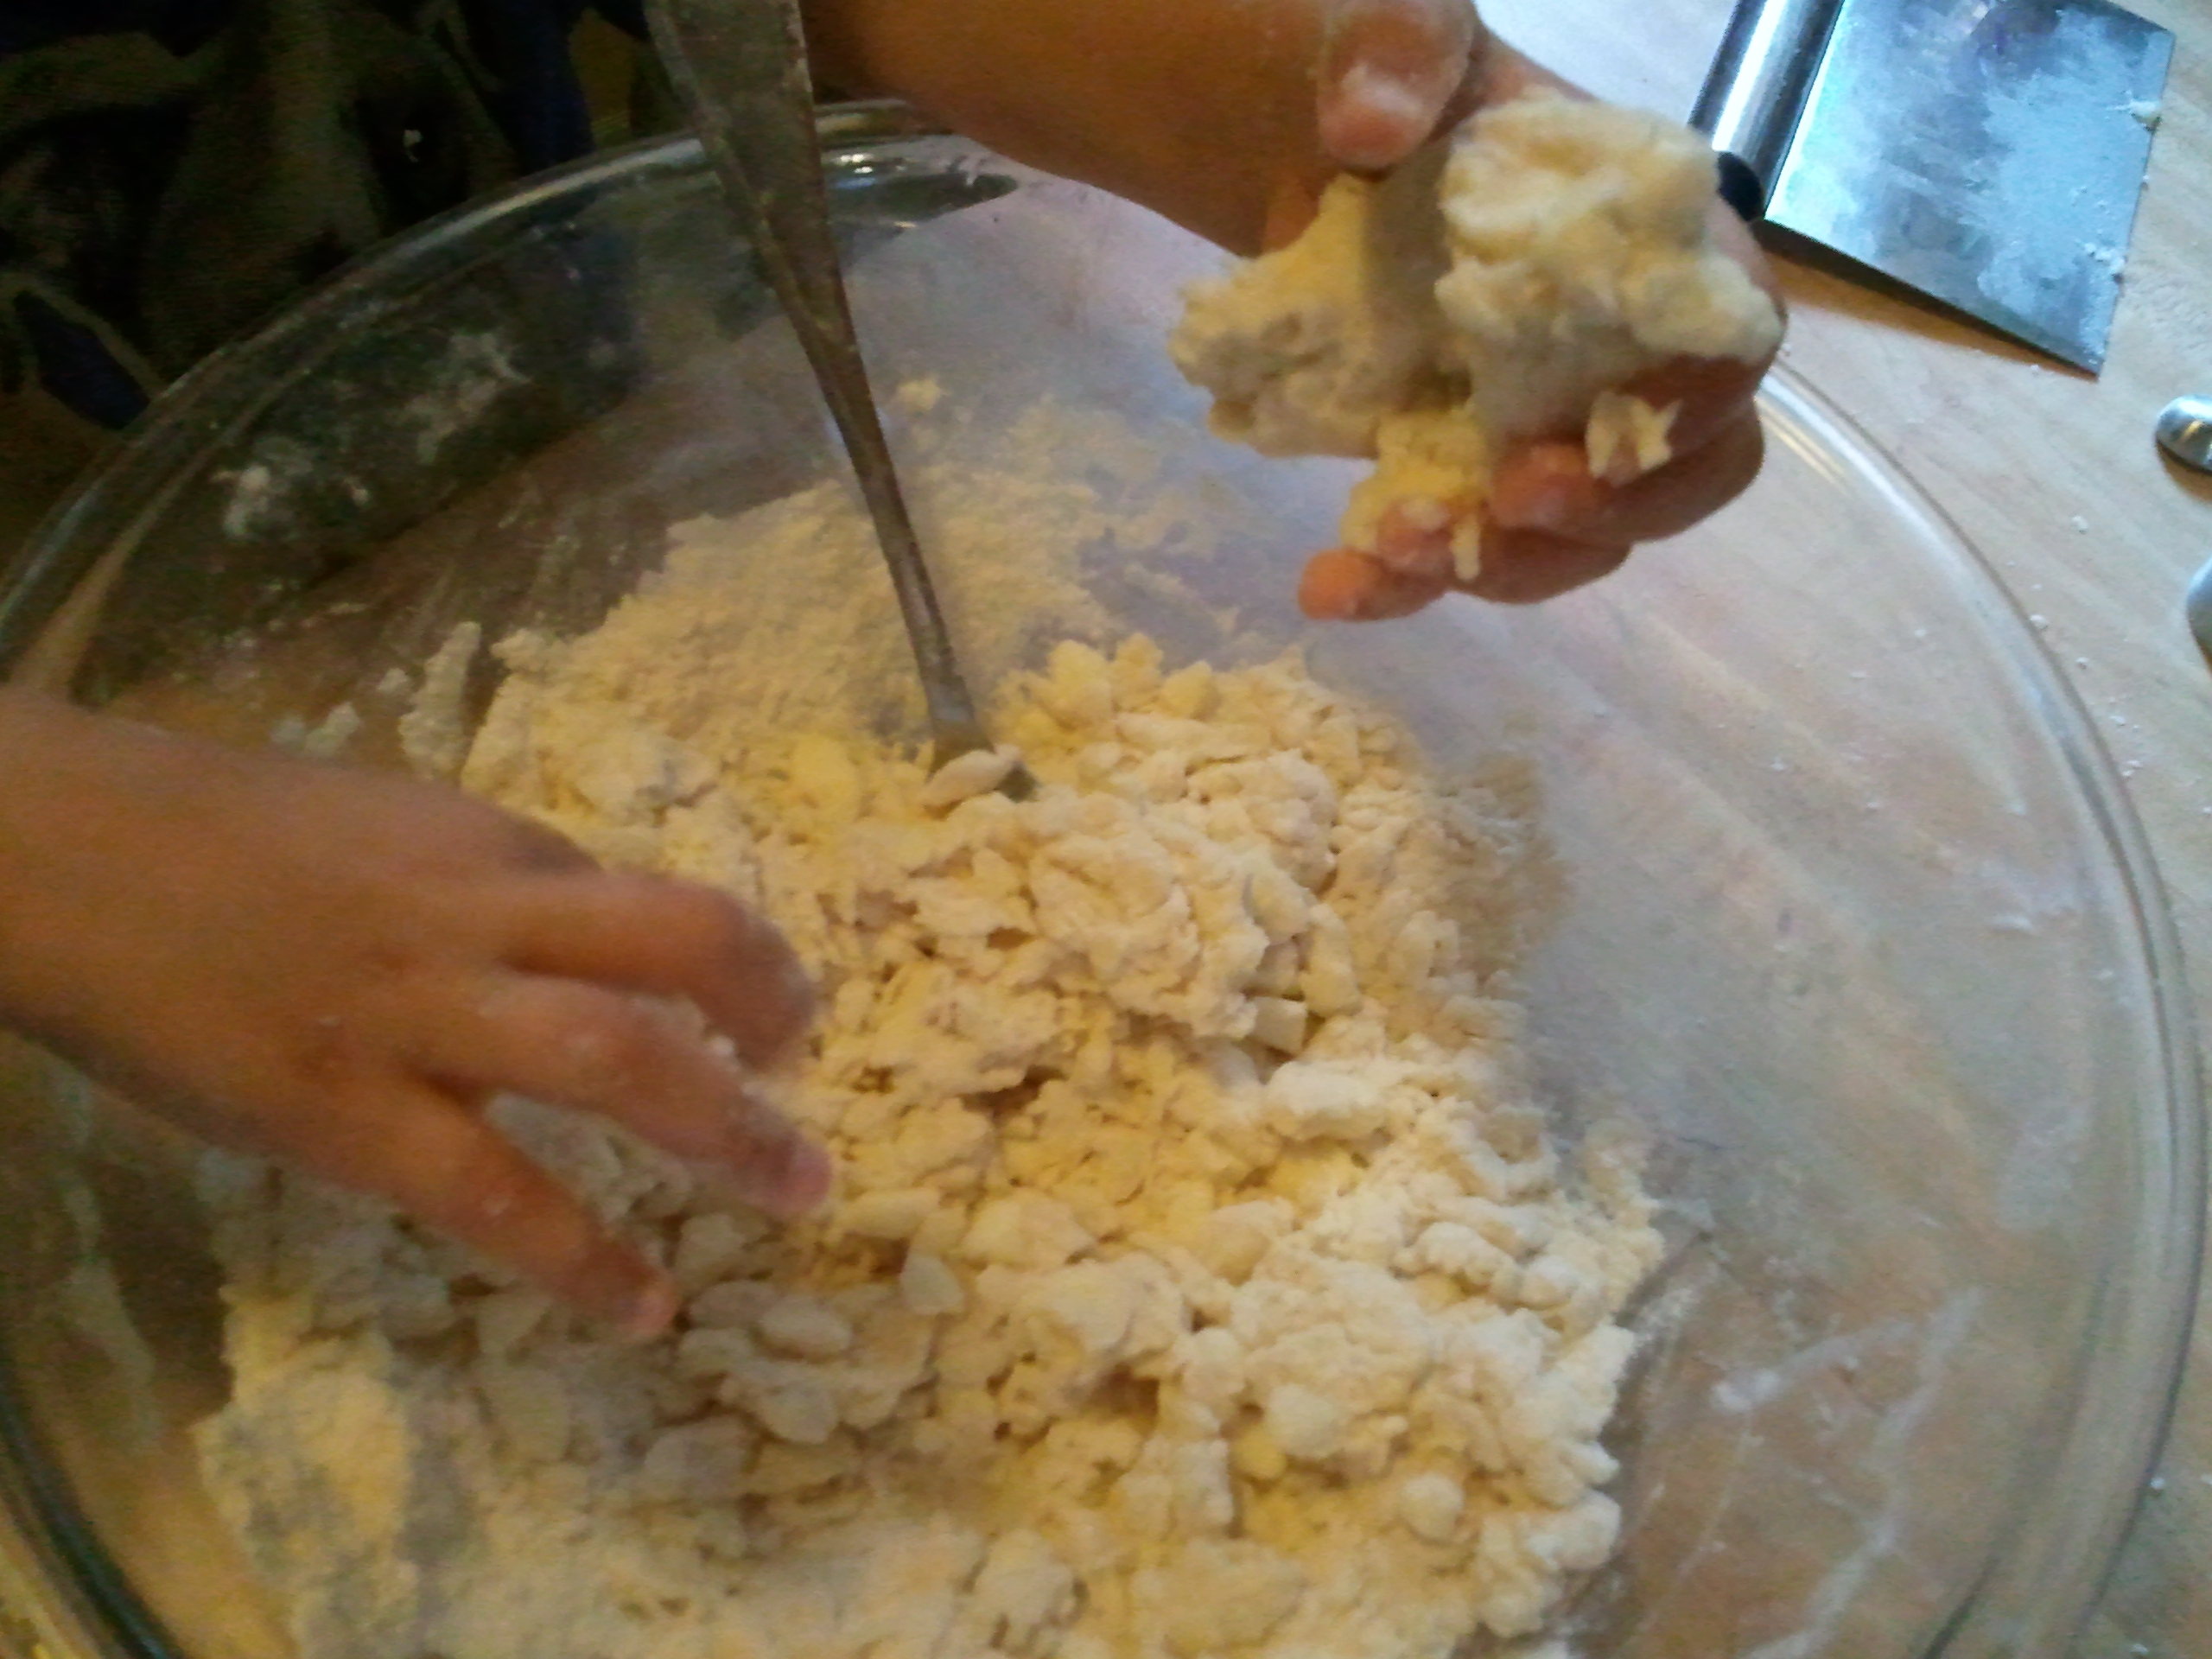
Now you add your water. Drizzle it over the dough (or run it through the feed tube of the food processor while pulsing), then stir with a fork. You can start with about ¼ cup water, then add about 1 tablespoon at a time to get it to the consistency you want. Mama says there’s never a precise measure for this, as a lot of factors are variable: if your kitchen is warm, if your butter is starting to melt, if your water isn’t supercold (I did tell you to put it in the fridge), if you’re using a combination of flours other than all-purpose, etc. What you don’t want is to make a smooth ball of dough. If you end up with this (easy to do in a food processor), you’ve overworked the dough, and it’s going to be tough, rather than flaky. Test it by clumping a bit of the mixture in your hand—if it holds together, it’s wet enough.
See how the dough in the bowl doesn’t look like dough at all? But look what’s squished in my hand. Perfection.
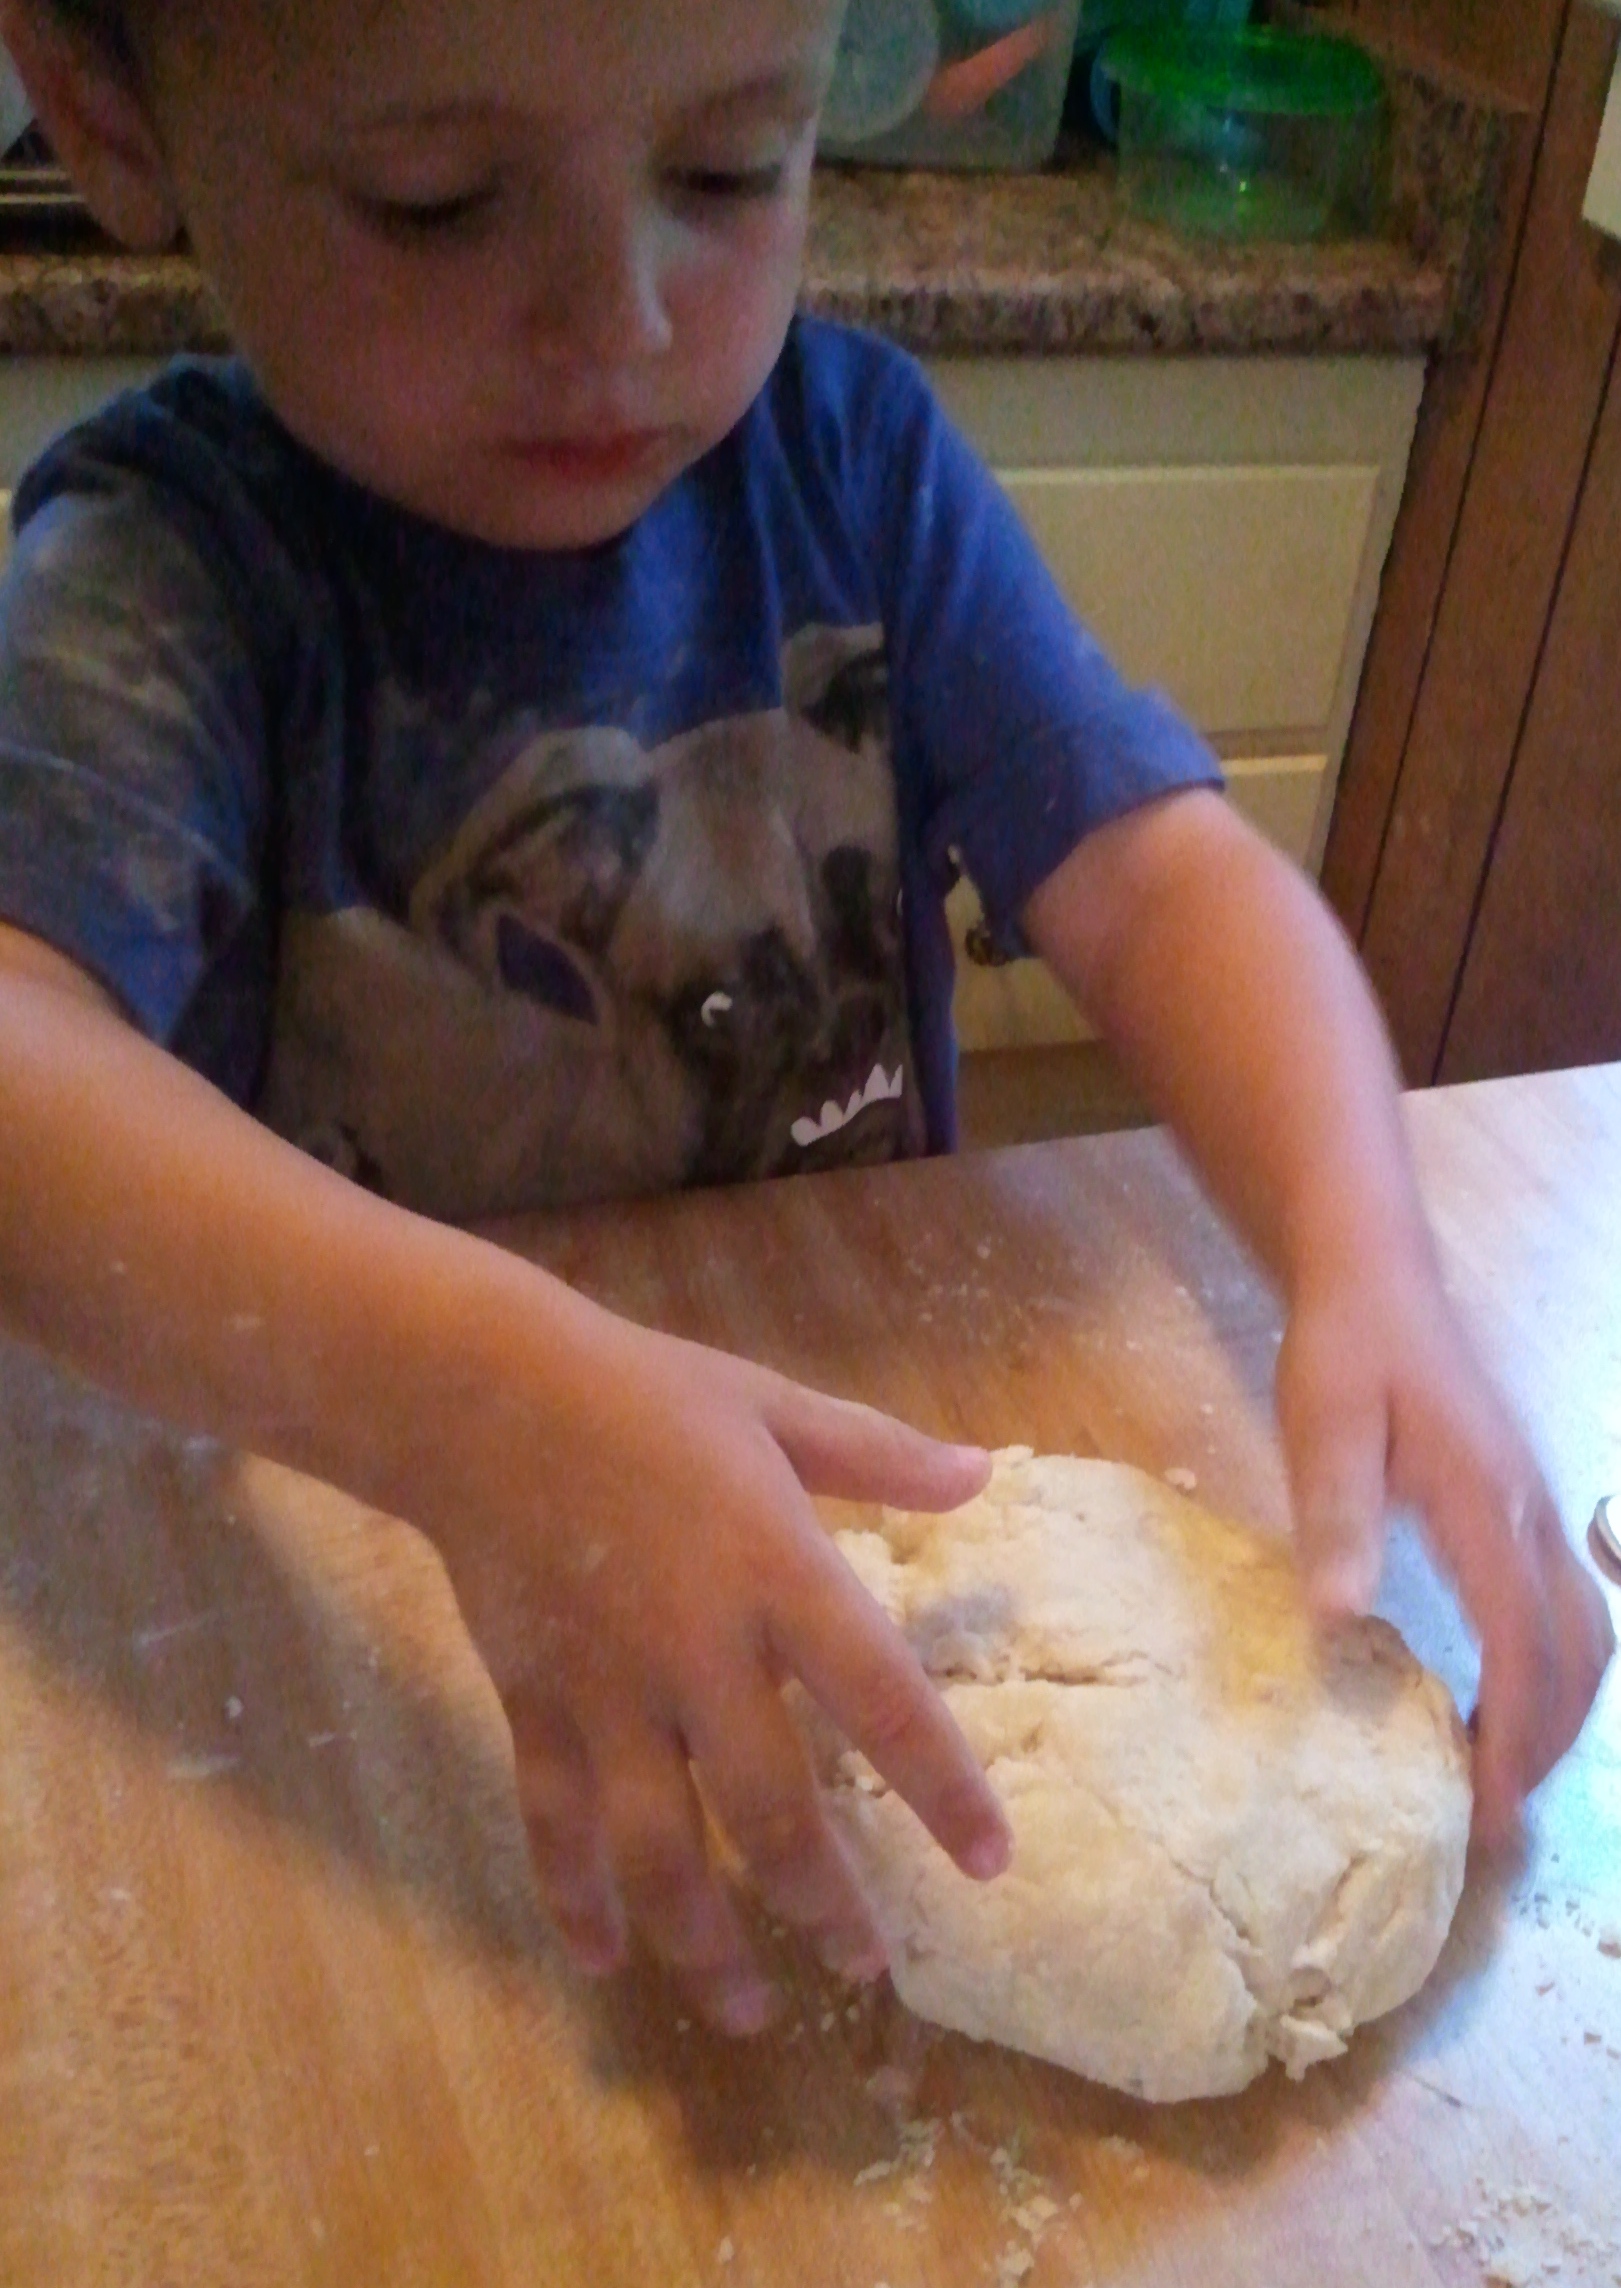
Turn it out onto a counter then gather it all together. Again, don’t overwork it. If it’s sort of shaggy at this stage, that’s alright. Don’t manhandle your dough, and you’ll get a tender crust in return. Form it into a disk (or 2, if you’re making a pie with a top crust—but make one disk slightly larger than the other), wrap it well in plastic wrap, then refrigerate for a minimum of 30–60 minutes. This gives the gluten time to relax. Gluten is the protein in flour that holds the crust together and gives bread dough its structure. But like a toddler without a nap, it’s a little temperamental and needs some time to chill out.
You don’t need a perfectly smooth ball of dough right now. Remember that you’re going to take a rolling pin to it after it chills. (Do you like my shirt? Grrr.)
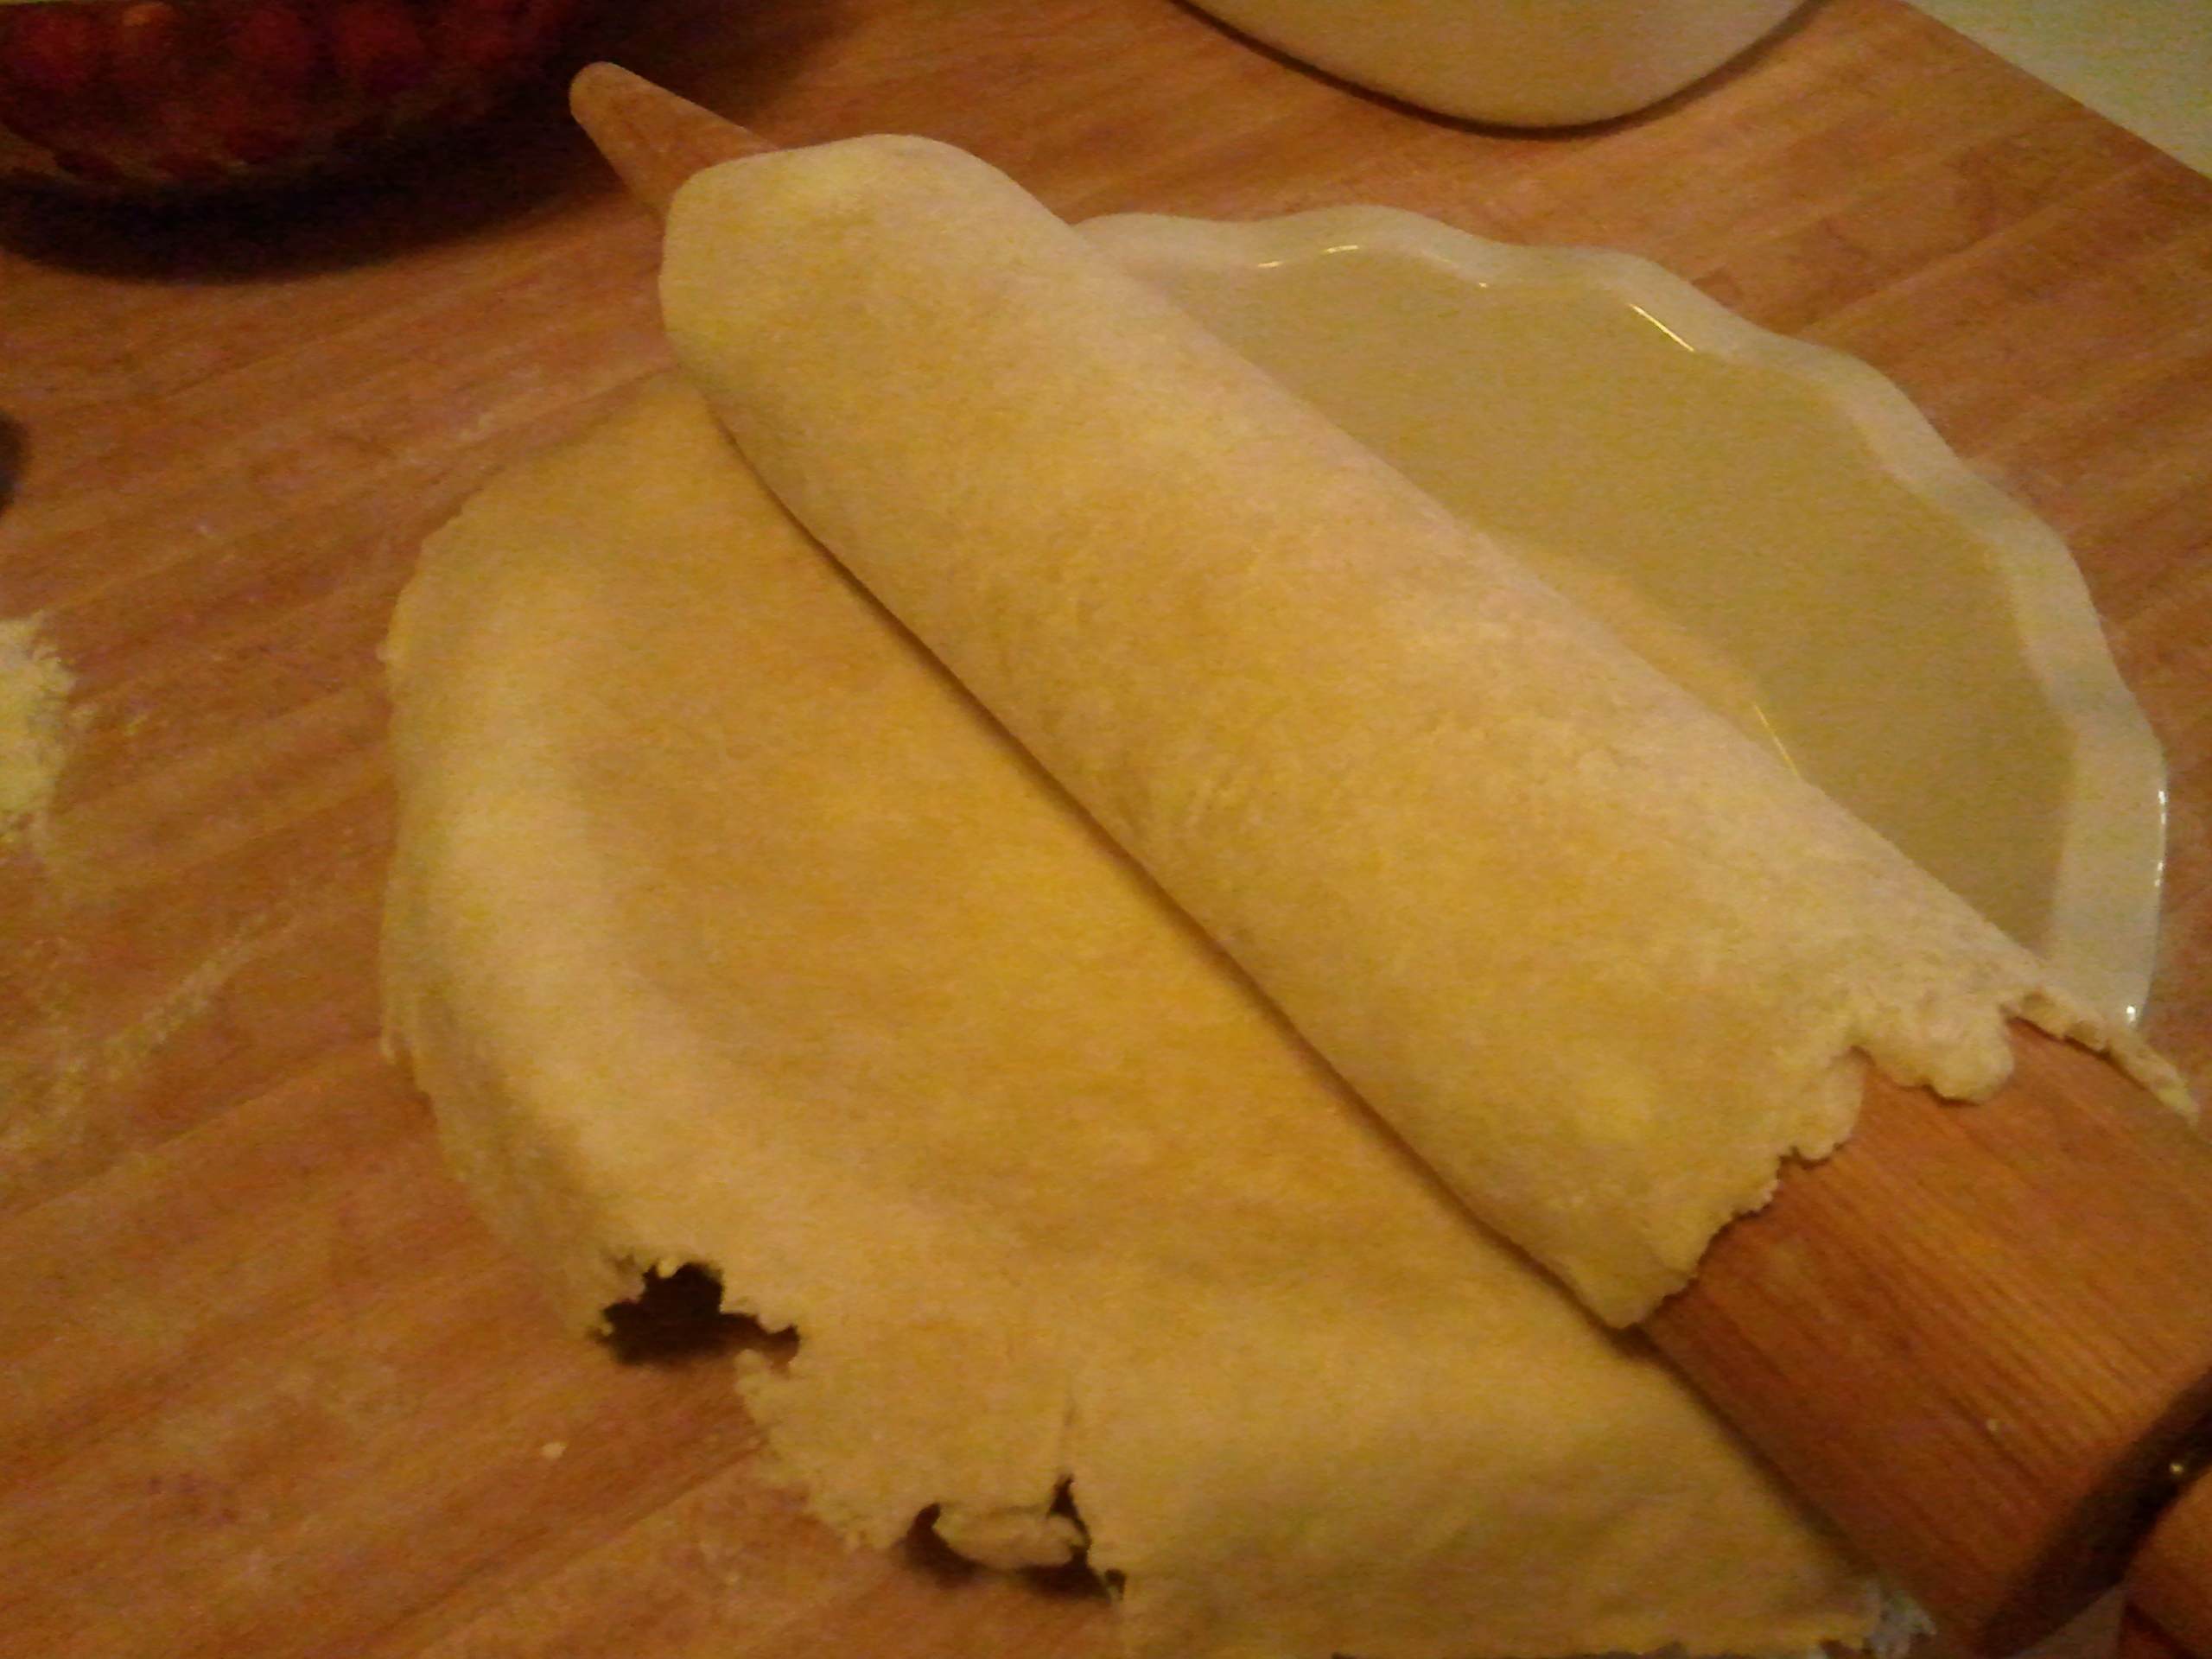
When you’re ready to assemble your pie, lightly flour your work surface and your rolling pin. Roll the dough in all directions (rotate the dough, not your body), taking care not to roll your rolling pin off the edge of the dough—just go to the edge. Keep rotating, so you know the dough’s not sticking to your counter and so that you roll a relatively even shape.
If you look closely, you can see butter smooshed into the dough–they’re the lighter colored splotches. That’s what you want!
Transfer the dough into the pie plate (wrap it over your rolling pin to keep it from stretching).
Gently roll the dough around the rolling pin, bring it to the pie plate, then unroll the dough.
Some folks put the bottom dough back into the fridge for 15 minutes. If you have yet to prepare your filling, then go ahead and put the crust in the fridge in the meantime. If you’re blind-baking your crust (that is, baking it without any filling), it can go right in the oven. Either way, when you’re ready, fill your pie and top it with the other disk of rolled-out dough, if using. And don’t forget to save your dough scraps. Wrap them well and store them in the freezer, as they make for a very easy last-minute dinner or even a lazy-day pie.
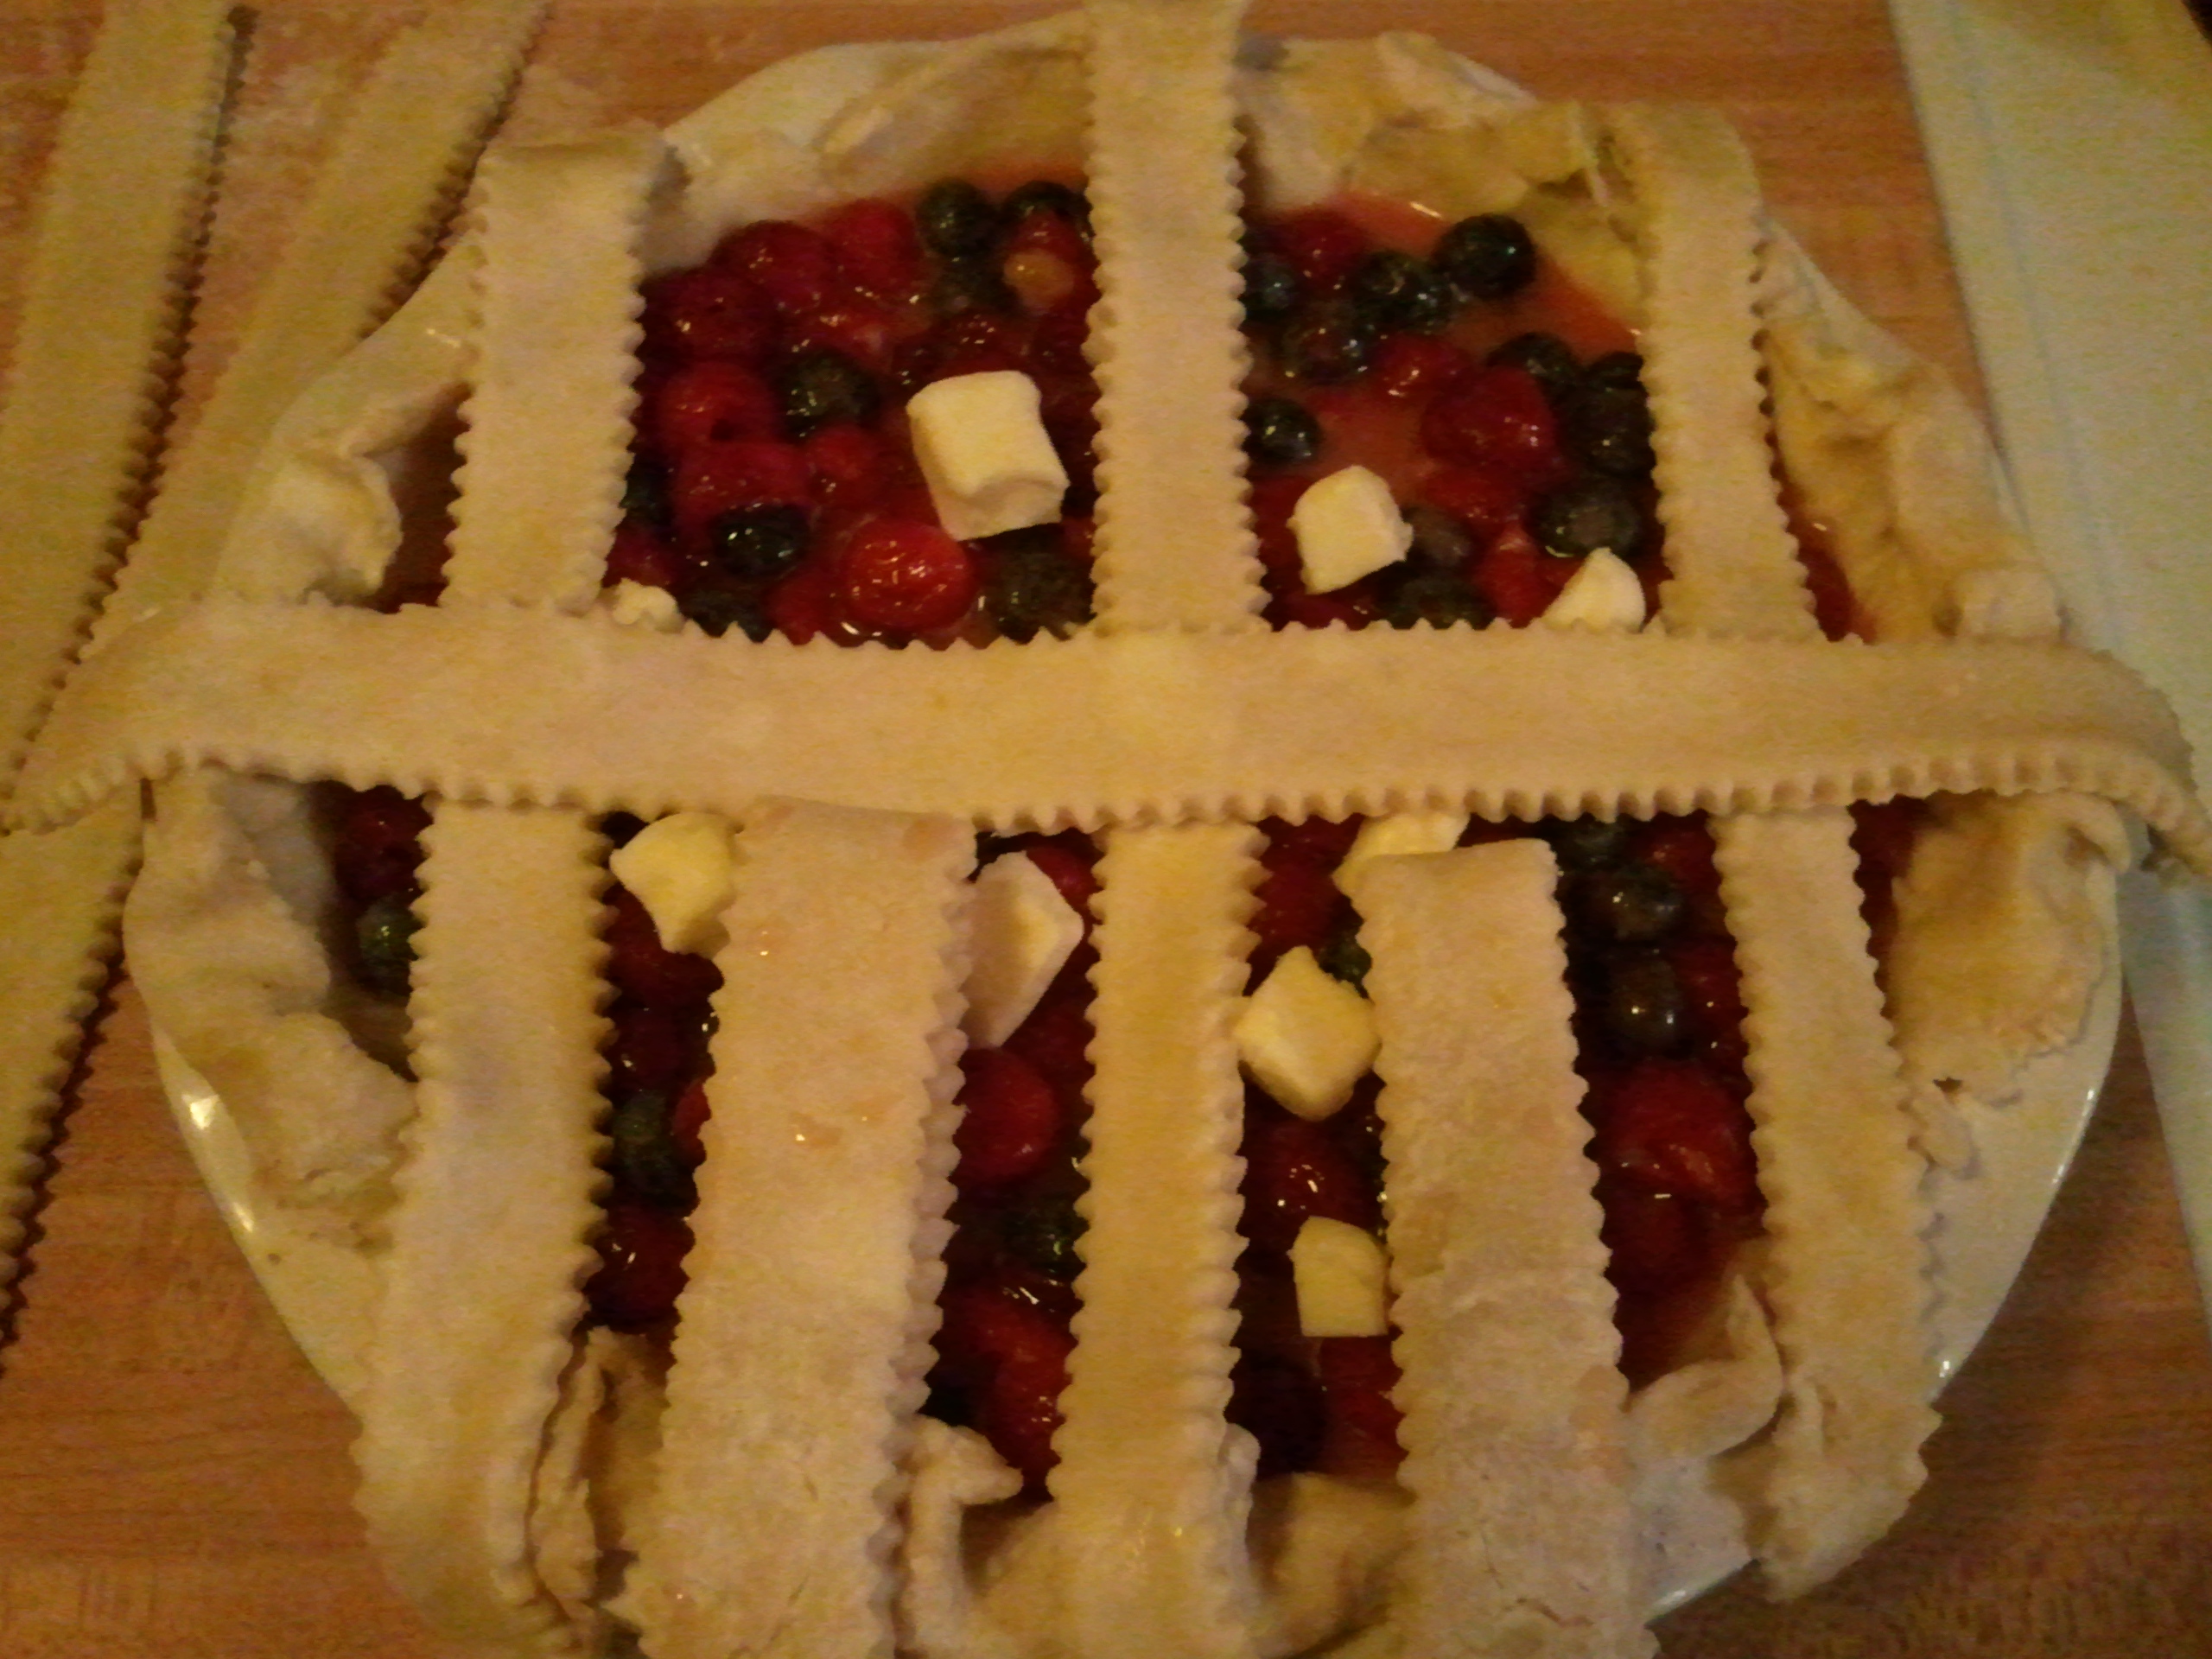
Mama does this very simply—some might call her work “rustic.” Have fun with various types of topping. You can roll it out, tear it into pieces, then lay a patchwork of dough on top. (You could also just tear small chunks of dough off the dough ball and flatten them with your hands and skip the rolling altogether.) You can roll it out smaller than the size of the pie and lay it on top, without touching the edge of the bottom crust, making a “floating” crust. You can lay it on top and flute the edges or press them together with the tines of a fork. Or, you can make a lattice.
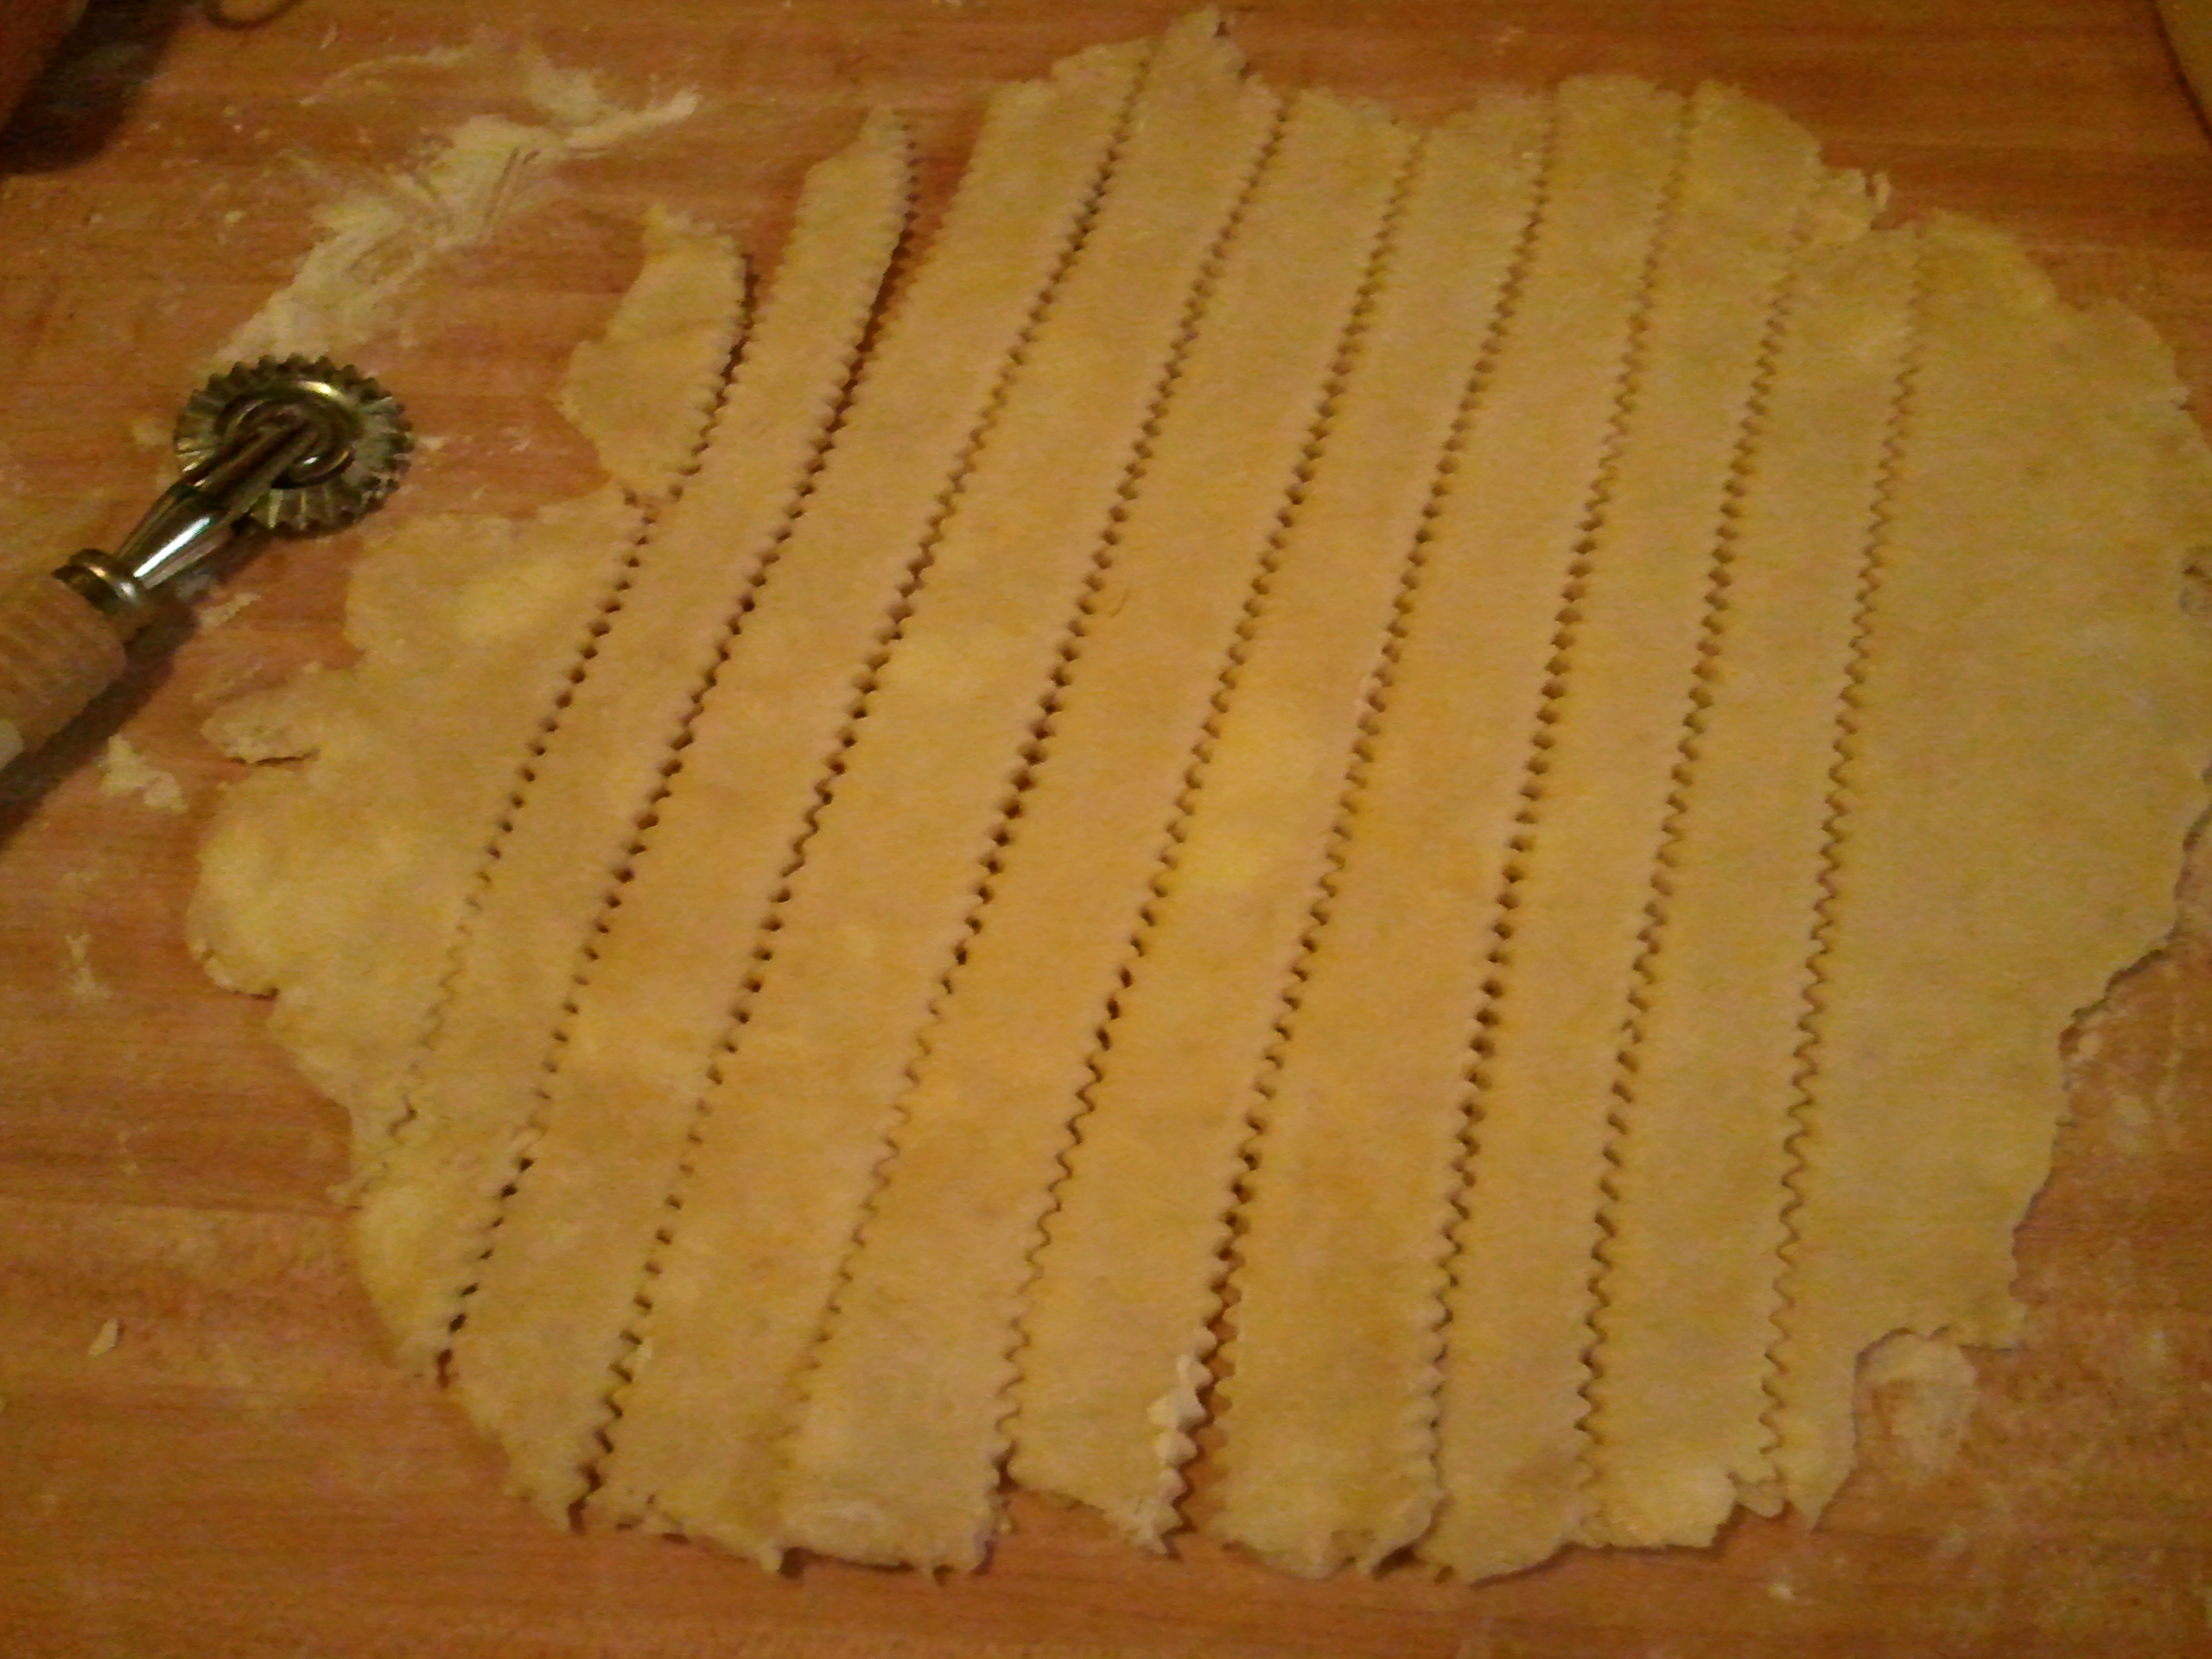
Like everything else, there are a couple ways to make a lattice crust, but here’s one that’s just as easy as…pie. (Come on, you knew that was coming.)
Roll out your top crust, then use a pastry wheel, pizza cutter, or sharp knife to cut strips. Try to keep them as uniform as you can (but you can always call it rustic!). You should have 3 or 4 that are about 10” long, if you’re making a 9” pie. The rest can be shorter. You’ll need 8 strips total. Lightly moisten the edges of your pie crust that’s already in the pie plate; this will help the top crust adhere.
Your strips don’t have to have crinkly edges…but their flaws are hidden a bit better.
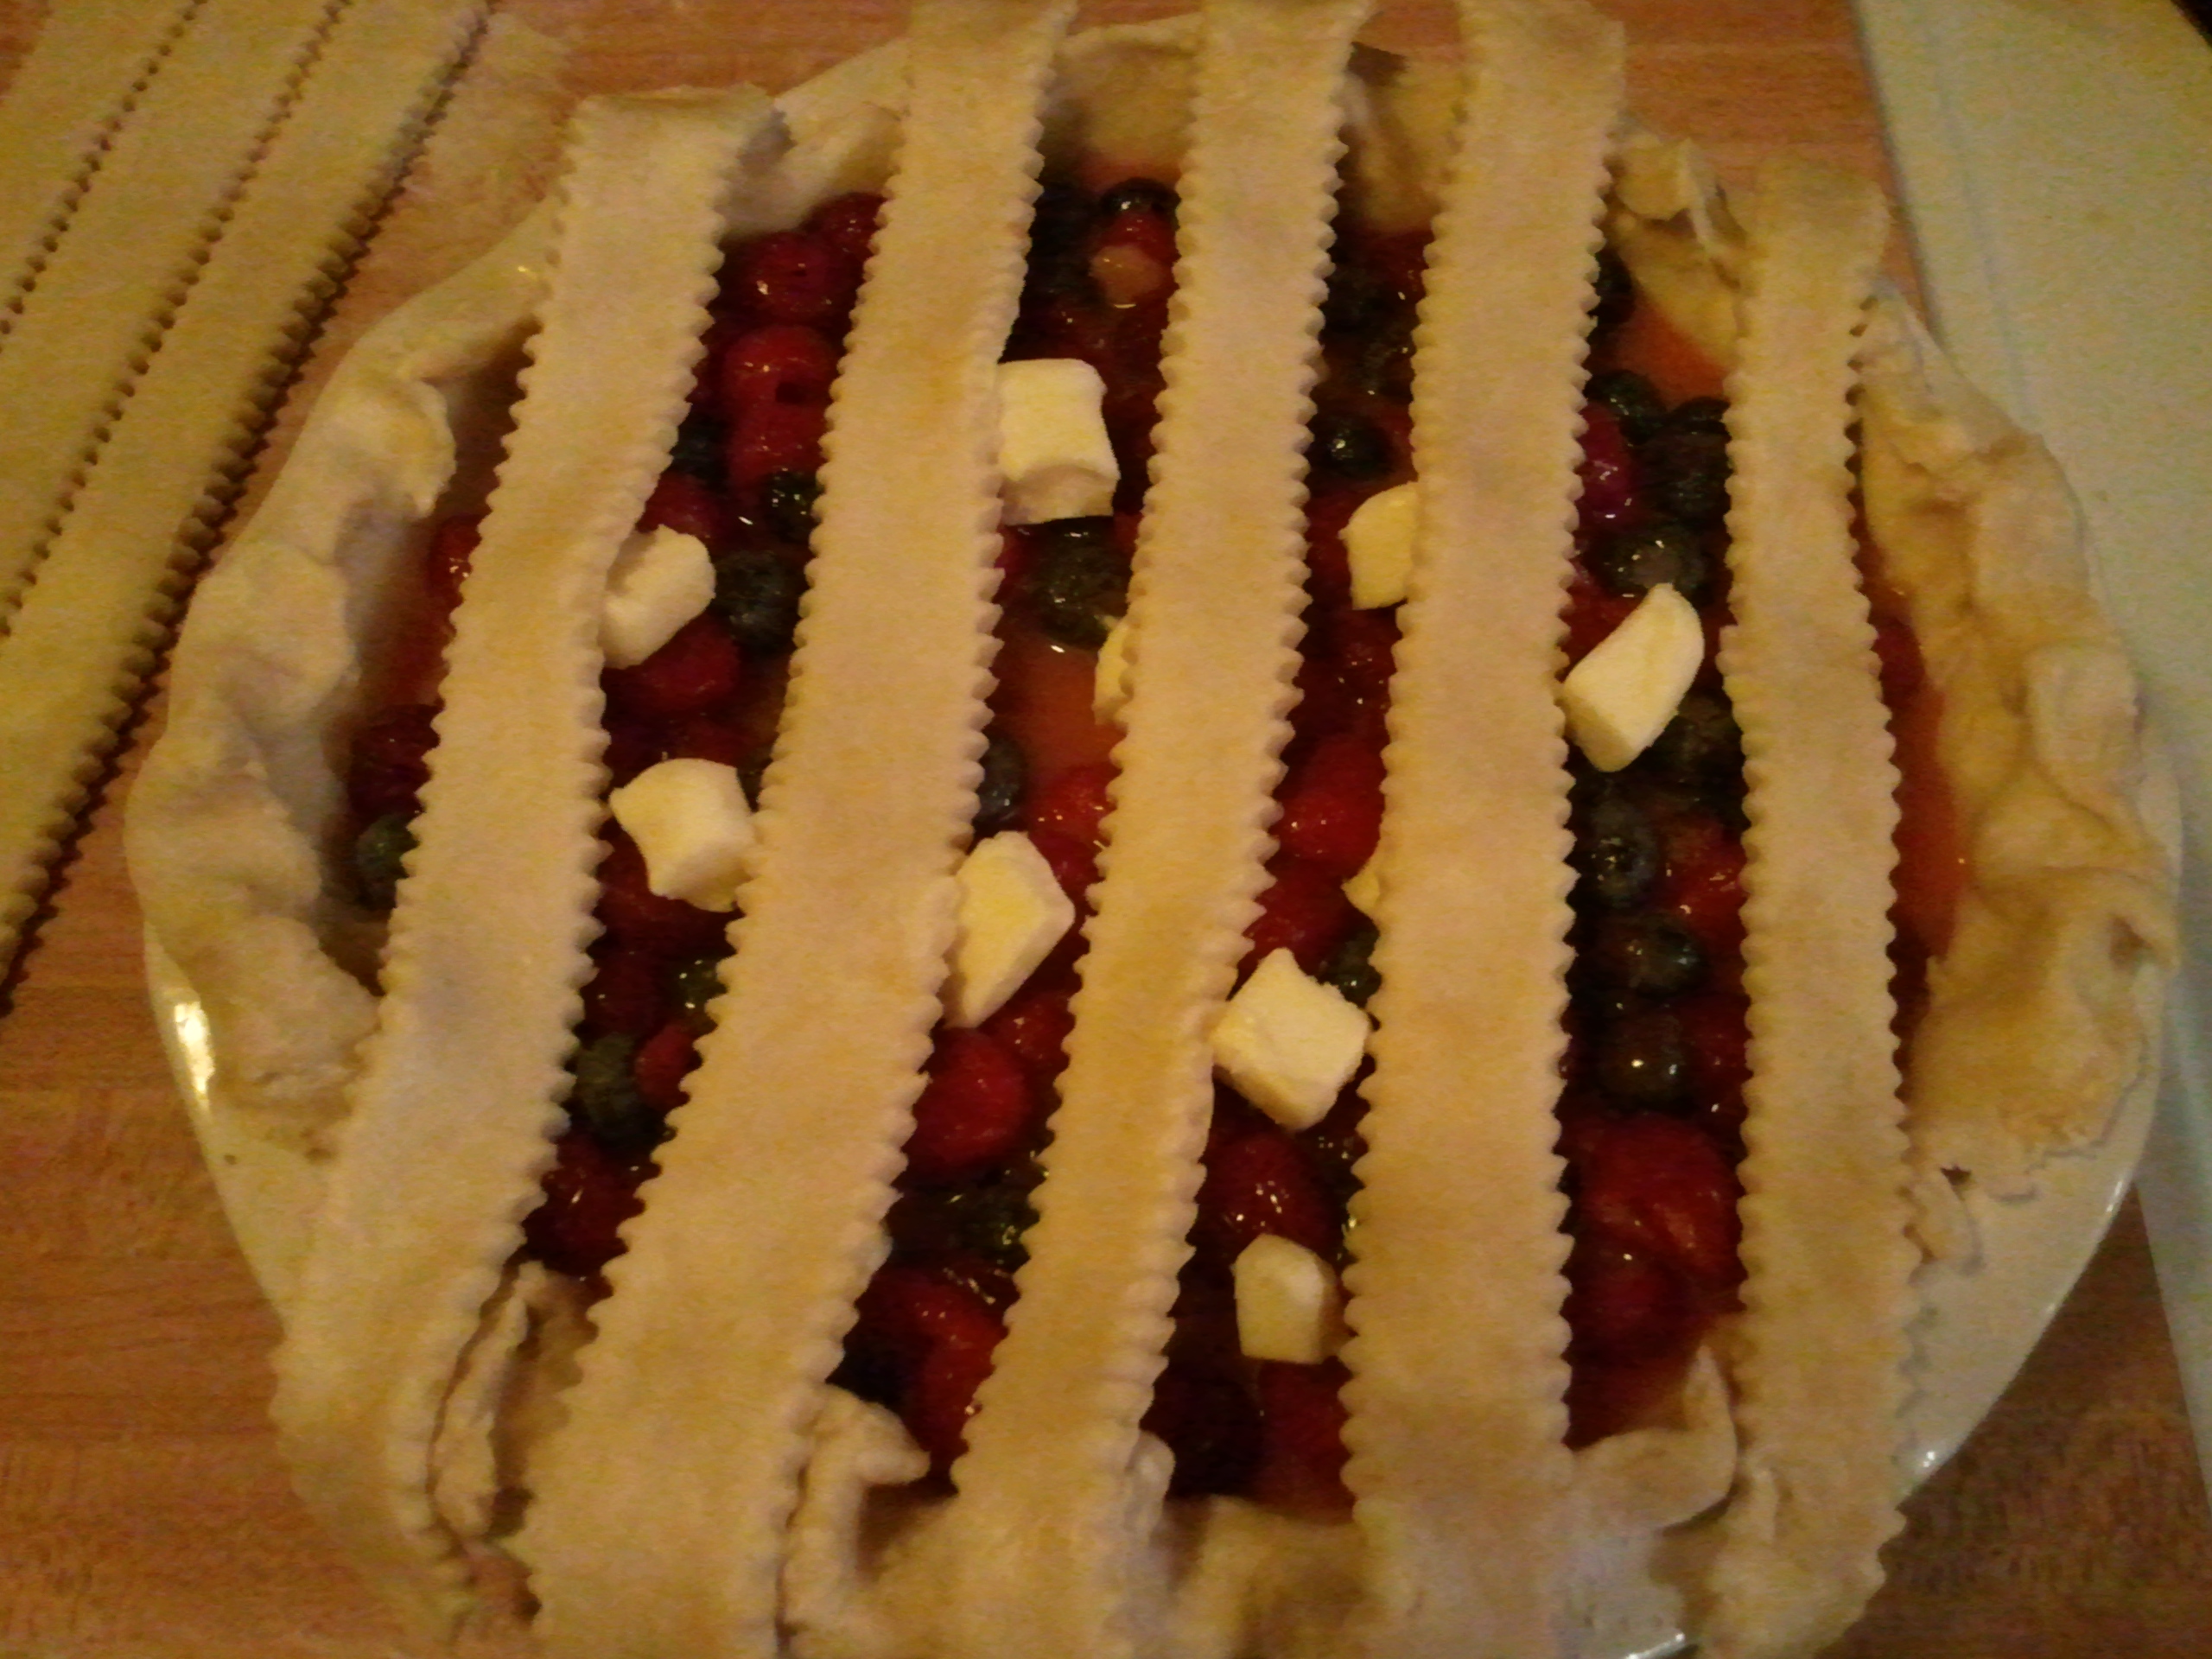
Lay 5 strips vertically across your pie, evenly spaced apart.
You can see the blueberries and cherries and cubes of butter peeking out like they’re behind the bars of a crib.
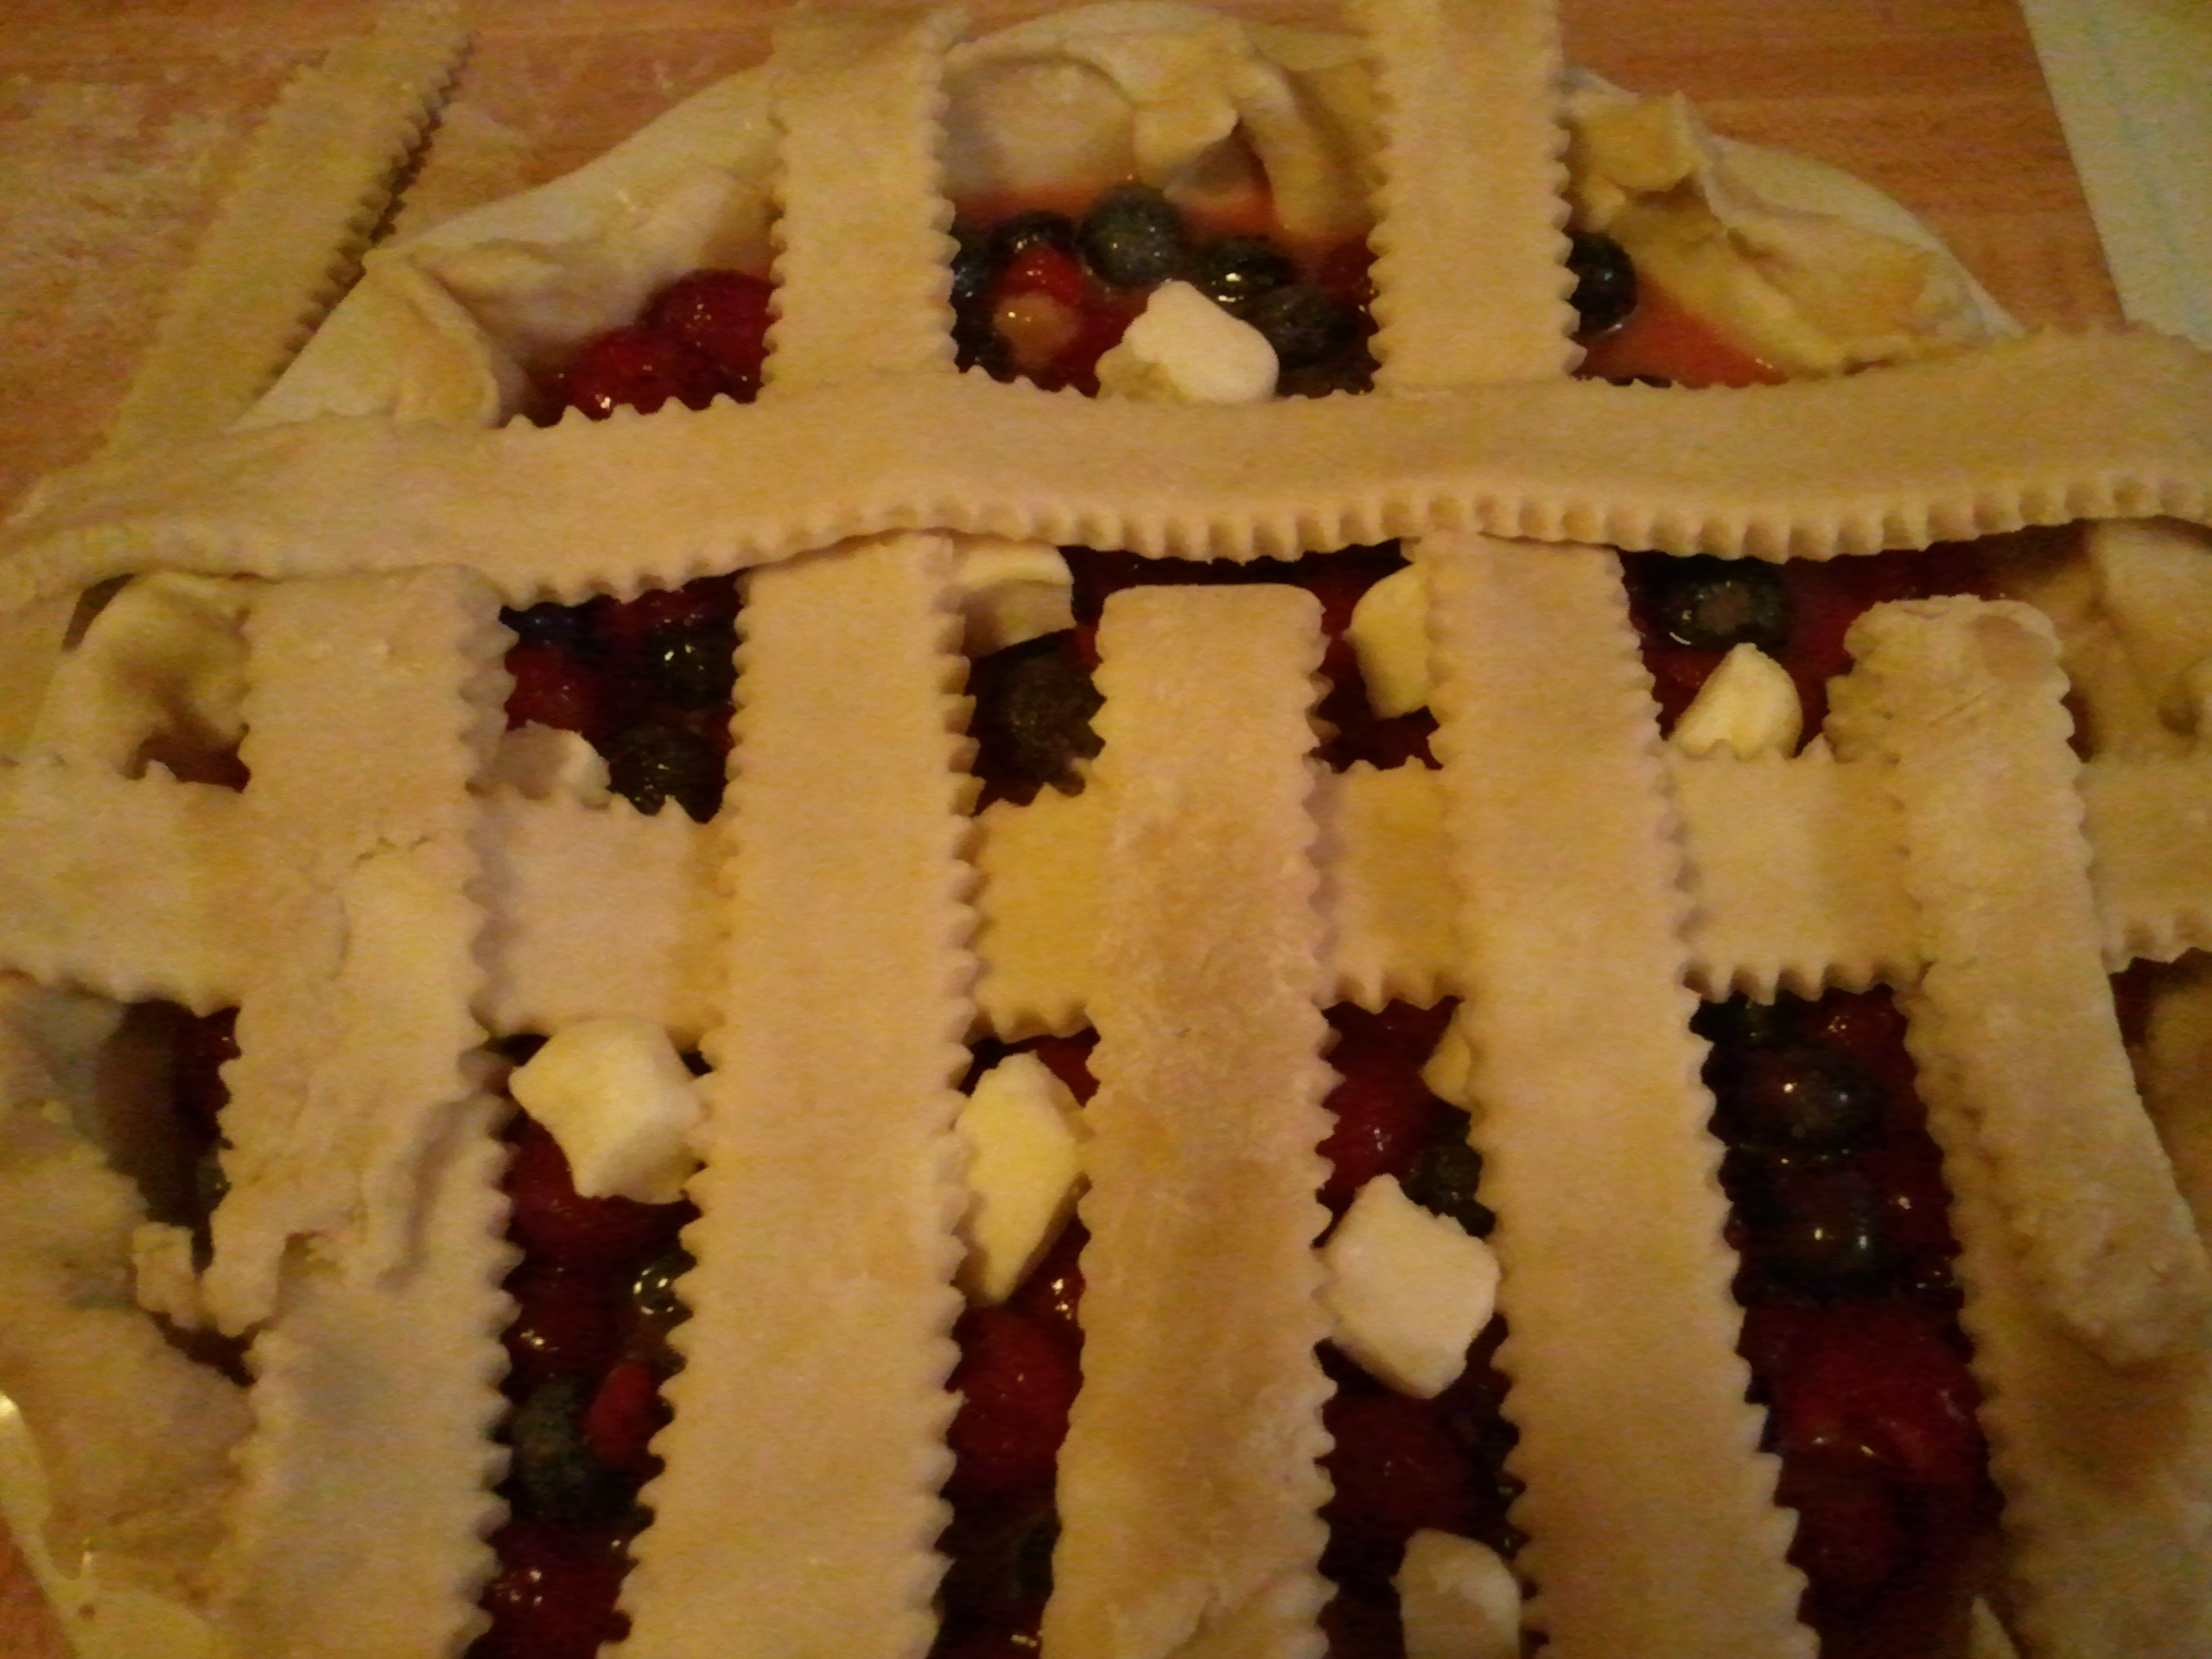
Fold down vertical strips 2 & 4, about halfway down. Then lay 1 horizontal strip across the middle, over vertical strips 1, 3, & 5. Then unfold 2 & 4.
Then fold down strips 1, 3, & 5. Lay 1 horizontal strip above the first horizontal strip, over vertical strips 2 & 4. Then unfold 1, 3, & 5.
Either turn your pie 180° so the bottom is now the top, and repeat the previous step. Or fold up (from the bottom) vertical strips 1, 3, & 5. Lay 1 horizontal strip, over vertical strips 2 & 4, beneath the middle strip. Then unfold 1, 3, & 5.
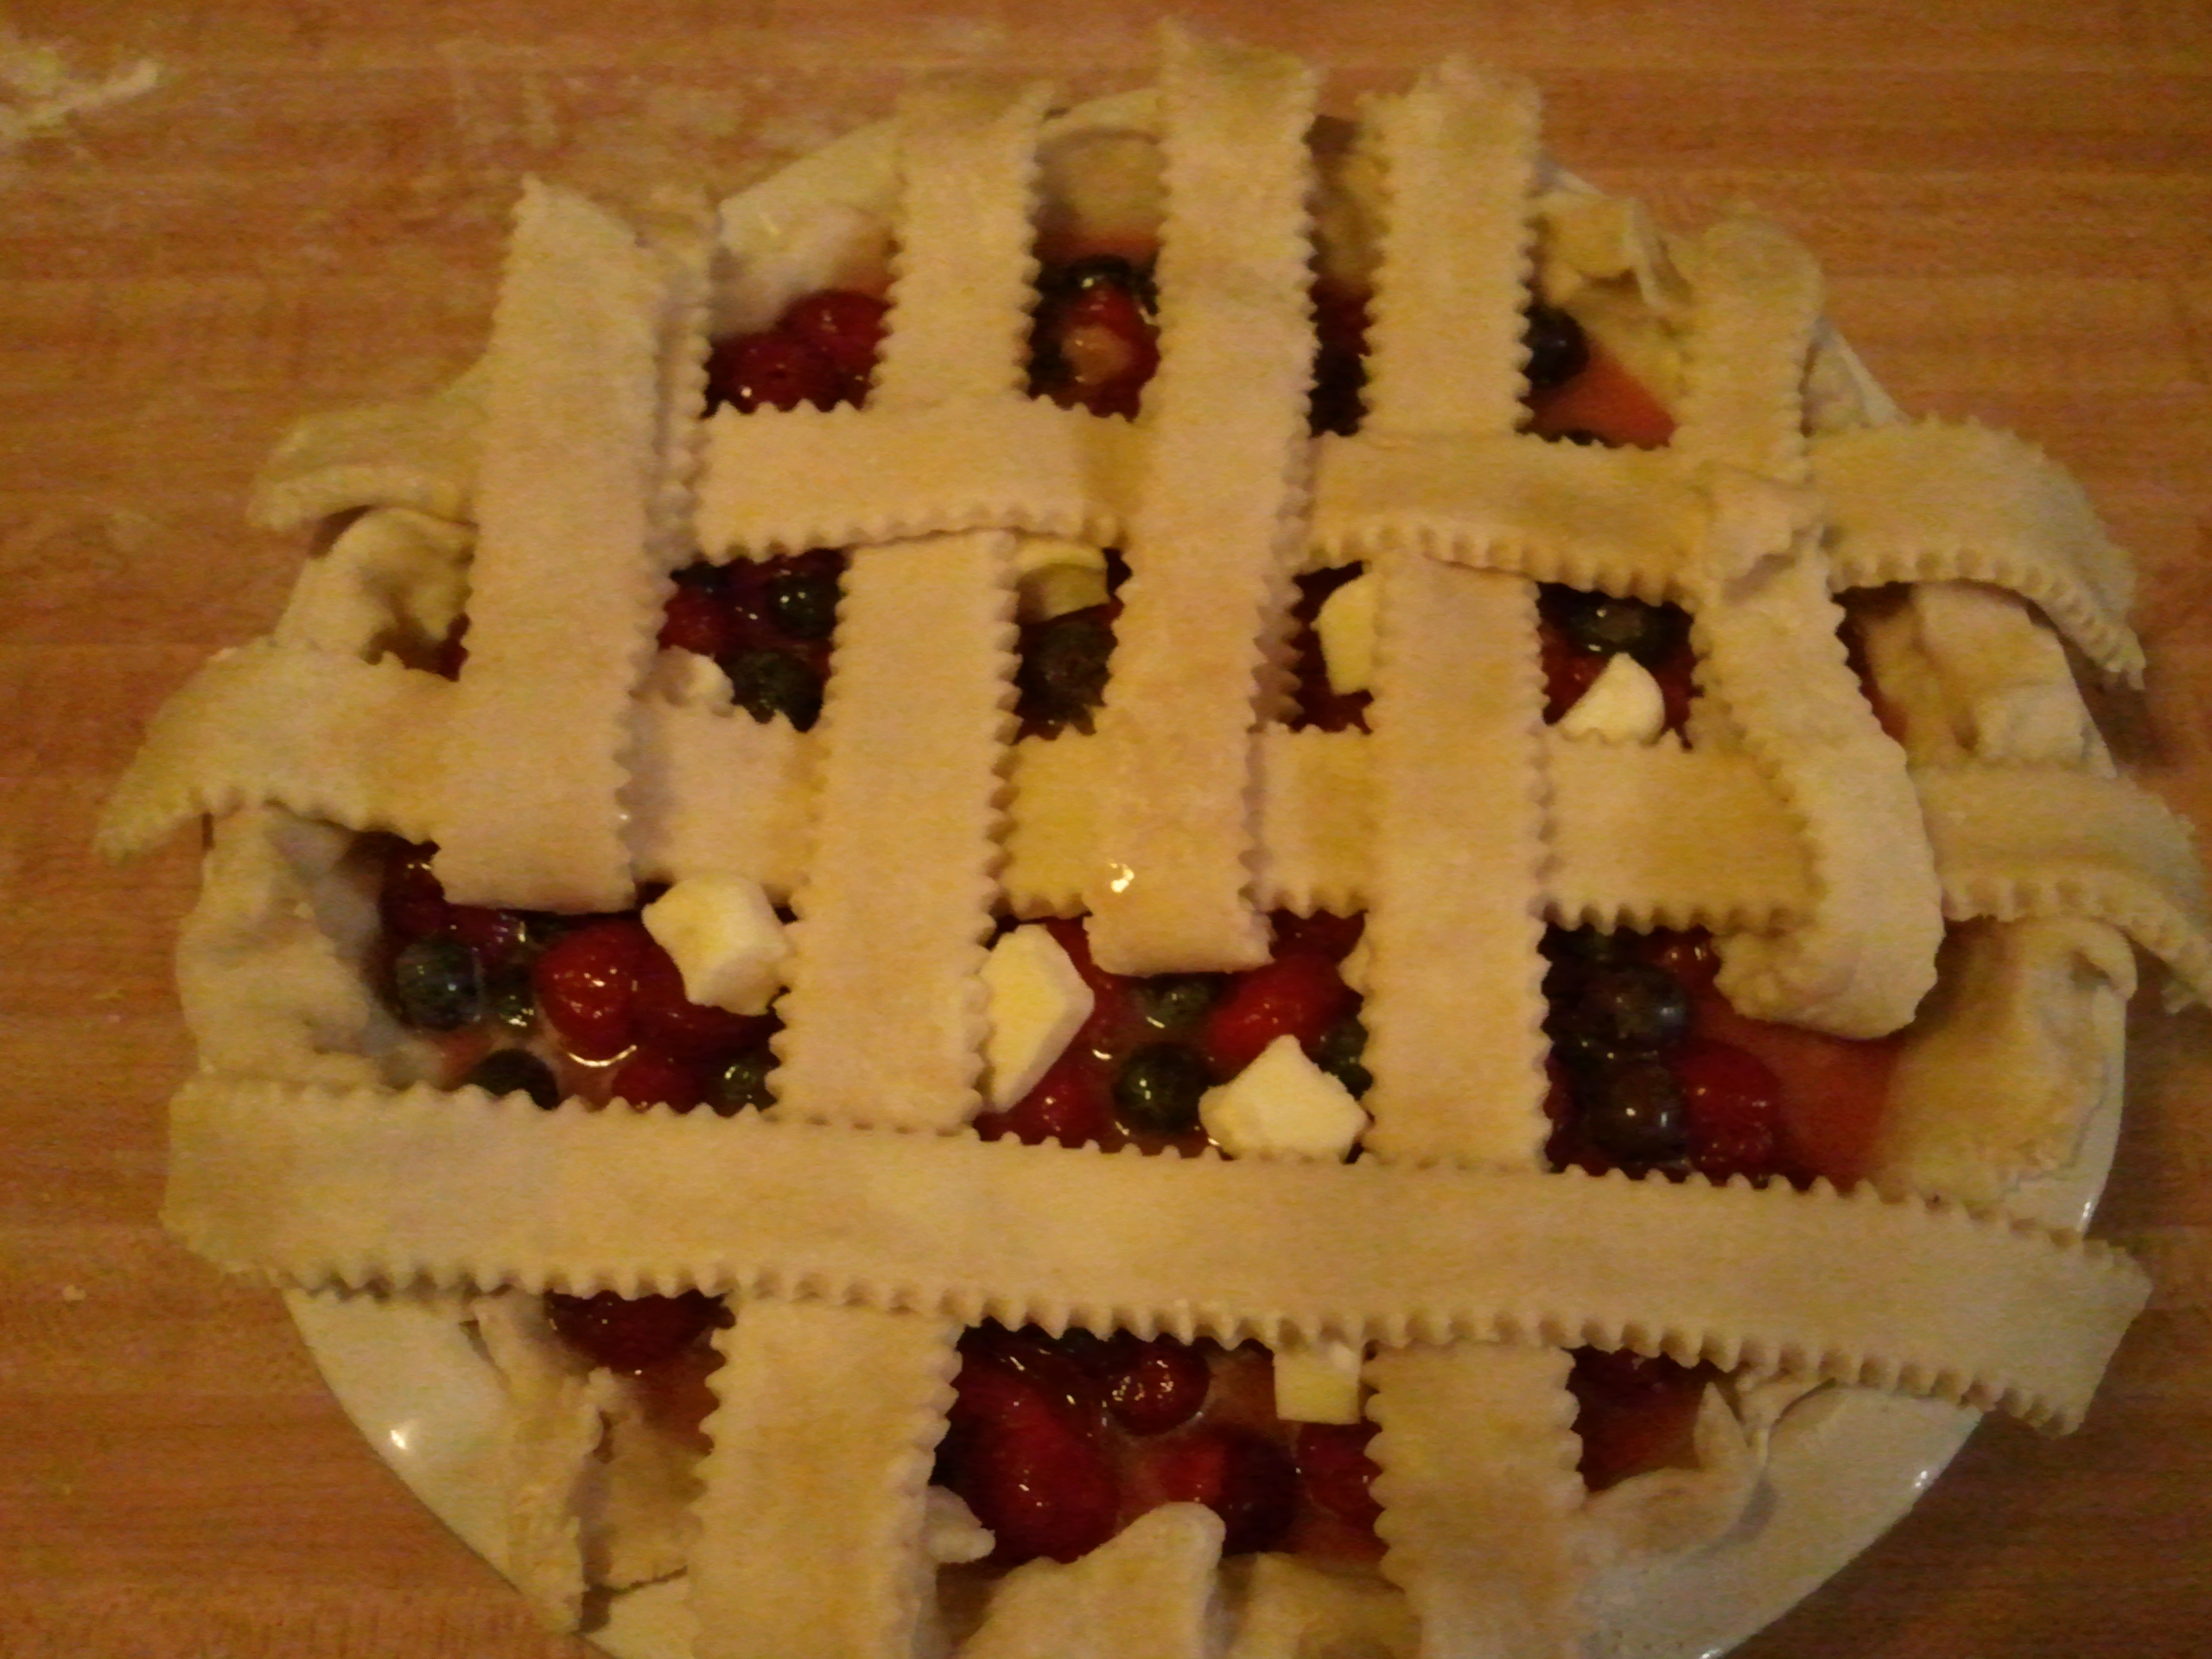
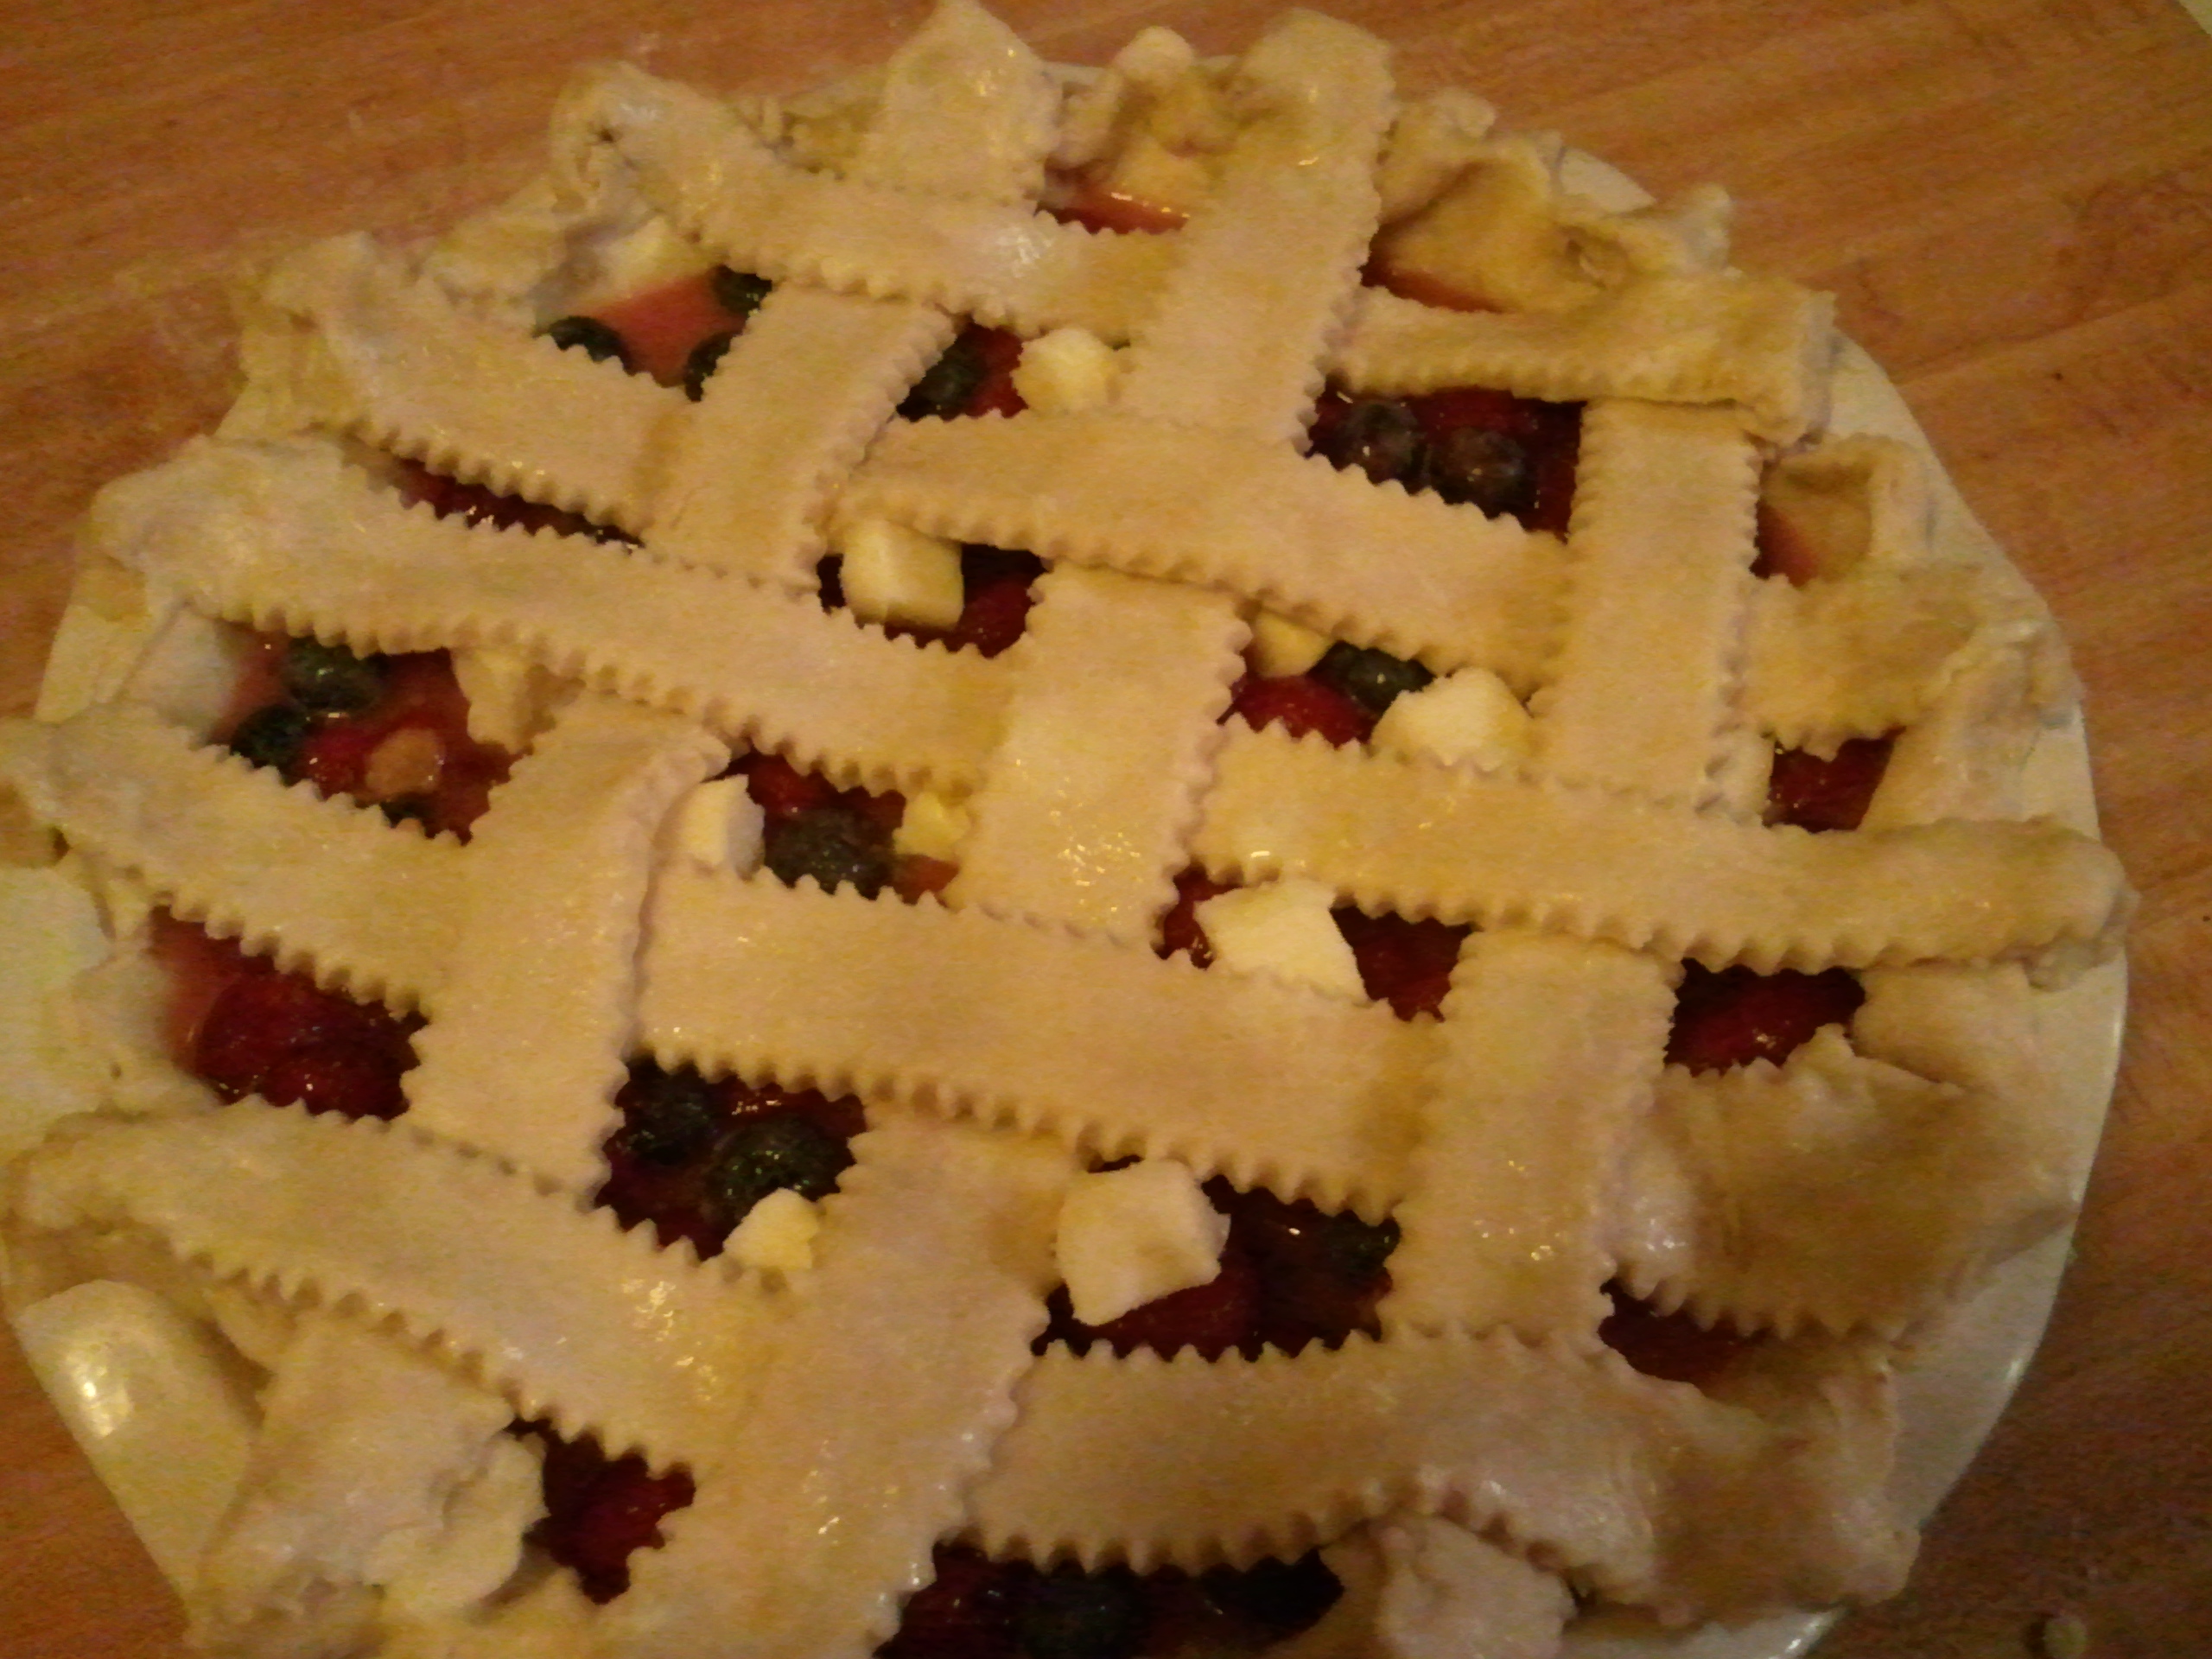
Now crimp the edges of the 2 crusts together. Brush with milk or egg wash (1 egg mixed with 1 Tbsp milk or water) and sprinkle with sugar, if desired.
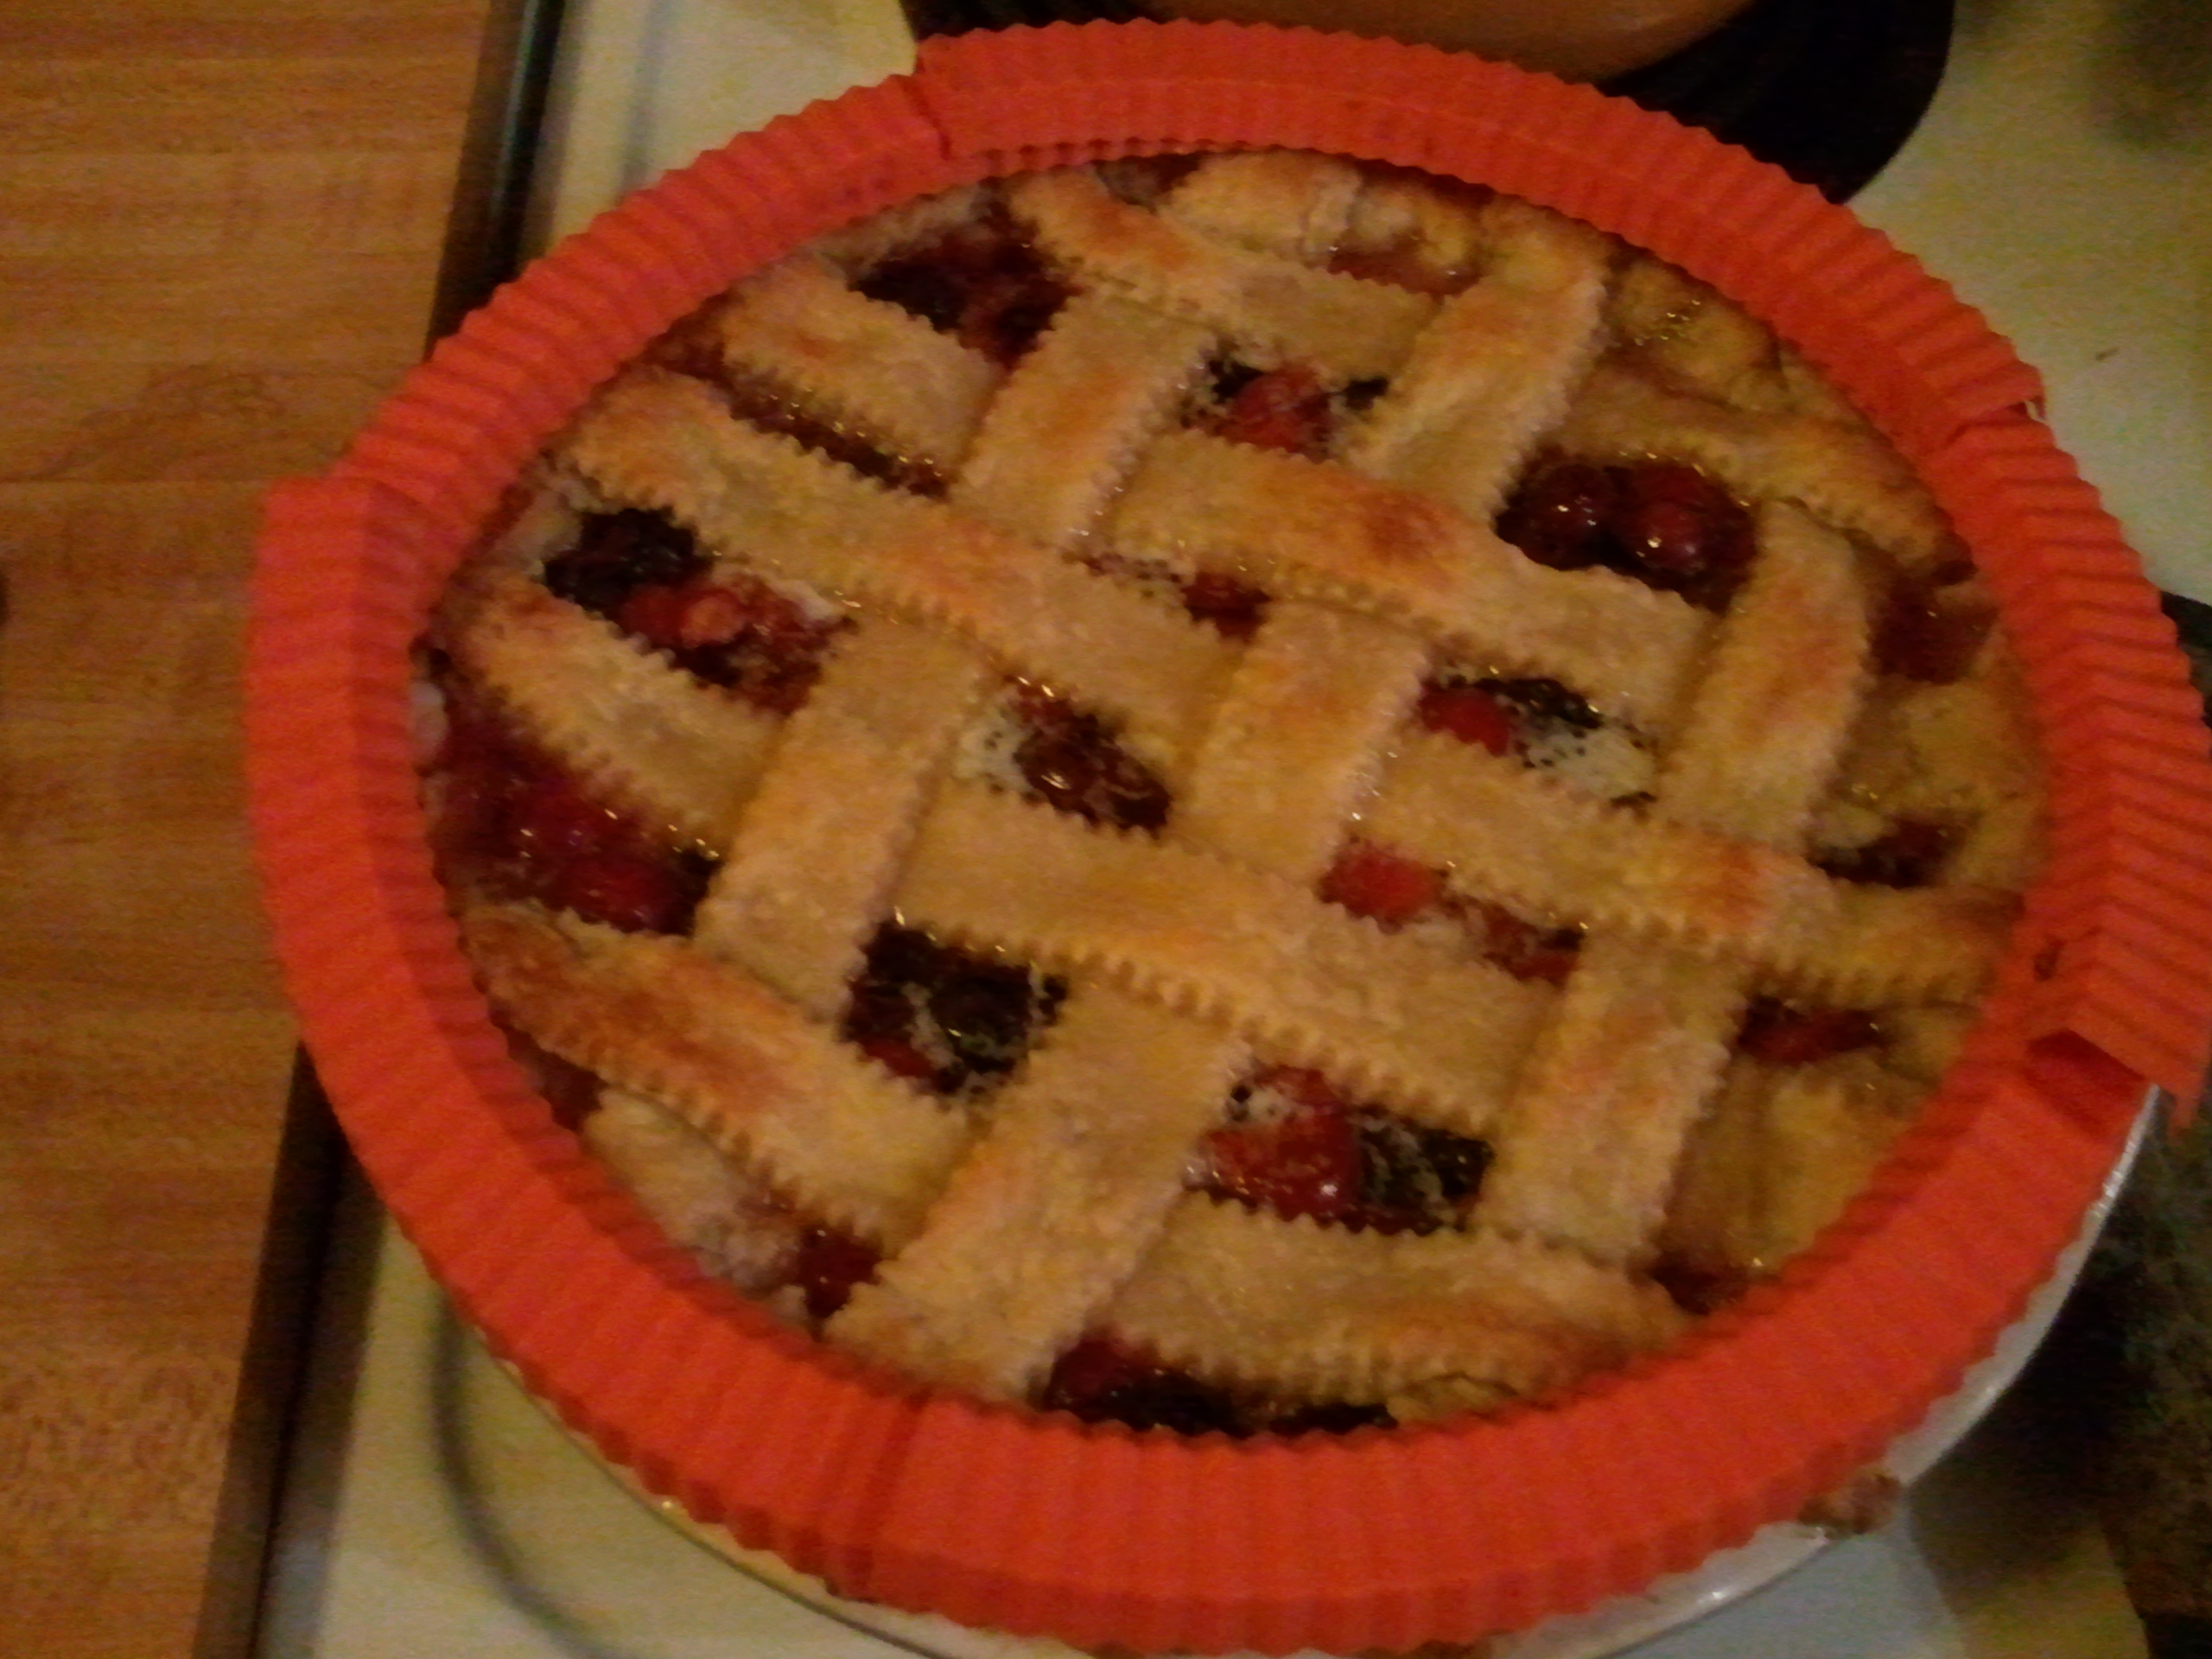
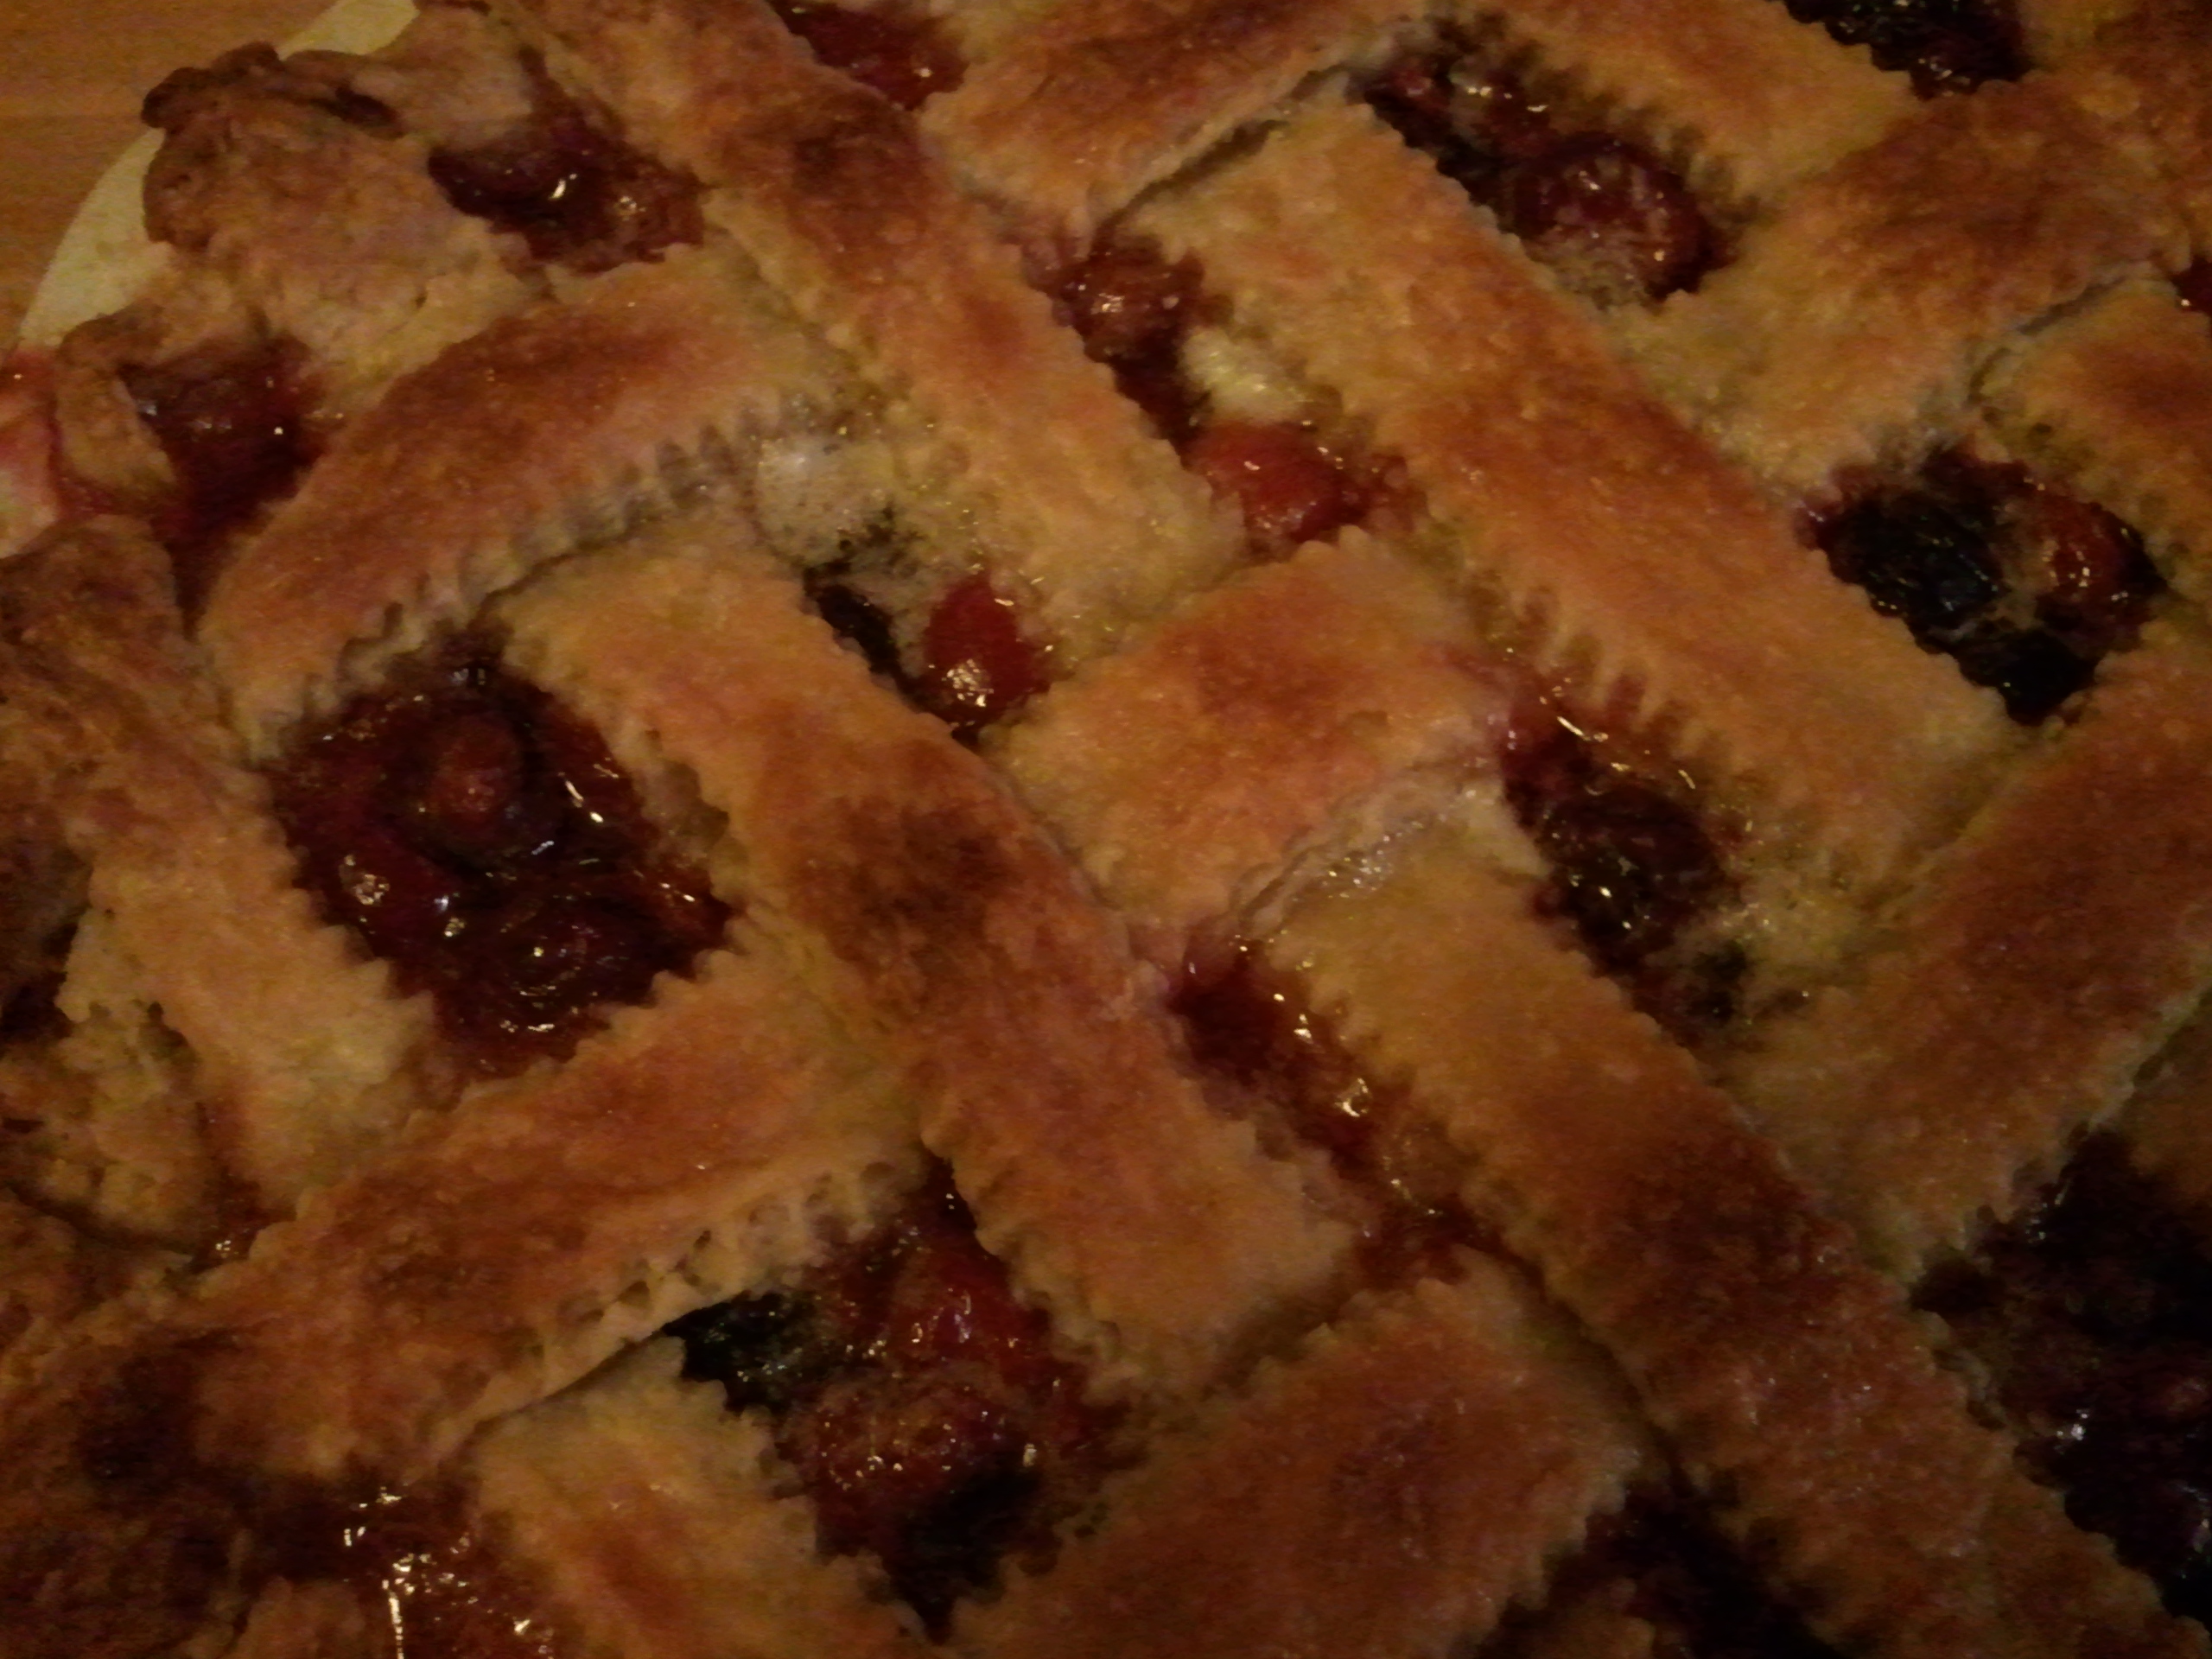
When you make fruit pies, it’s always a good idea to put a foil-lined baking sheet on a rack beneath the pie to catch the inevitable spillover when the fruit juices start bubbling. About halfway through baking, you should rotate your pie too, for even browning.
You can see that the crust is starting to get good and golden, but the edges are turning a bit dark.
It’s also a good time to put pie crust shields or foil around the edge if it’s starting to brown too quickly.
You can use silicone pie crust shields like these, or create your own by tenting foil around the edges.
As always, allow for the pie to cool, overnight if you can stand it, before cutting into it. This will give the juices time to set, so you’re not eating berry soup over a soggy crust.
Flaky crust of deliciousness…I’m guessing.
I wish I could tell you what bluecherry pie tastes like, but I didn’t eat my dinner (grilled skirt steak with chimichurri), so I didn’t get any. Maybe tonight. Wish me luck.
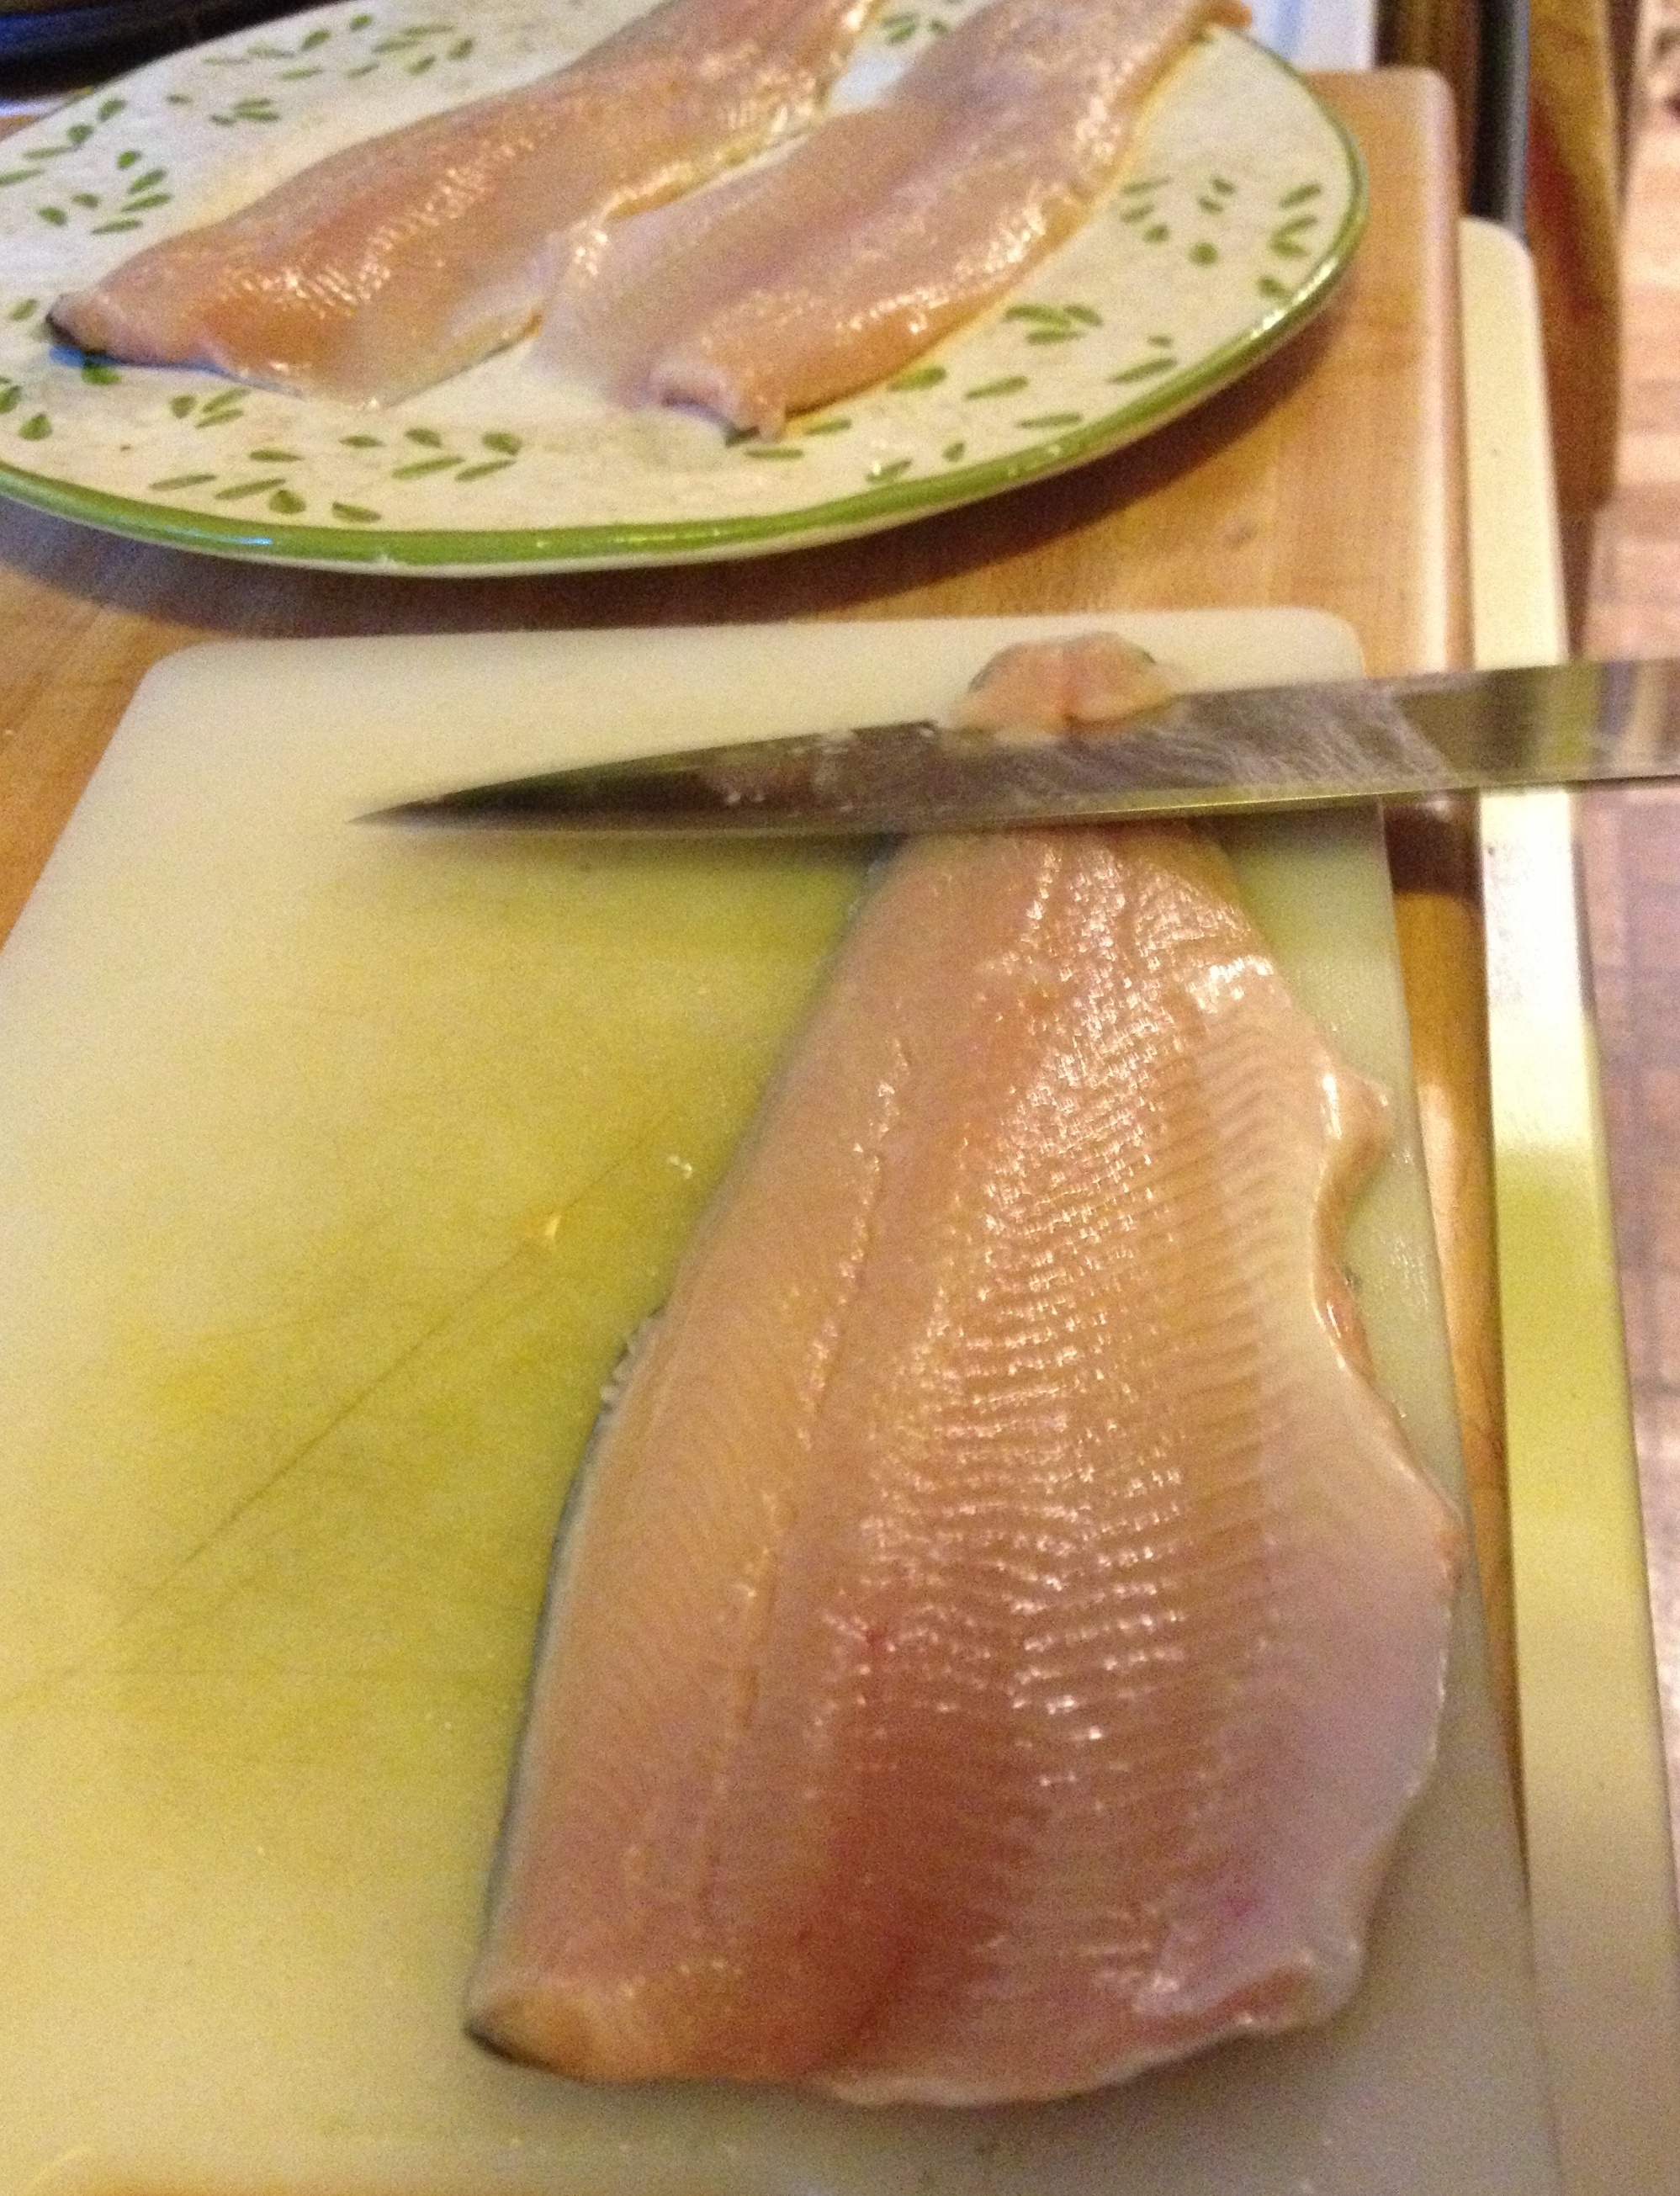
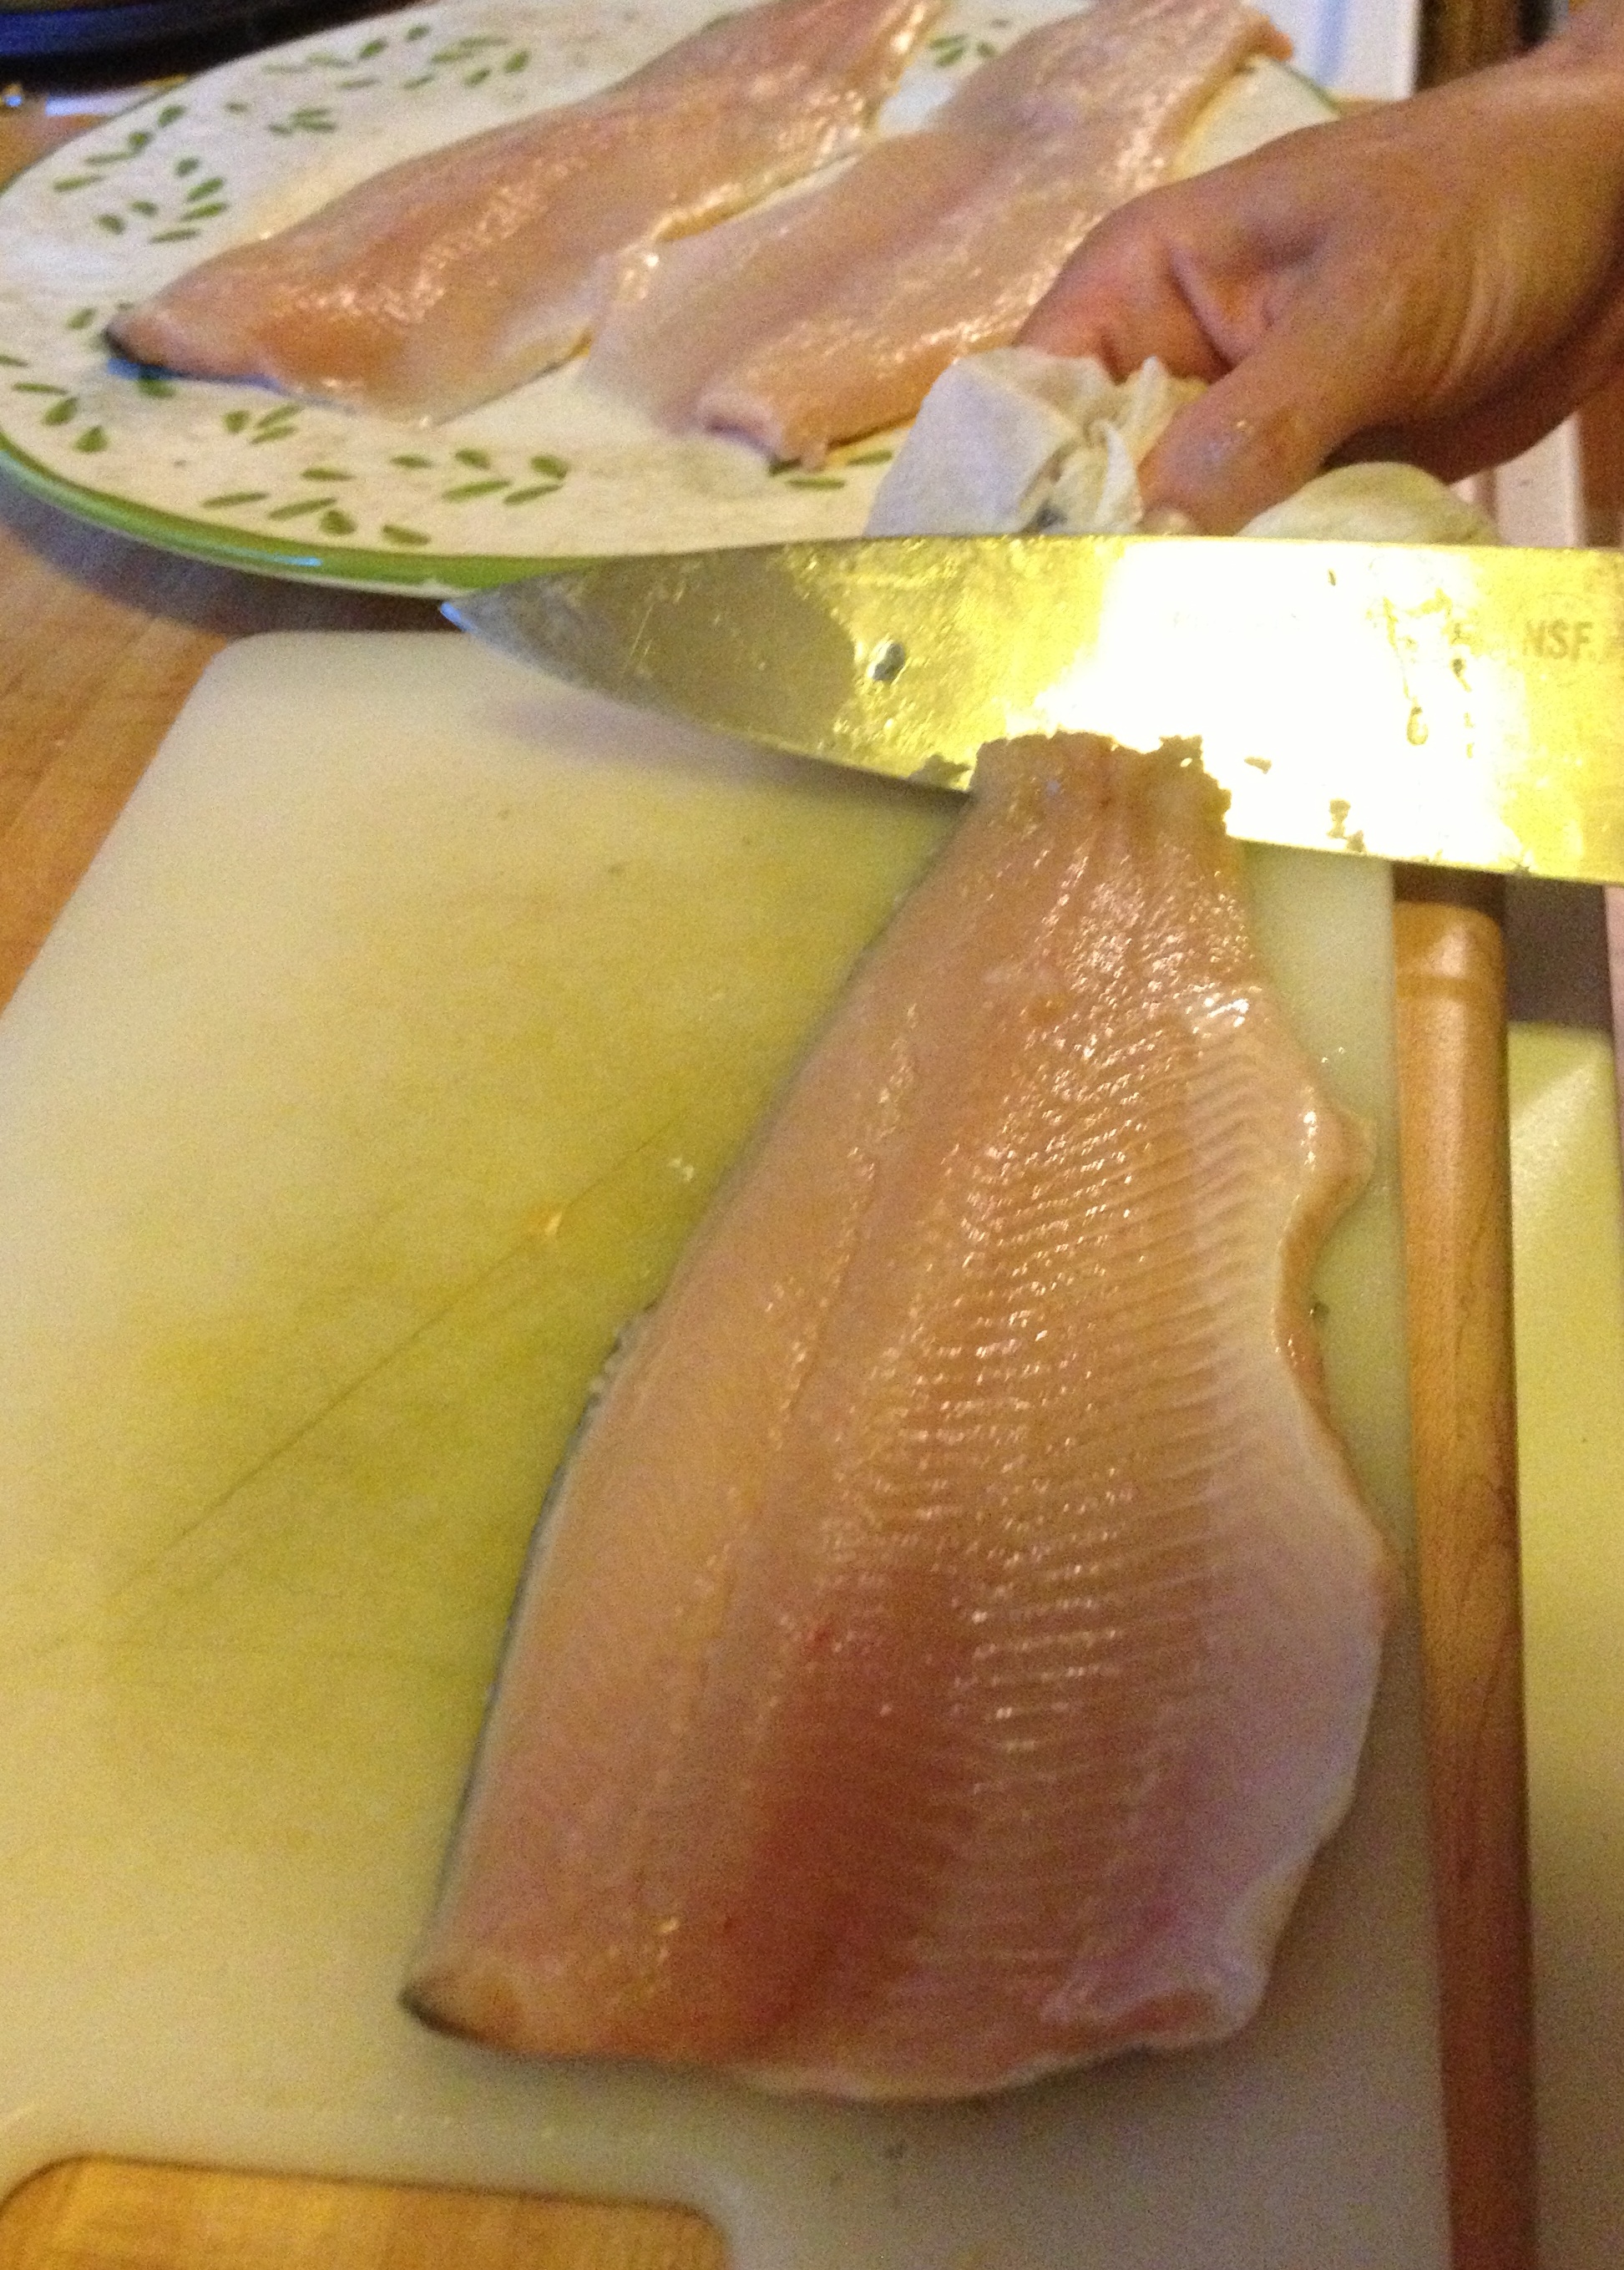
Last night, Papa made pecan-crusted rainbow trout with citrus butter from one of his and Mama’s favorite restaurants. (It was really yummy. You could taste the citrus, and the fish had a delicate crust.) Mama brought home fillets with the skin on, and I thought I’d show you how simple it is to remove, in case that sort of thing makes you squeamish. You can always ask the fishmonger (isn’t that a funny word?) to do it for you, or choose skinless varieties, but don’t let a little skin on a fish keep you from trying it!
Start with a cutting board and a sharp knife—not a serrated one. A boning knife is ideal, but Mama likes using her chef’s knife for most things. If your fillet is really thick, like from a fat old salmon, lay an edge of the fillet flush with the edge of the cutting board closest to you. This is less important if you have a skinny fillet, but Mama still likes to line them up. Position the tail (narrow) end toward your non-dominant hand. Mama’s left handed, so the tail is toward her right.
About ½” from the tail, take your knife and put a little notch in the tail, in the direction of the tail’s tip. Mama’s cutting a wee tab, heading toward the right, or the tip.
Now pivot your knife so it’s headed in the opposite direction. Keep it in that notch you just made. You made it just for this purpose! Because fish are slippery, use a paper towel (or kitchen towel if you don’t mind) and grip the tail (the tip on the other side of your freshly made notch) between your thumb and first finger. Mama uses the side of her knuckle, but do whatever feels most comfortable. You need to get a good grip. Her knife is now facing left, toward the body of the fillet.
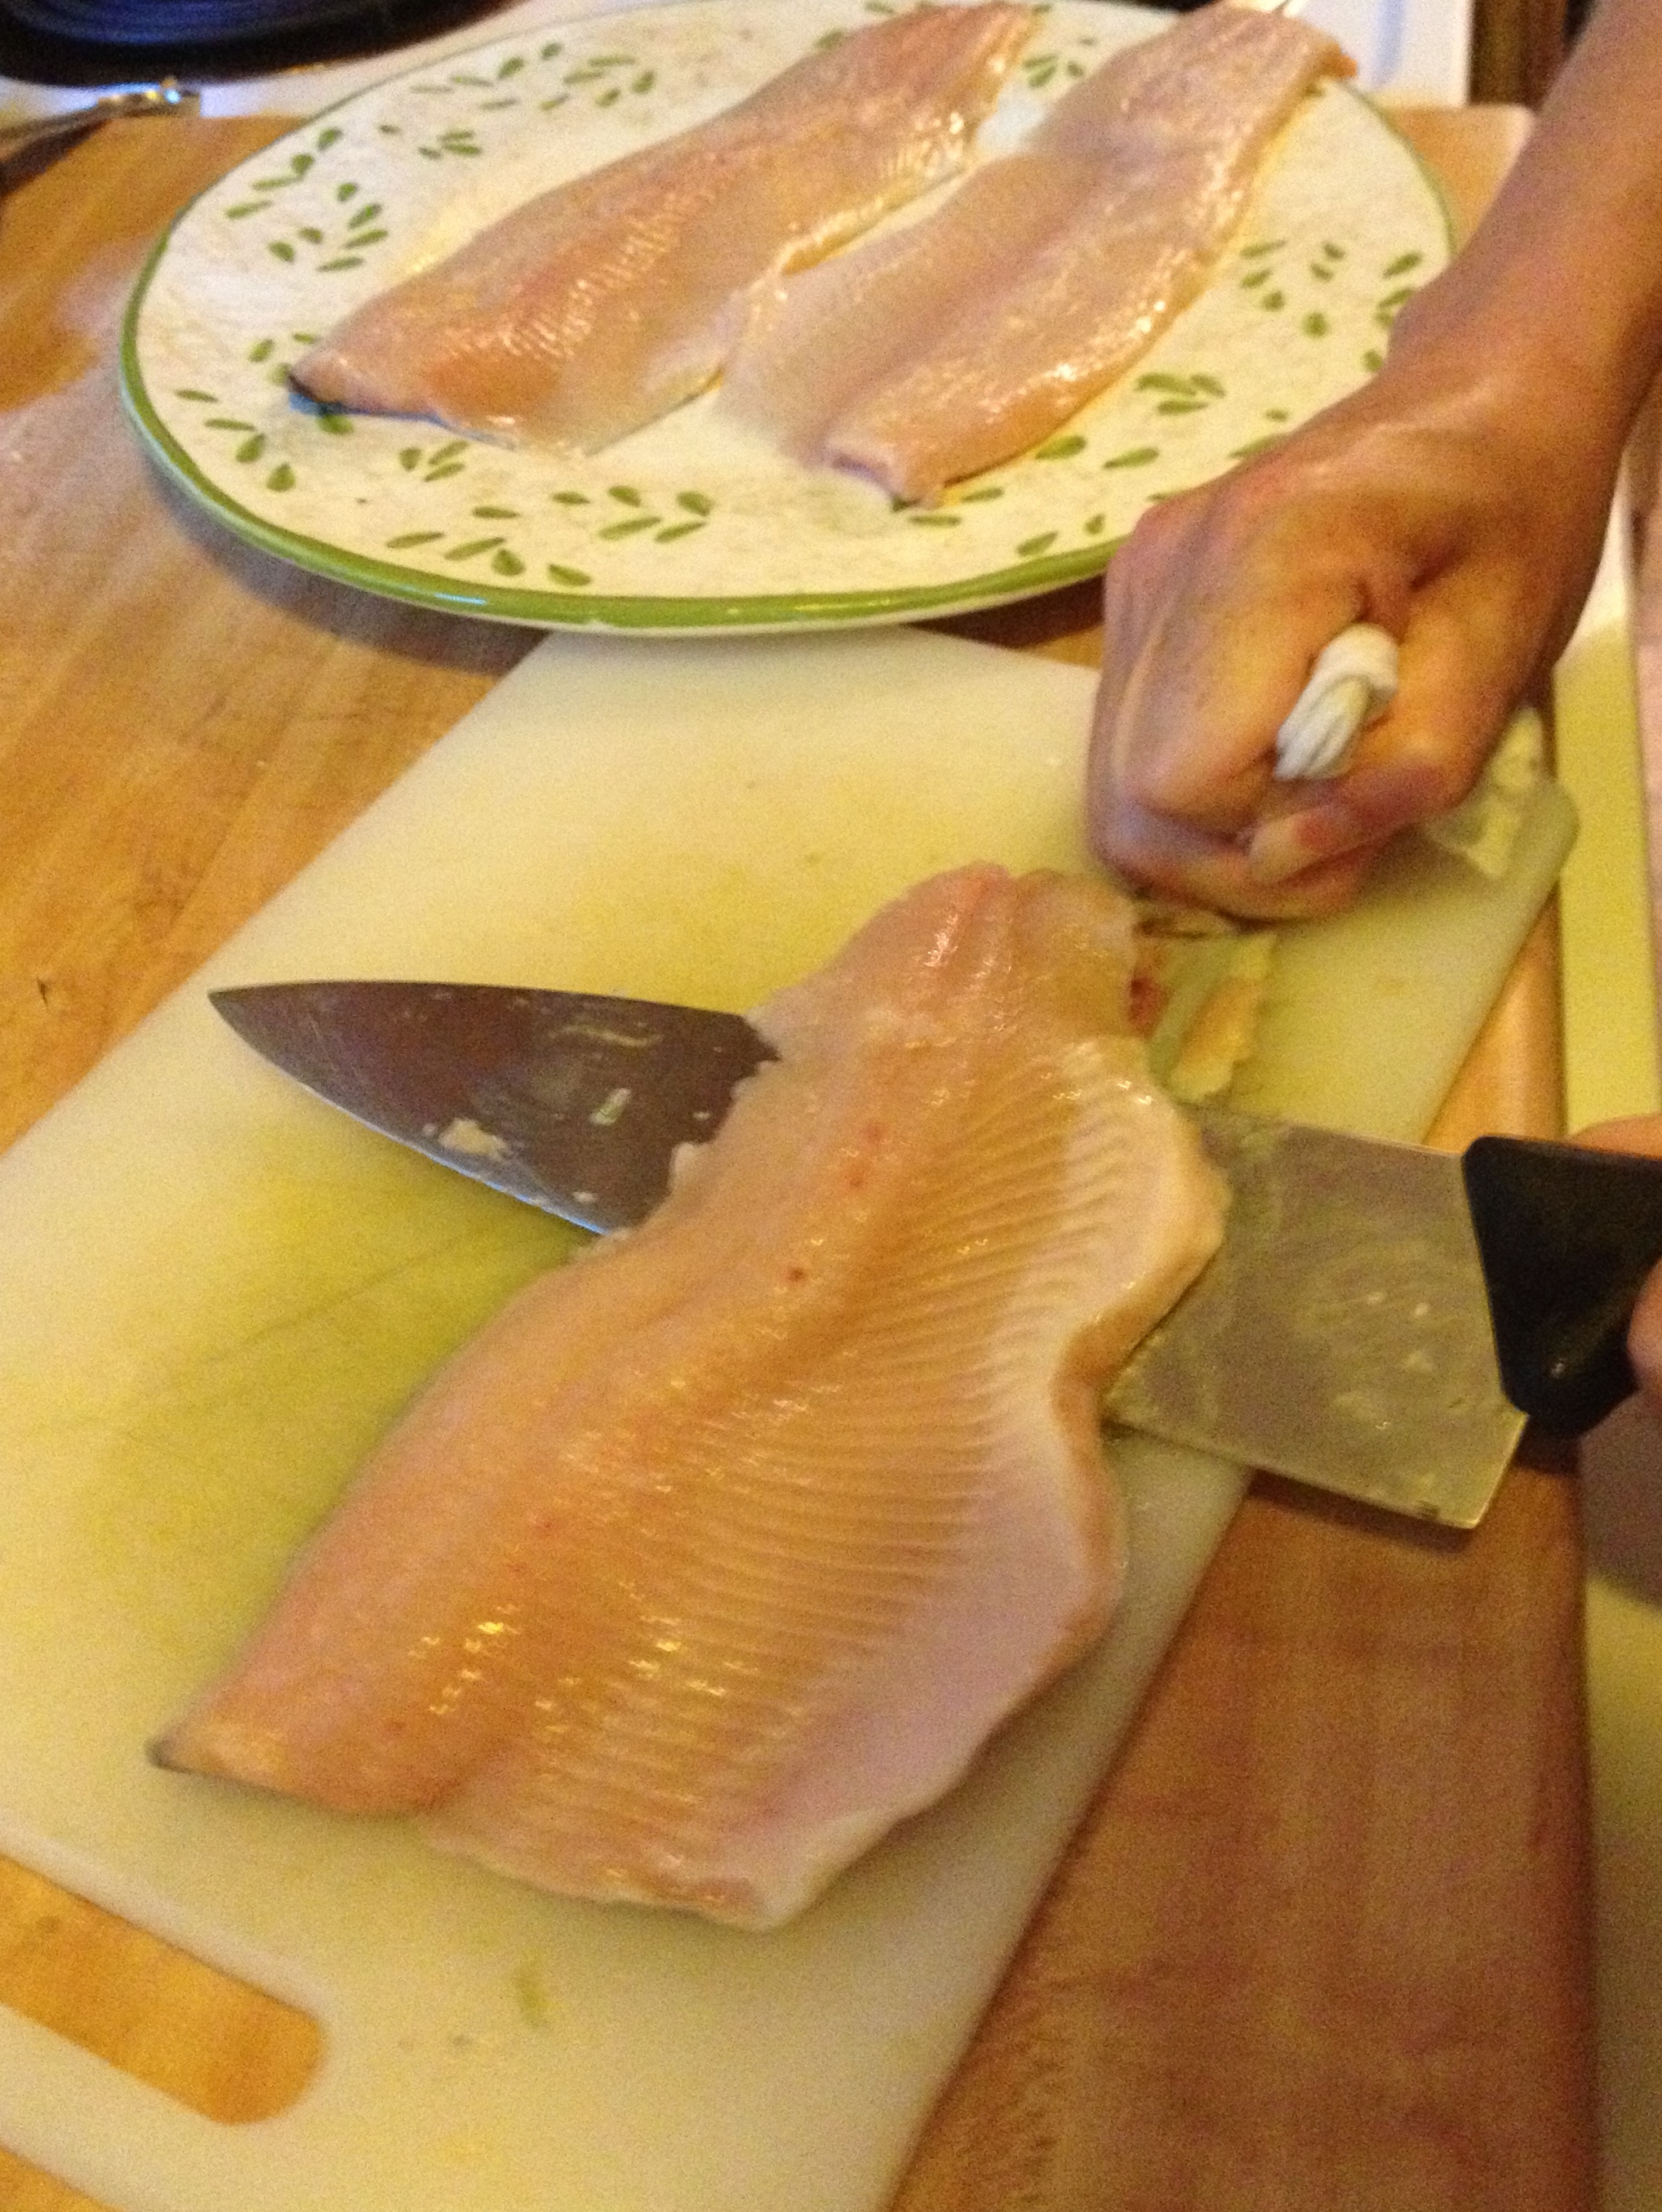
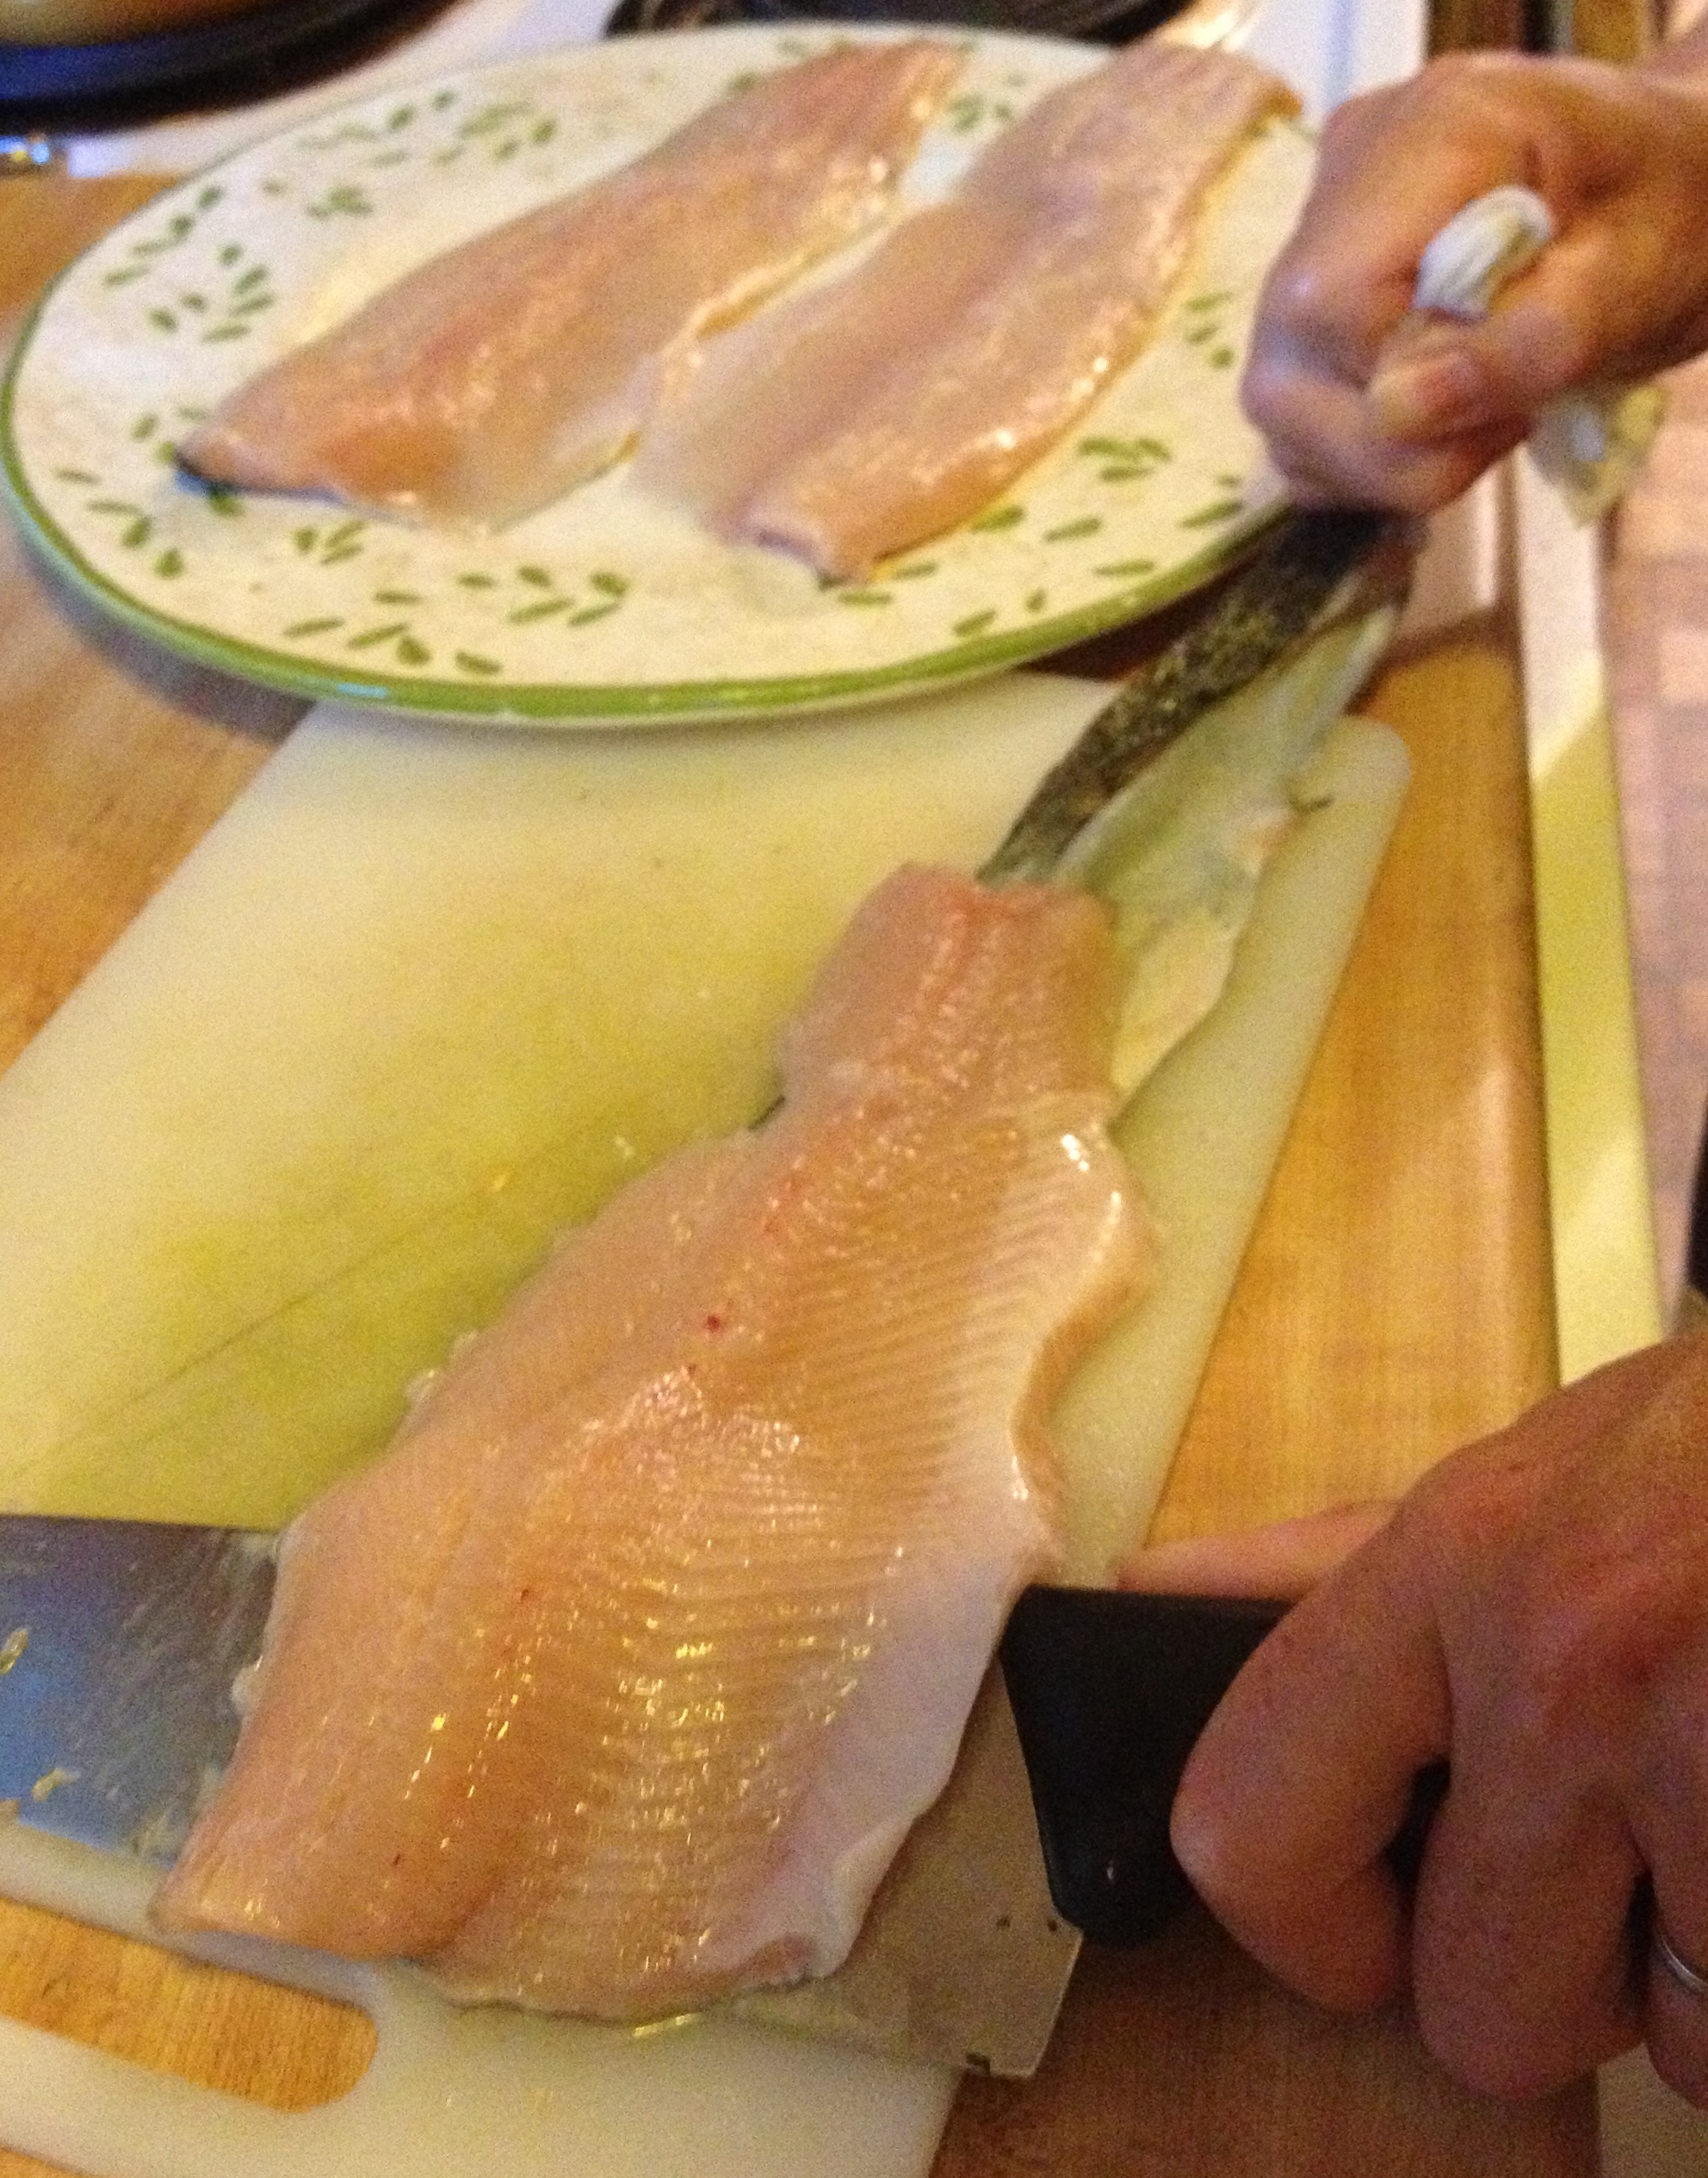
Now comes the amazing part. With the tail gripped in your non-dominant hand, and your knife’s blade at an angle (think of a shovel moving snow), pull the tail in one direction while pushing your knife in the other.
For Mama, she’s pulling the tail toward her right and pushing her knife toward her left, while skimming her knife along the inside of the skin. She’s basically scraping the flesh off the skin, but really, it’s the pulling of the tail that’s doing most of the work.
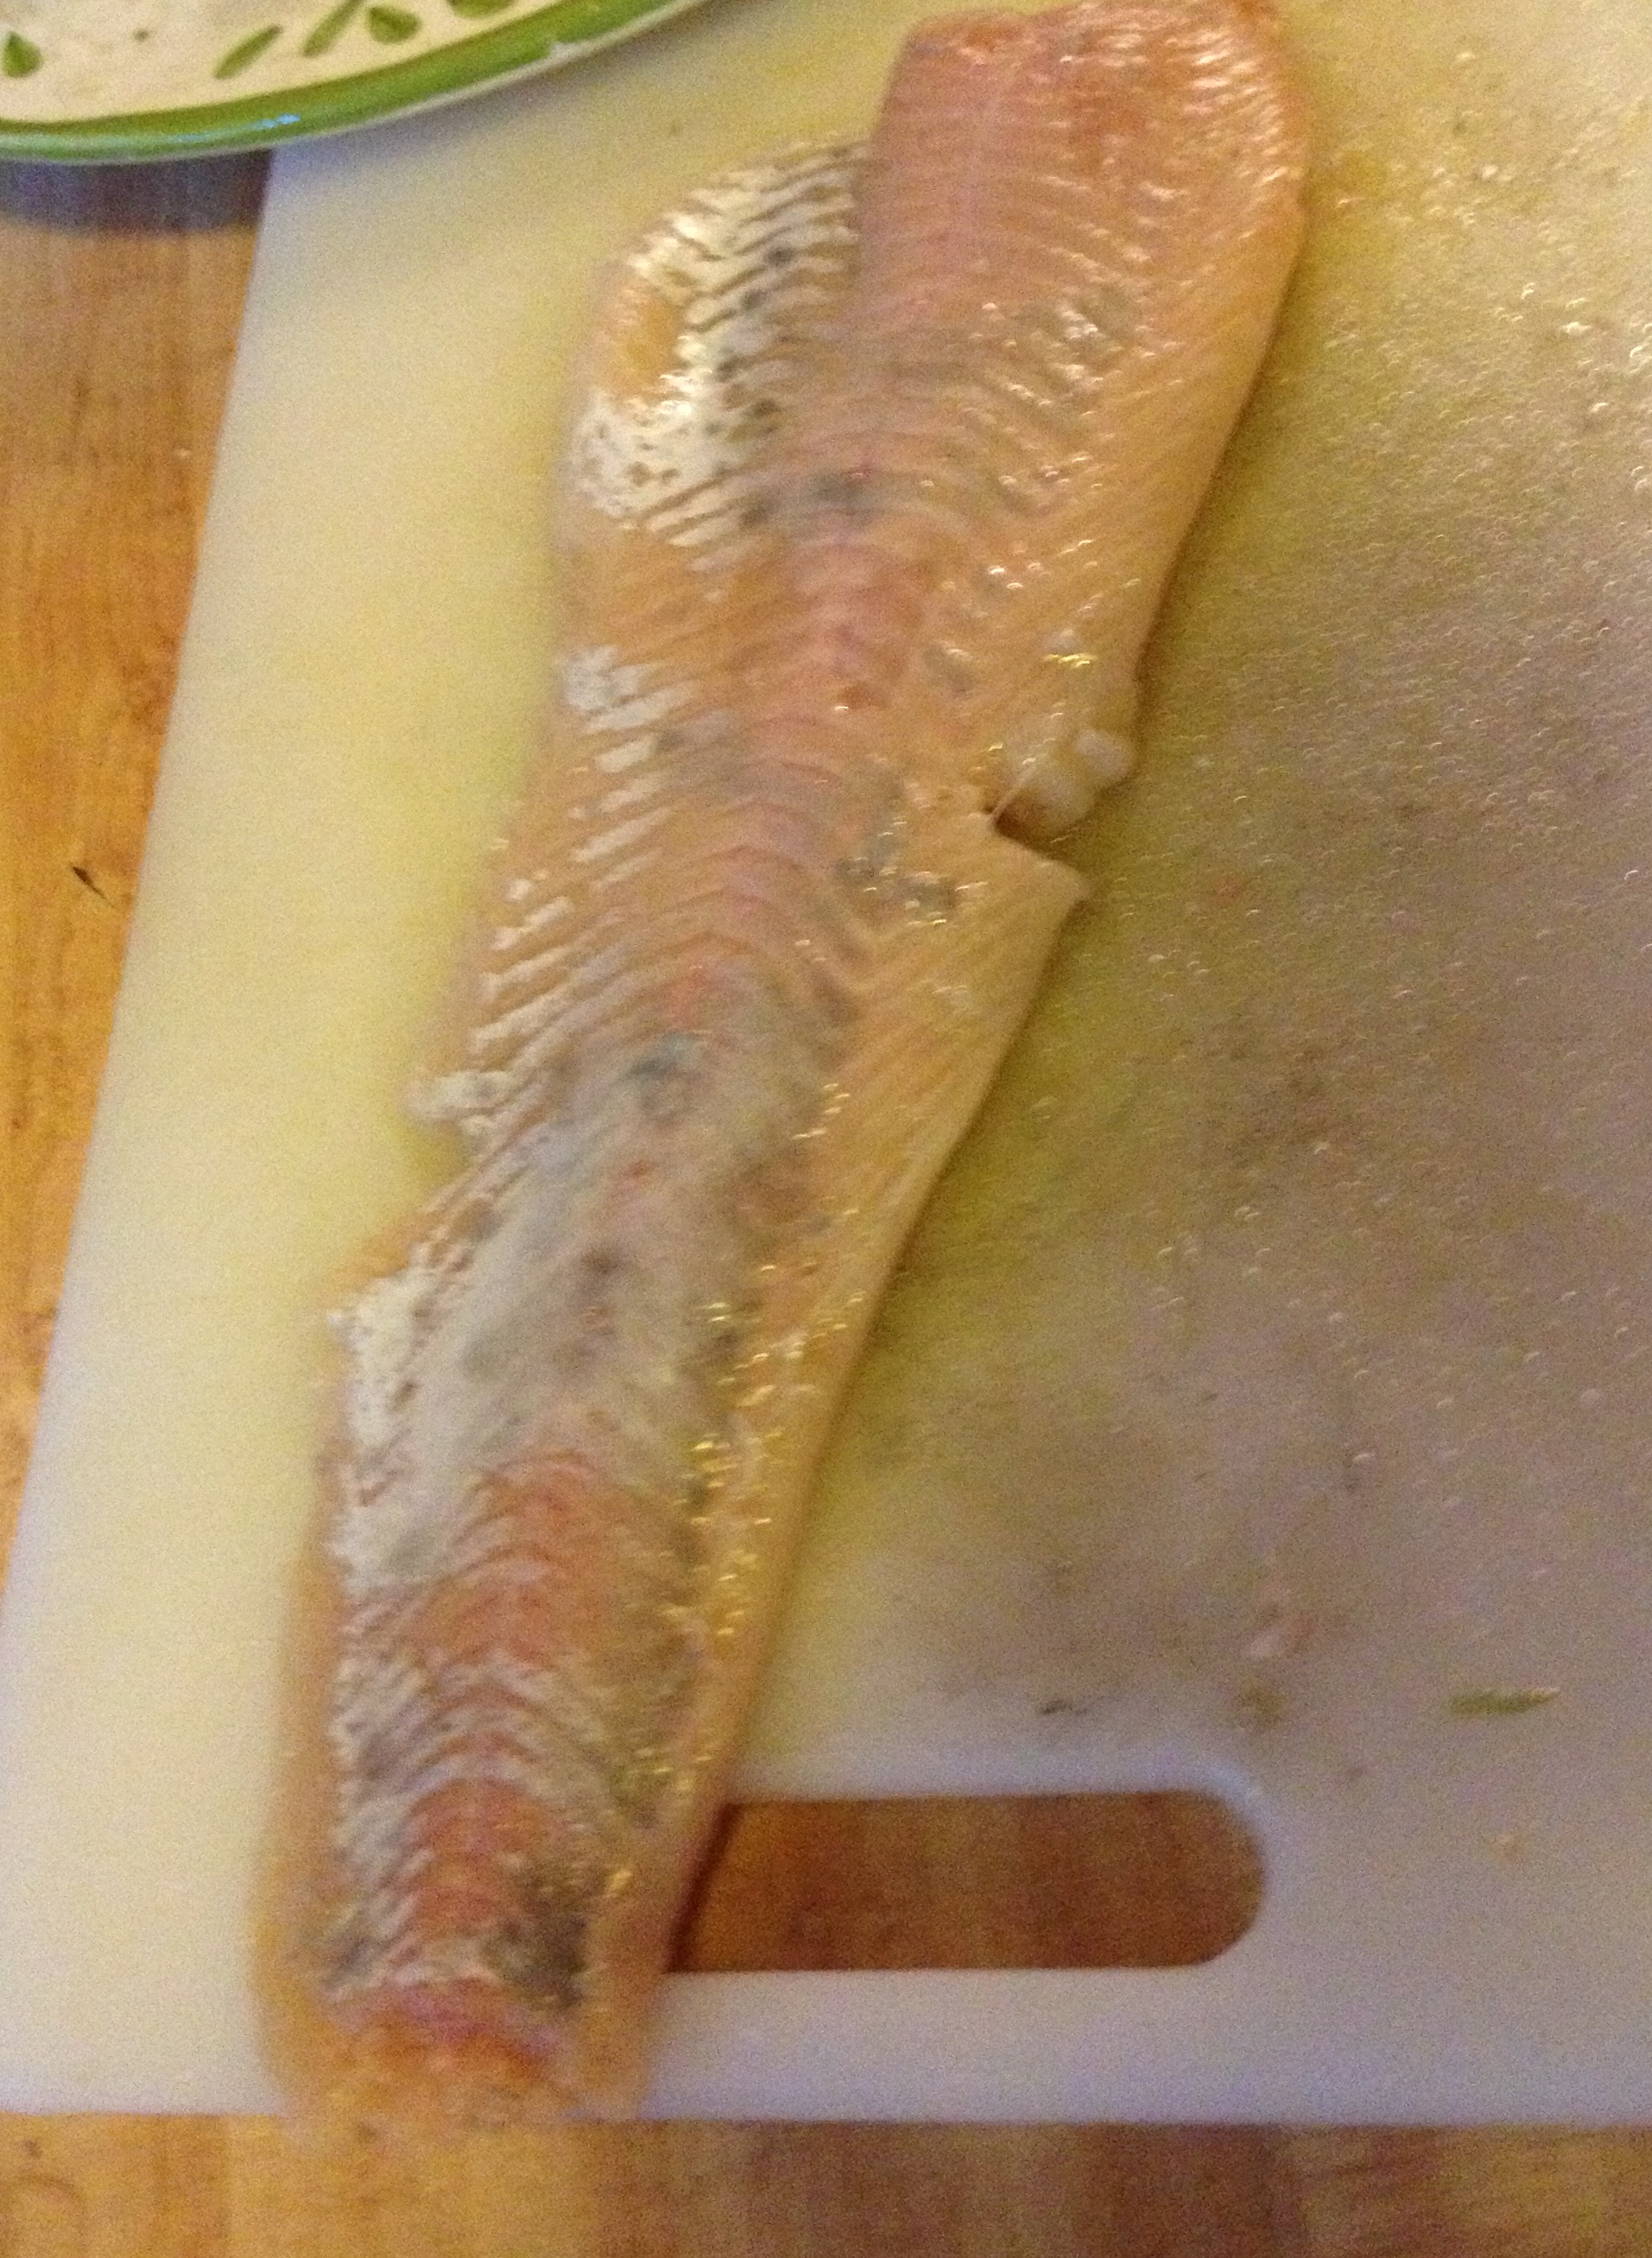
And that’s it! It took longer to take these pictures than it did to skin the remaining fillets. Those bits of silver don’t amount to much and will essentially cook off. (They’re not hunks of scales, if that’s what you’re worried about.)
This method works on any size fillet. If you try this technique and you find that it’s just not working, Mama suggests a sawing, back-and-forth motion with your knife instead of pulling. This is where you’ll want your fillet and cutting board edges lined up so you can see where your knife is going—you want it to remain as parallel to the cutting board as possible so you’re not leaving unfortunate chunks of fish on the skin.
Incidentally, Mama grilled asparagus (love it!), sweet peppers (yucky!), and fresh peaches picked from a local farm (wow!) to serve with the buttery fish. I liked this dinner very much.
Mama sure loves her some sour cherries. She waits all year for them, and it’s often hit or miss because we’re usually traveling during the 1 or 2 weeks they’re available (around July 4th where we live). One year, she was so desperate for them, she bought them from a farm stand off the turnpike as we went on vacation. Last year, it was so hot that the farmer she usually buys them from told her they practically melted off the trees. Needless to say, they were both very sad about this, as was Papa, who counts Mama’s sour cherry pie among his favorites.
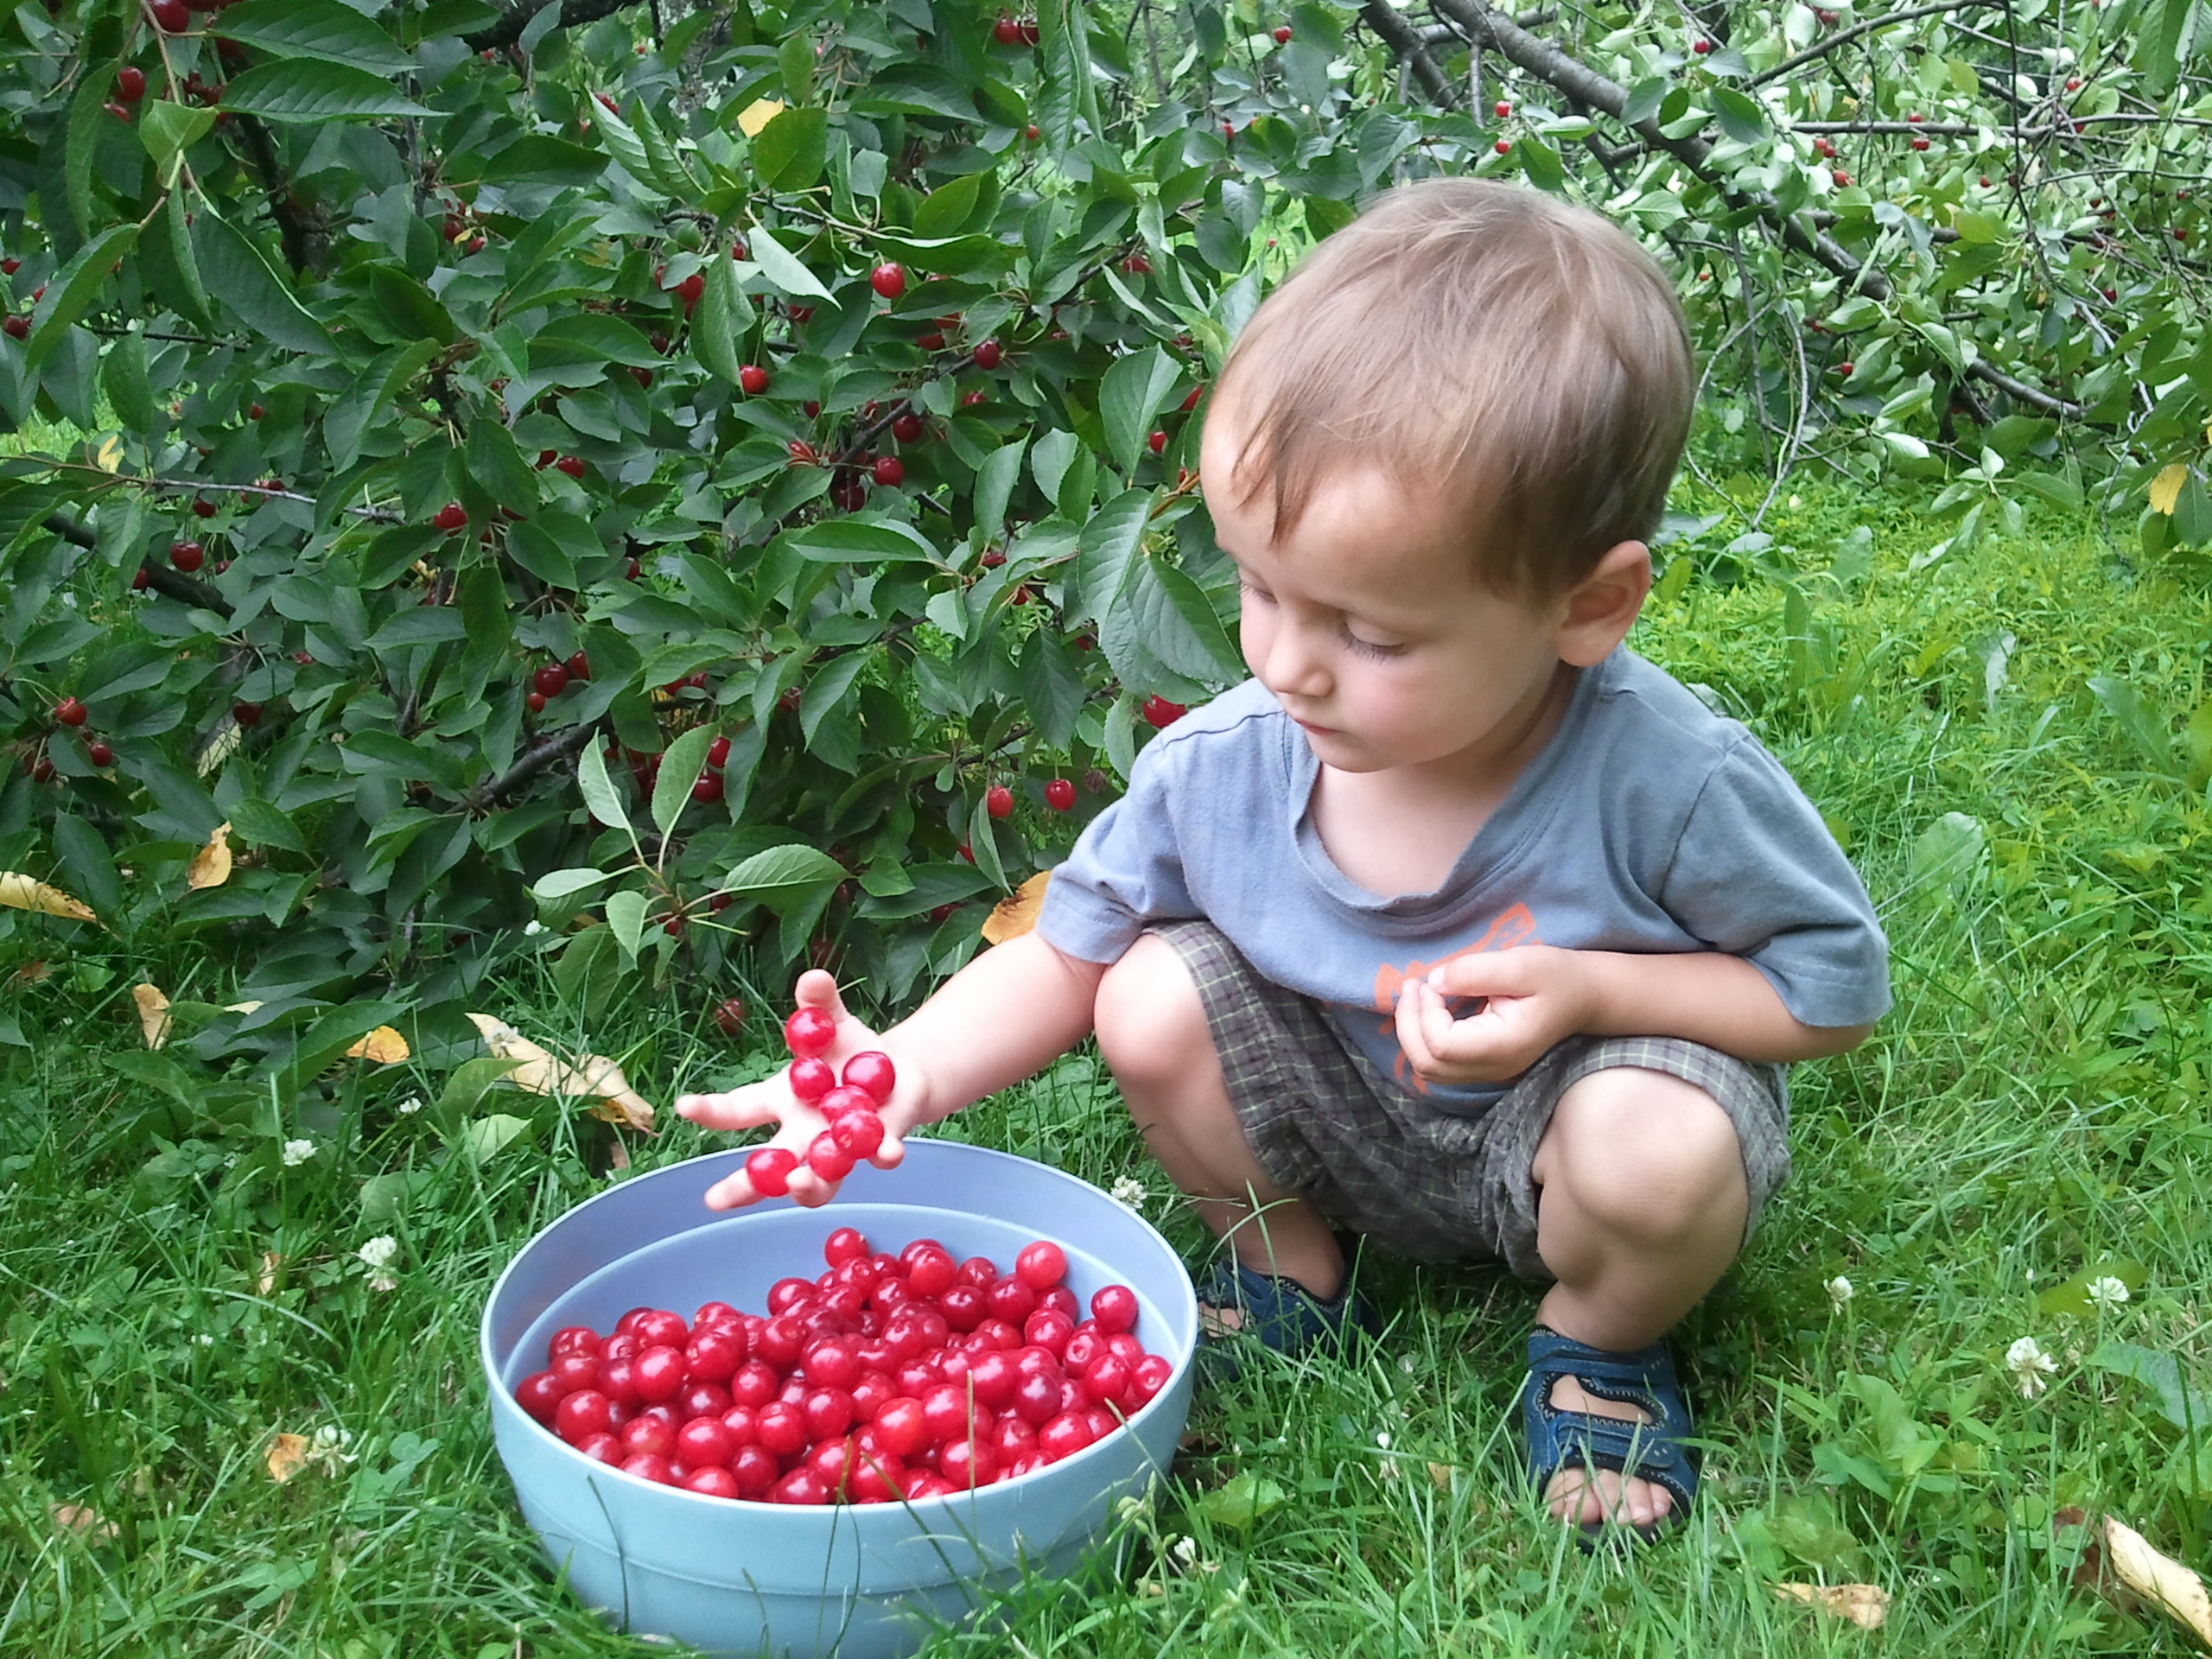
As usual, Mama was in a panic this year. We would once again be traveling, headed to a place with a growing season that’s at least a couple weeks behind ours. (I don’t know what that means, but it seemed to matter to Mama.) Then, Mama spied a sign that read “sour cherries.” It put her into hyperdrive. She saw the sign while taking Papa to the airport in the morning, then she went to work, drove all the way back home to pick me up from daycare and let out the dog, took us back to the orchard to pick the cherries before a thunderstorm hit, washed and froze a few quarts, then packed us up for our trip to visit my grandparents. Apparently sours are that important to her. And they should be to you too!
Life is like a ….
I had never been cherry picking before (though I have pickedotherthings), and it just so happened that the particular tree we picked from had split and some of its boughs hung all the way to the ground. They were perfect Jude-height for me to pick from! Mama bit a cherry for me so she could take out the pit, and she warned me that it would be sour like a lemon. And it was! I was expecting it to be sweet like the cherries I just started to enjoy, and even though I like lemons, I wasn’t too crazy about these bright red little gems.
These cherries are just the right height for me to pick.
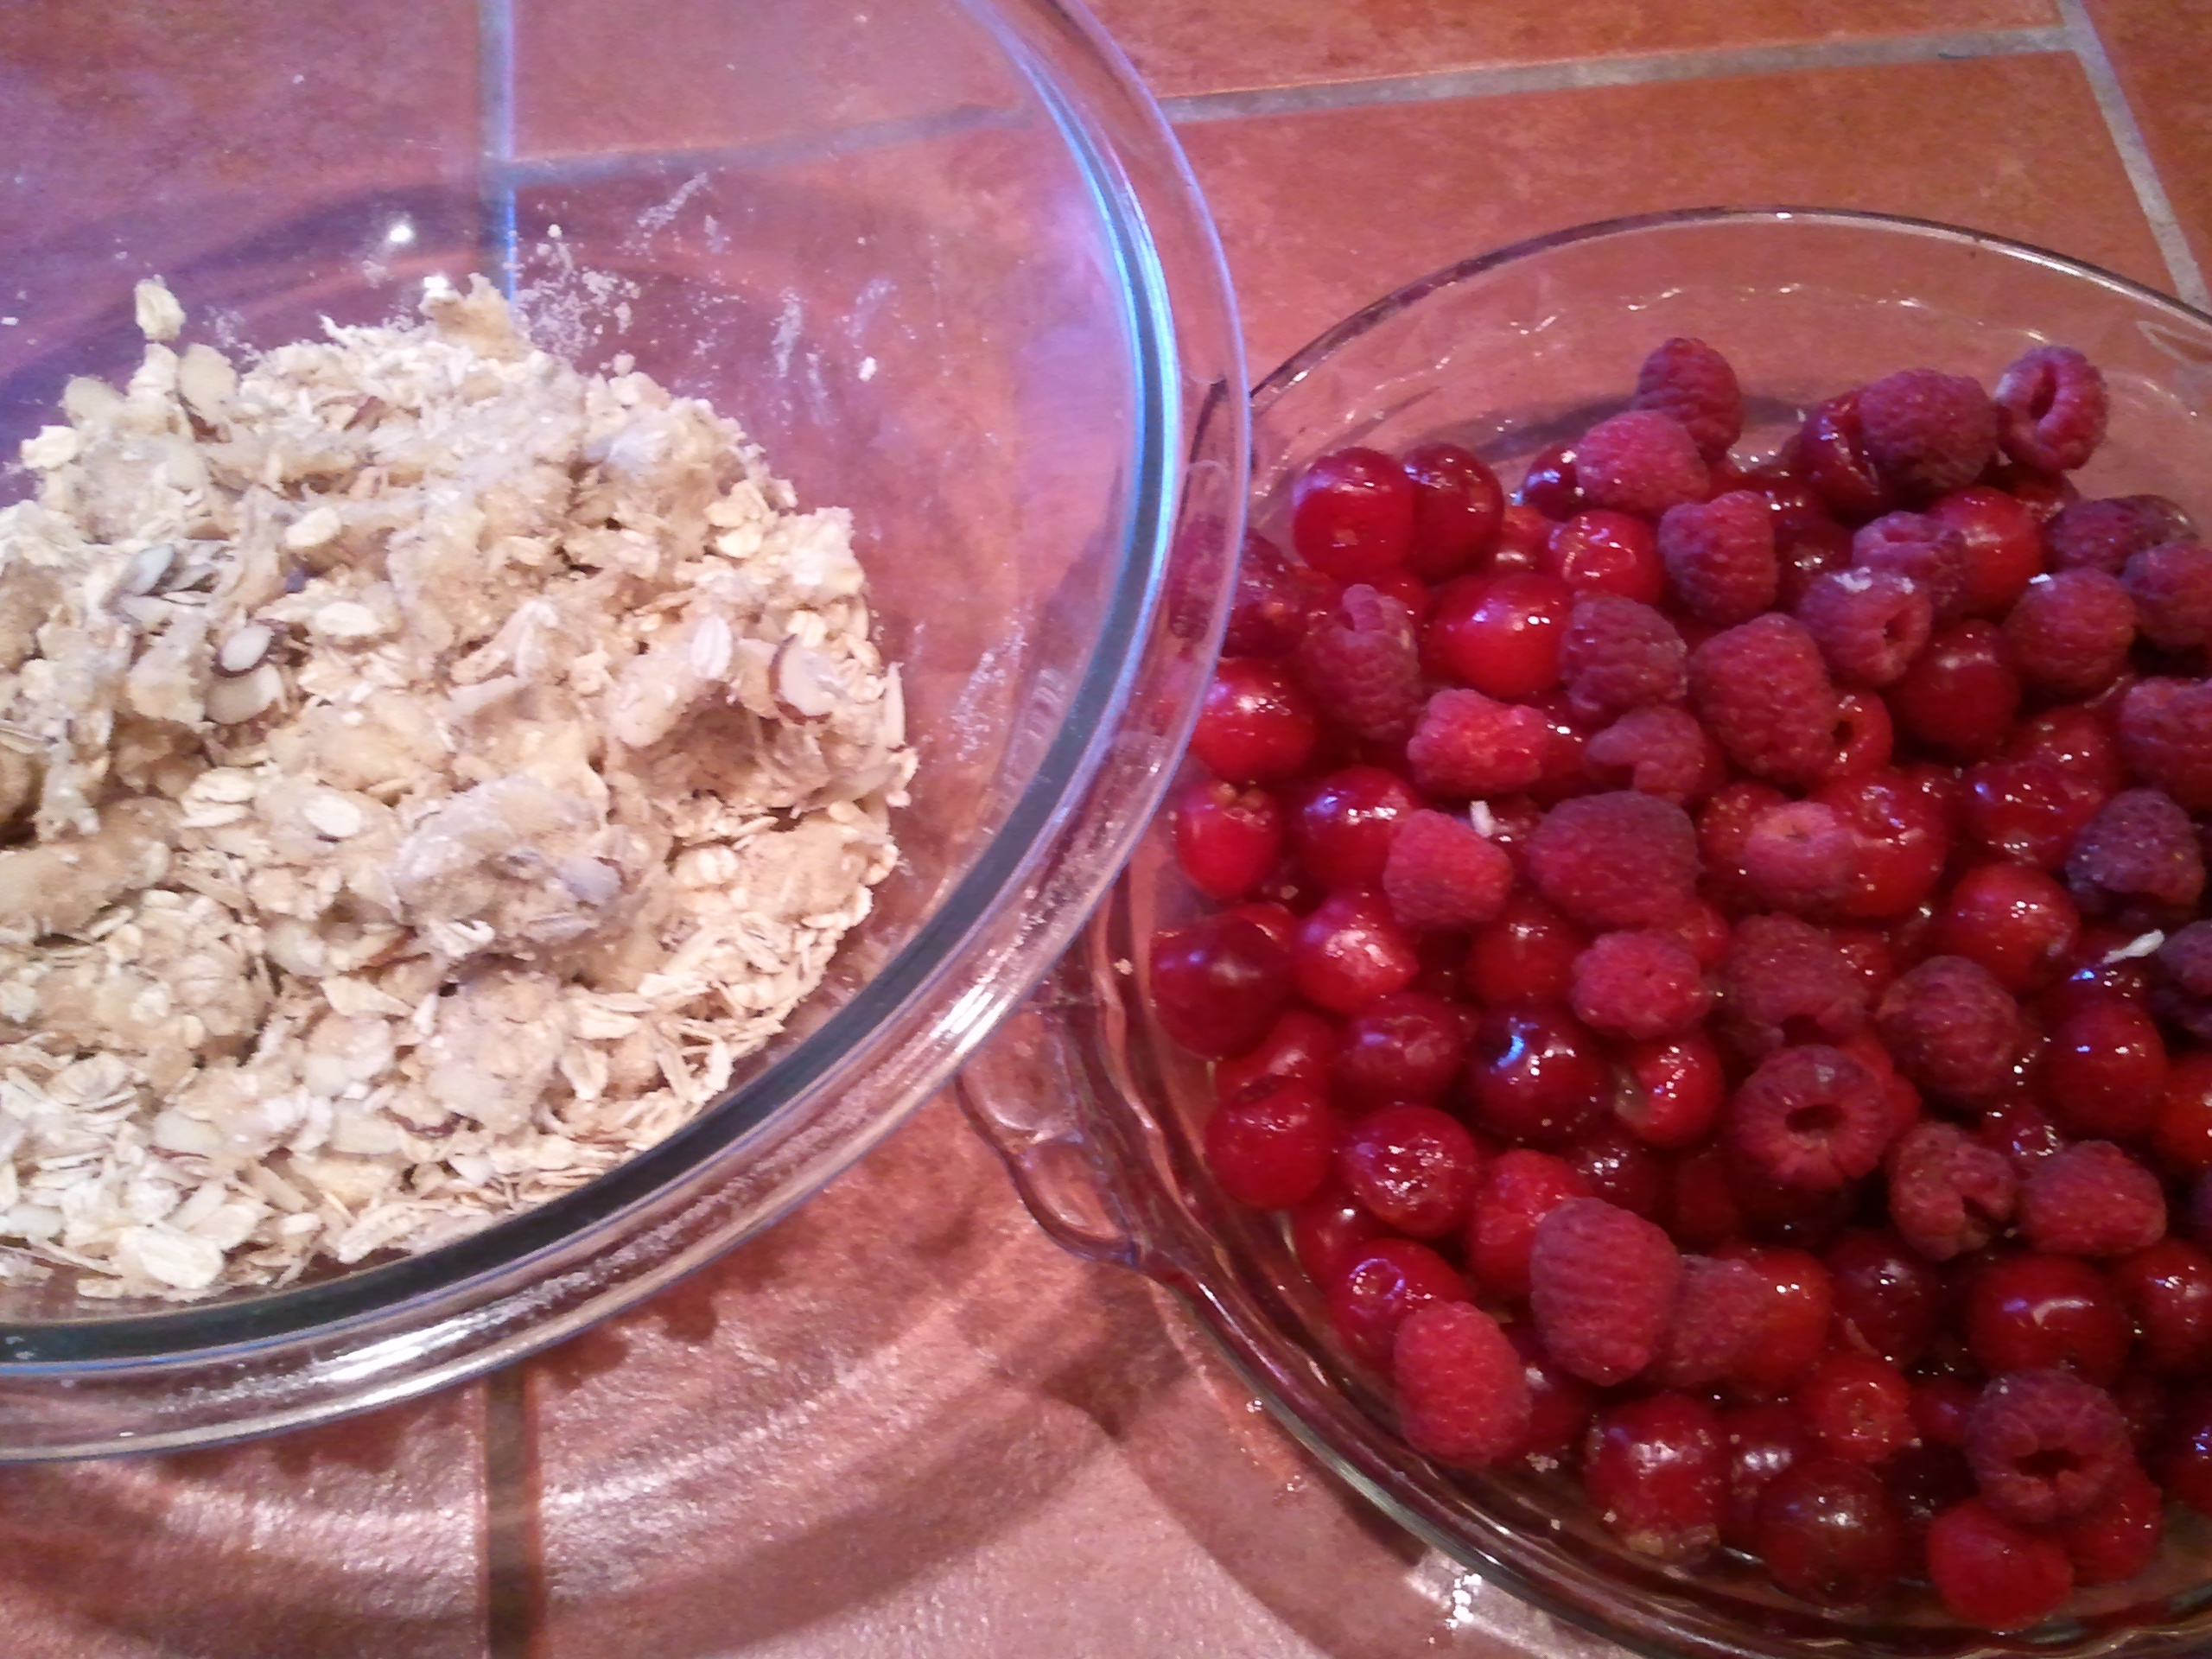
But Mama showed me how yummy they can be with a few simple additions. Because we’re looking for easy here, she made a crumble. She explained that if she didn’t use any oats in the topping, we could call it a crisp instead. Are you confused yet? Both a crisp and a crumble are a jumble of fruit that is topped with a loose mixture (called a streusel) of brown sugar, butter, spices, maybe a bit of flour, and sometimes nuts or oats, then baked. A cobbler is the same idea, except with biscuits dropped on top of the fruit in place of the streusel.
Mama likes crisps and crumbles because they’re easy—you really can’t screw them up, she says. And I like them because I can use my hands to make the topping! You can use any kind of fruit and bake it in any size pan—a pie plate, an 8 x 8” dish, or even individual ramekins. And because they’re not neat like a slice of pie, you don’t have to bother with getting the fruit to gel and hold together. The beauty of these desserts is that the fruit is meant to mix with the topping.
Jude on Food: Freeze your cherries before pitting them. Mama found that they splatter a lot less, and the stones pop out much easier!
Mmm, mmm. We made this at my friend Walter’s house. His Mama had some recently picked raspberries that she added to it. Mama didn’t put too much sugar in with the cherries because the streusel was quite sweet, so I was still able to get that bit of pucker mouth when I ate it. And the topping was crispy yet buttery. All in all, it was worth it to turn the oven on on such a hot day!
Love, Jude
Sour Cherry Crumble
About a quart or so of sour cherries, pitted (add a handful of raspberries or blueberries, if you want) 1/3 to 1/2 cup brown sugar (or more, if you really want to sweeten it up) About 1 cup old-fashioned oats Whole-wheat or all-purpose flour (optional) 1/2 to 1 tsp spices such as cinnamon or cardamom, if desired 1/2 cup chopped or sliced nuts, if desired (Since cherries and almonds like each other, Mama added a handful of sliced almonds.) 4 to 5 Tbsp butter (you can be like Mama and put in a whole stick if you really want to)
Preheat the oven 375°F. Put the cherries in a bowl and toss with a a couple tablespoons of the brown sugar. (You have to cut some of that sourness!) Toss in a tablespoon or so of flour, if you like, to thicken up your filling, but you certainly don’t have to. Pour the cherries into a pie plate or other baking dish.
Mama says the worst part is pitting the cherries. But once that’s done, the rest is easy-peasy.
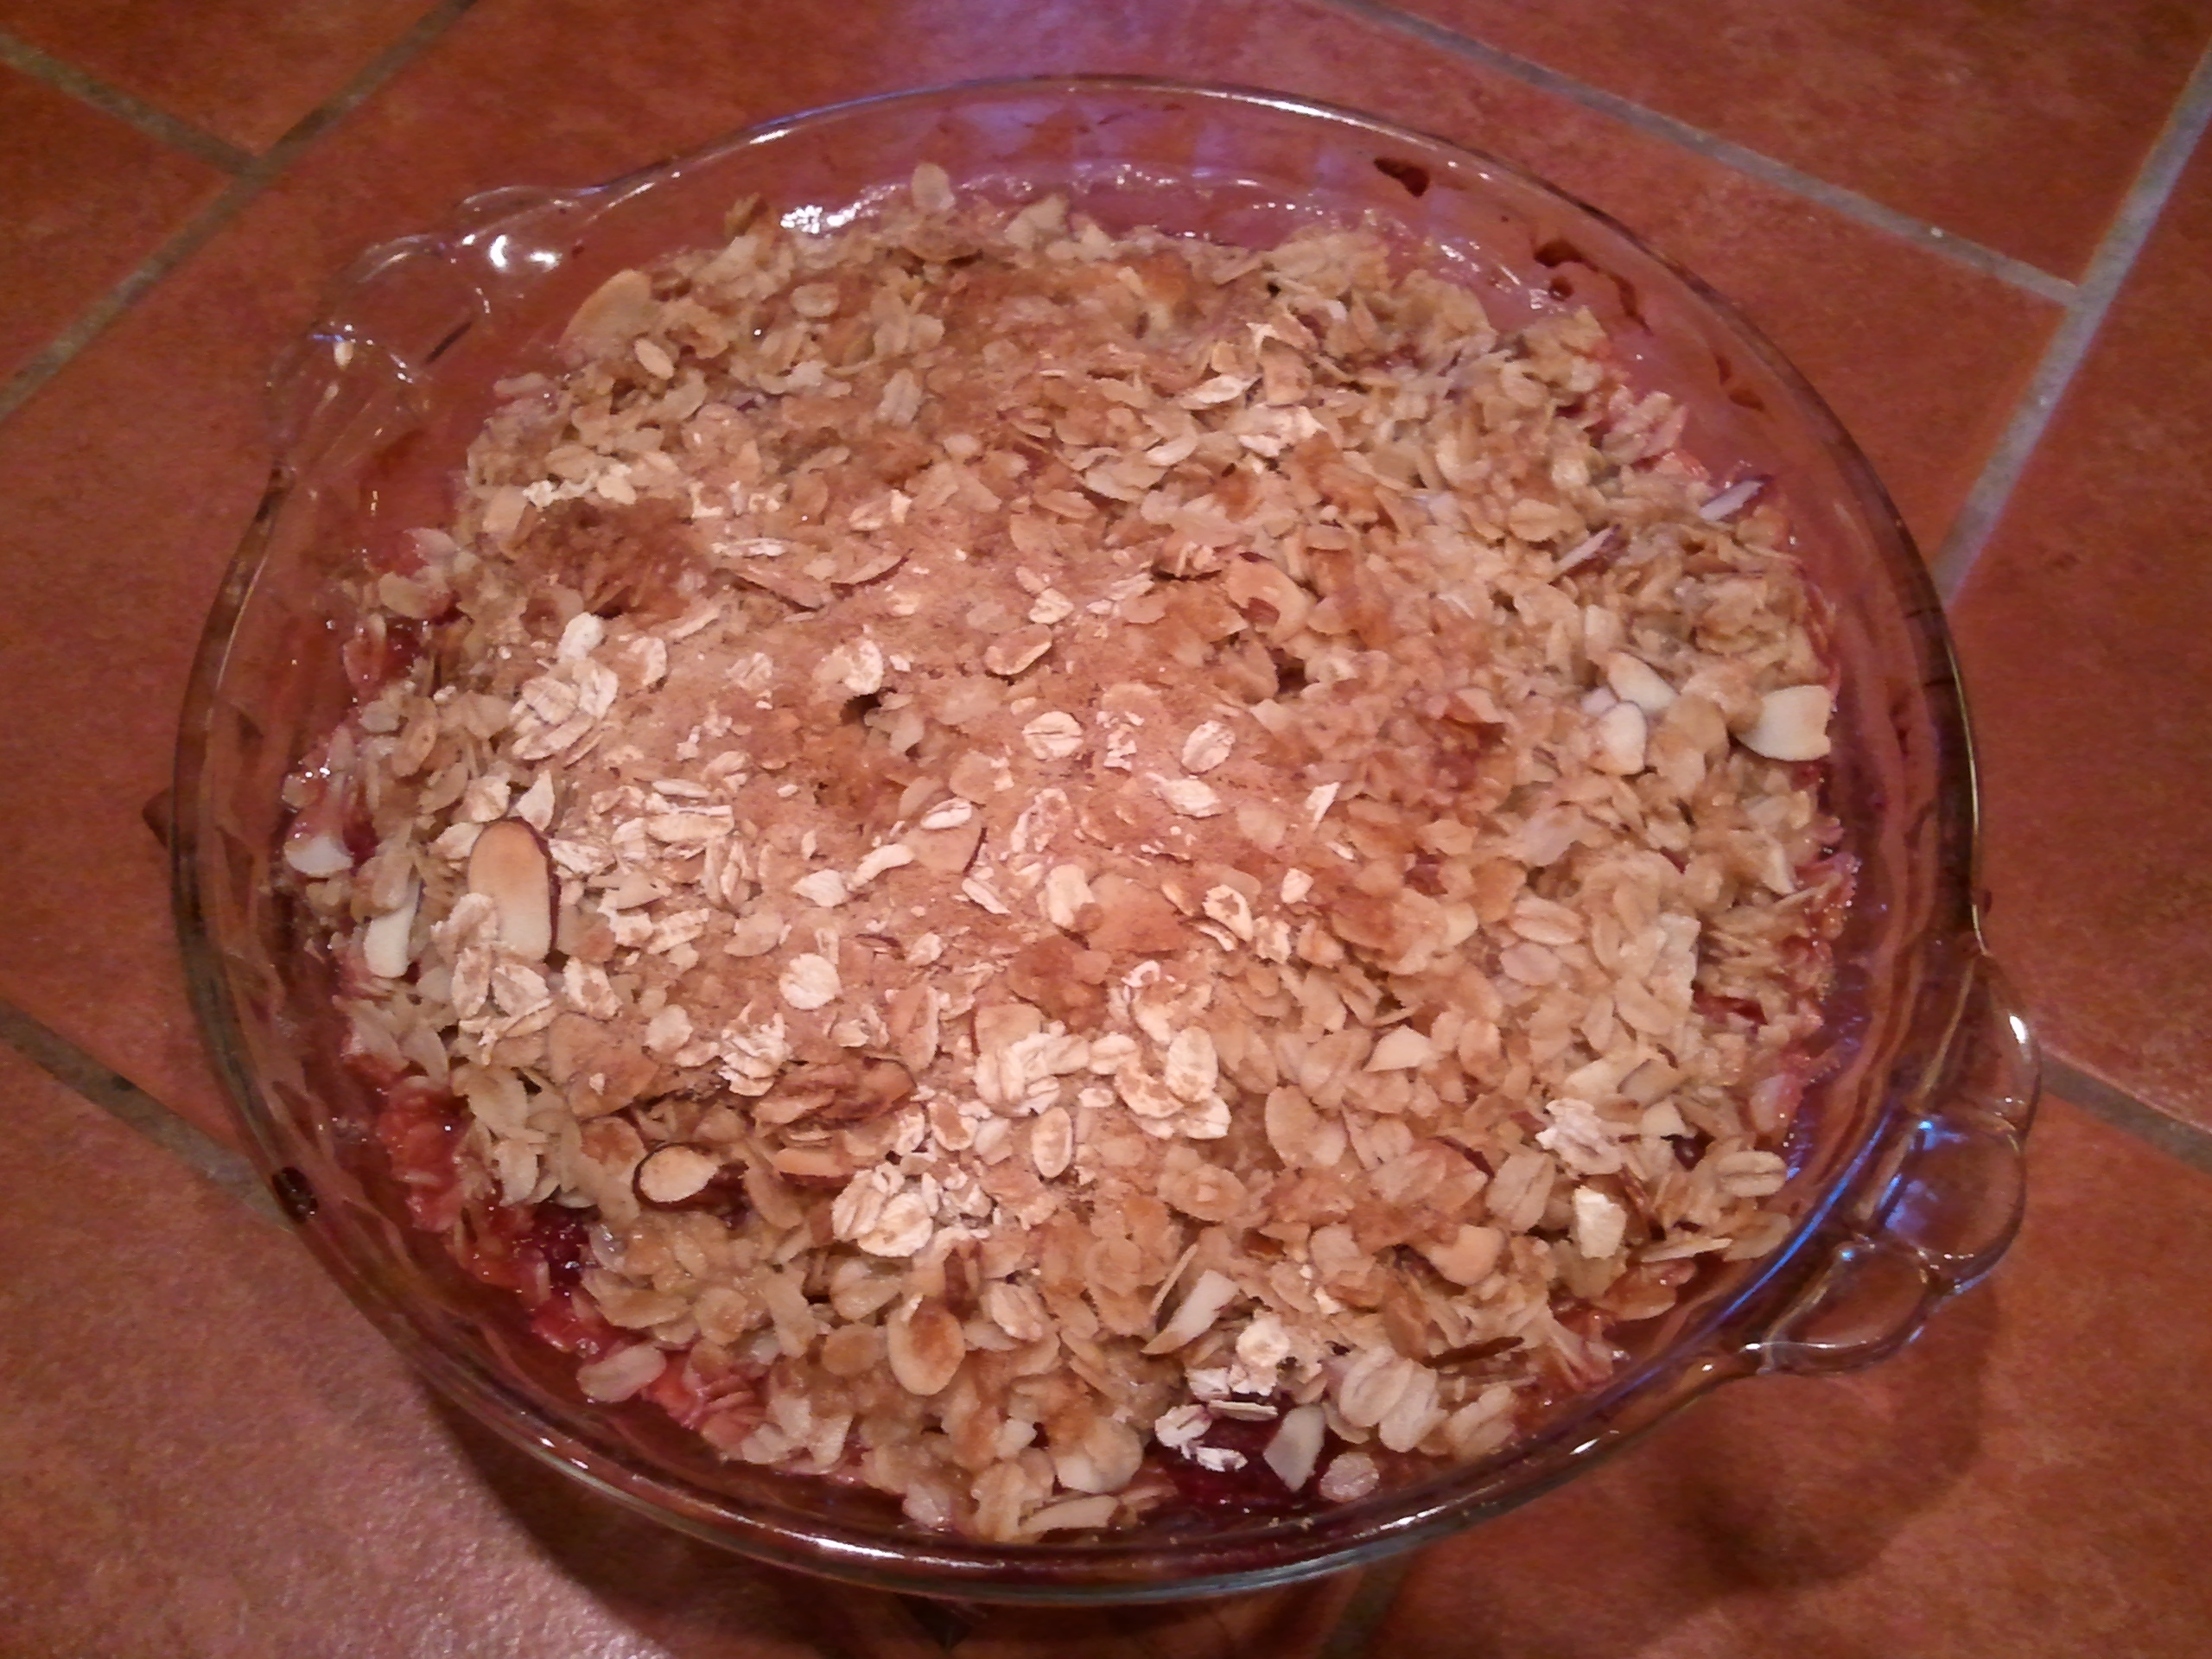
In a separate bowl, combine the oats, remaining brown sugar, spices (if using), and nuts (if using). Cut the butter into chunks and toss it into the bowl of dry ingredients. Use your fingers to mash it all together, so you get some glops of buttery oatmeal. Evenly sprinkle the mixture on top of the cherries, then bake in the center of the oven for 35 to 45 minutes. The topping should start to brown, and you’ll see the cherries bubbling.
I think the worst part is waiting for it to cool.
If you’re allowed, add a scoop of vanilla ice cream when the crumble has had a chance to cool from the oven but is still warm.
I’m crying because I can’t get my ice cream to stay on the spoon.
There are many food preferences I have in common with my folks. On the Mama side, I like olives (even as Papa cries, “Yucky!”), yogurt, and eggs. On the Papa side, I like hot dogs, chicken piccata, sausage pizza, and pork chops. (I once told Papa, “JuJu like pork chop.”) And all three of us love fish.
Other than pasta, fish nights are the one dinner we can all eat together. You might remember that Mama is vegetarian, but she does eat some sustainable, wild-caught fish. (She feels they have a fighting chance, but also, she grew up eating it a few times a week, and you can’t just turn your back on history.) Probably the best fish we eat, however, is the kind my GeeGee catches. He lives near the ocean! (Mama says it’s really a Great Lake, but to me, it may as well be the ocean.)
See what I mean? That sure looks like an ocean.
When we visit GeeGee and Grandma Rita, like we did last week, we eat almost as much salmon, walleye, rainbow or brown trout, perch, crappie (“crah-pee”), whitefish, and bluegills as can fit in our bellies. (But not every night because poor Grandma doesn’t like it.) I could spend the next few weeks telling you all the different ways we eat it, but our favorite way is breaded and panfried. I didn’t watch Grandma make it, but Mama makes it quite often (and I can tell you it’s not as good).
Jude on Food: Some fish contain dangerous levels of mercury and other toxins. Some fish take years and years to reach maturity. And some are simply overfished. I can’t read yet, but you can easily learn about which seafood are your best options.
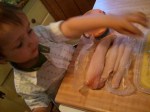
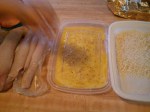
The key is in the breading. Grandma’s always favored Saltine cracker crumbs, but Mama says you can use anything you prefer. And the way to get that yummy breading to stick to your fish is to coat the fish with a beaten egg. You would think that slimy egg would slip right off the fish, but it doesn’t. You can even coat your fish in flour first (Mama says this is called “standard breading procedure.”) When you bread your fish, Mama suggests using one hand to do the “dirty work,” rather than using one hand for the egg and one hand for the cracker. Why dirty two hands?
Mama brought home some ocean perch, which is a type of Pacific rockfish that’s quite different from the lake perch we eat at GeeGee’s.
It’s important to set up all your breading ingredients before you begin. (I really did touch the fish.)
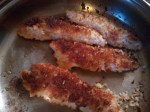
These fillets are on the thicker side, but you can still see how nice and golden they get.
When you cook fish this way, the coating gets crispy and the fish doesn’t dry out. It also doesn’t mask the fish’s flavor. It’s win-win.
Love, Jude
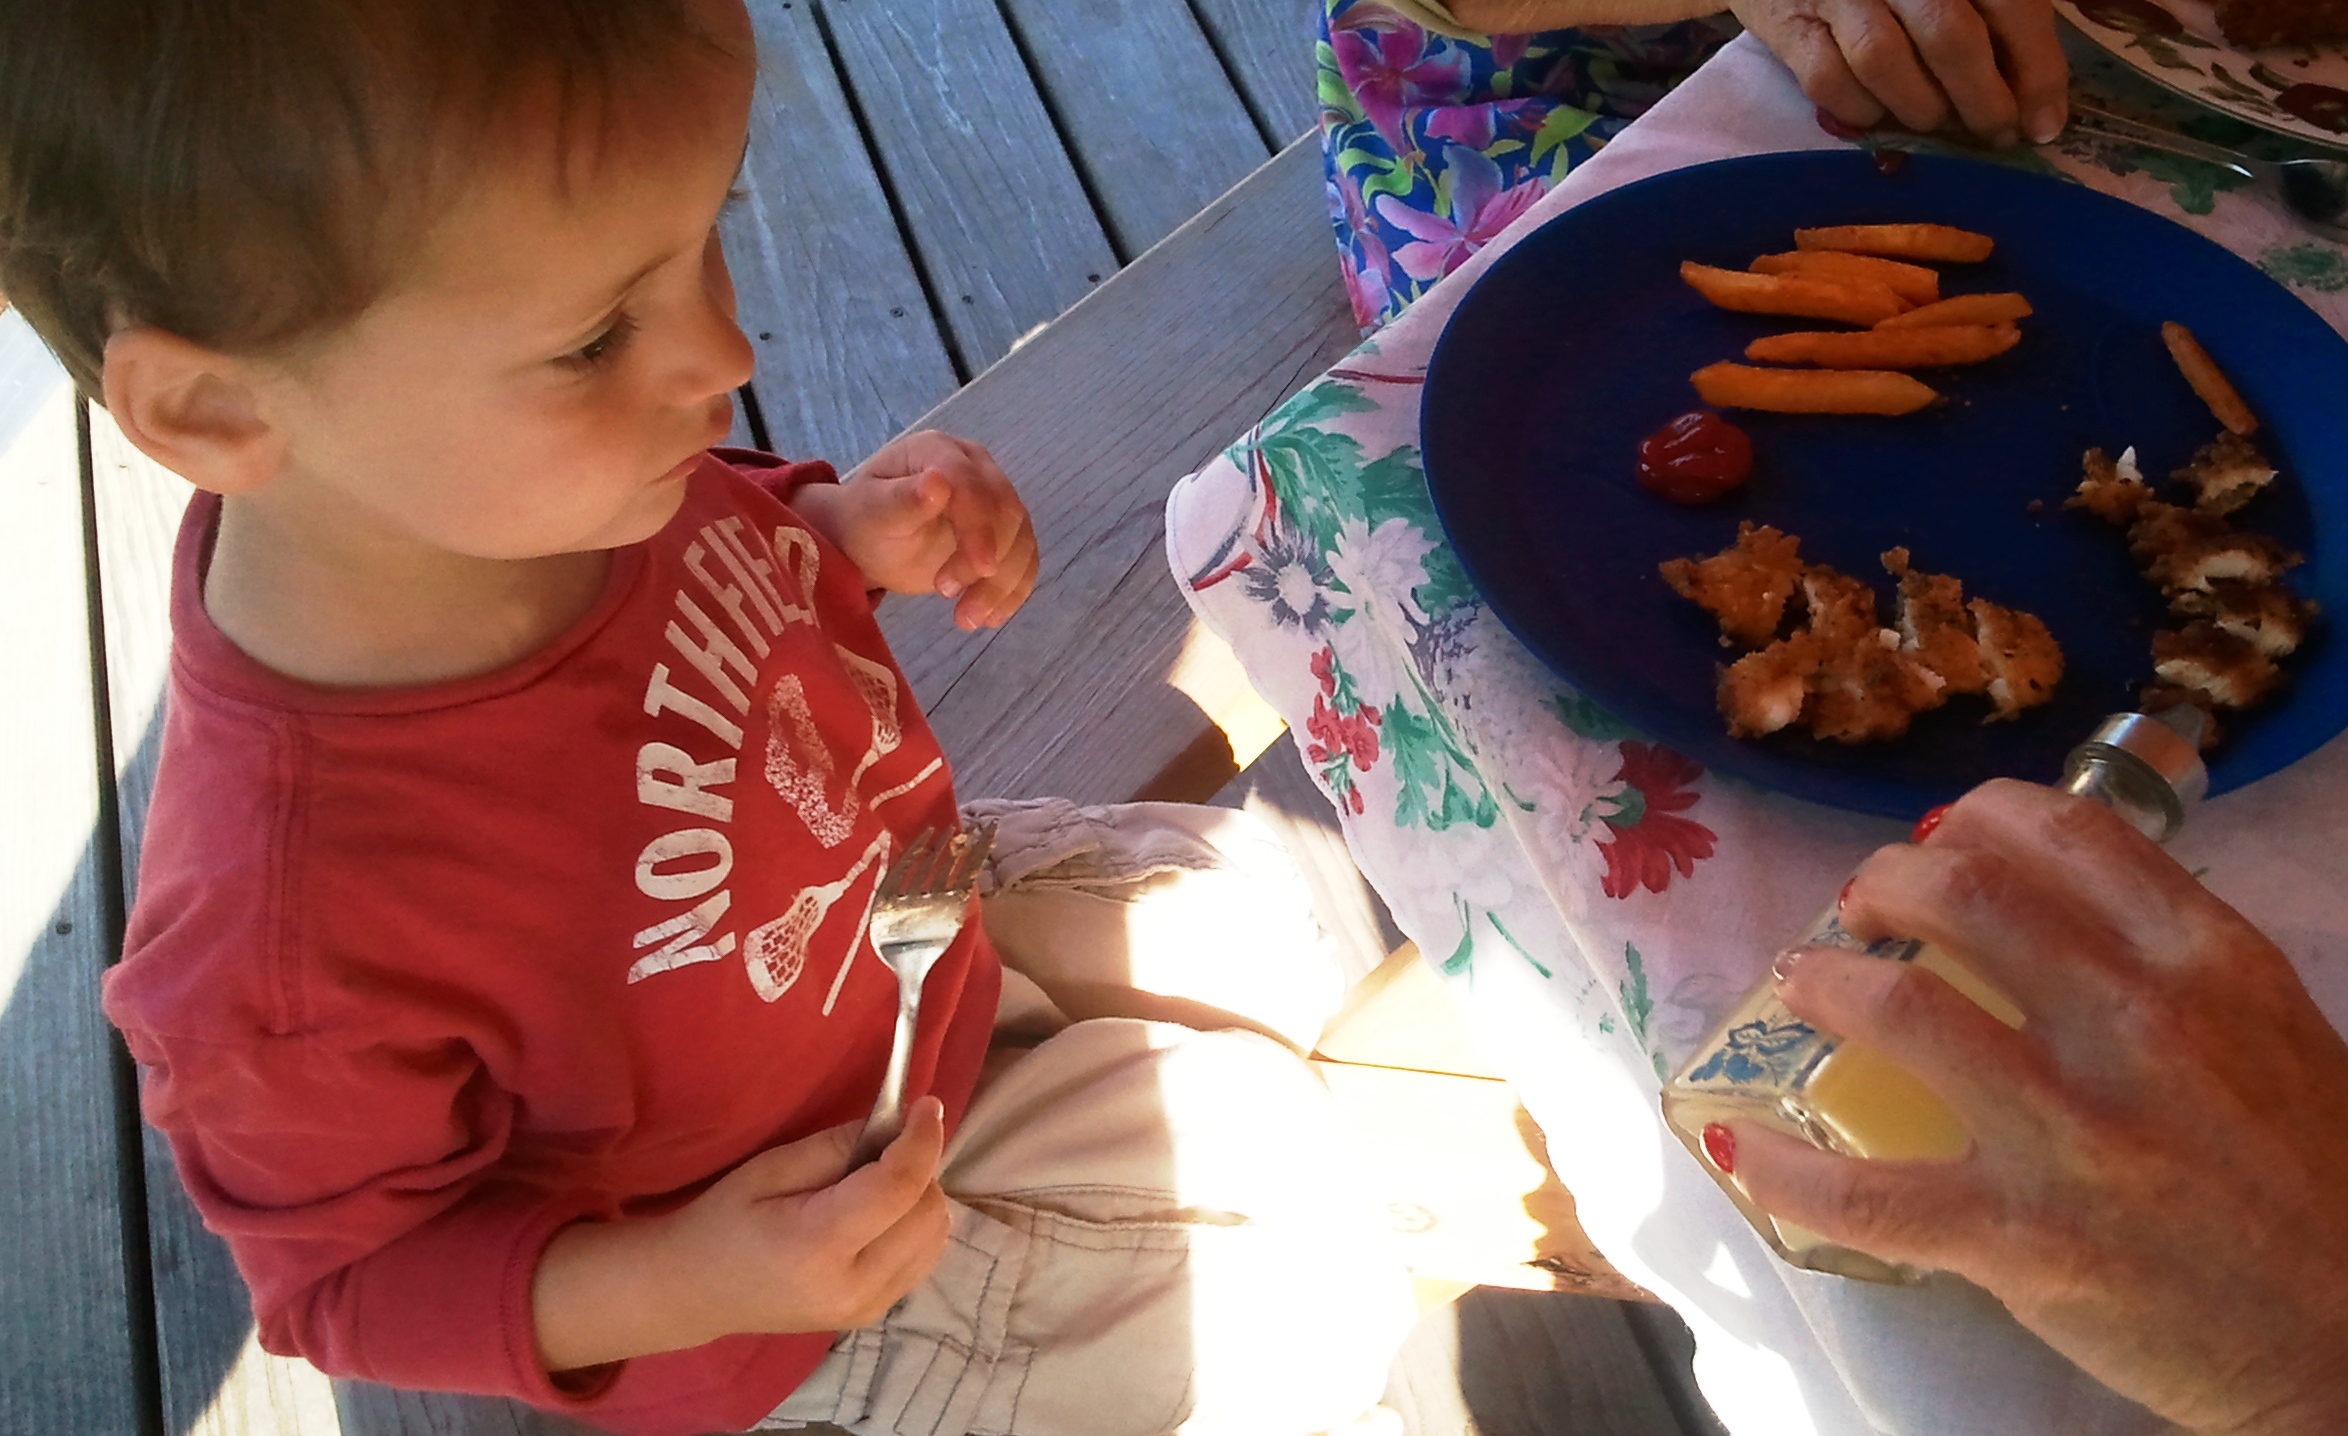
I’m about to dig in to my fish (but I’m pausing for my Auntie to put lemon juice on it). Sweet potato fries are waiting in the wings.
Grandma Rita’s Butter-Fried Crappie
1 egg
1 cup Saltine or Ritz cracker crumbs (or panko breadcrumbs) + more as needed
A few hefty pats of butter
1 pound crappie fillets (or other small lake fish), patted dry if necessary
Salt and pepper
A few shakes of bottled lemon juice (or lemon wedges) and/or white vinegar
In a pie plate or bowl, lightly beat the egg with a fork. Grandma doesn’t season the egg, but Mama tosses in some salt & pepper. (She also seasons her fish, but Grandma waits until it’s all in the pan.) Set cracker crumbs on a plate. In a large skillet, over medium-low to medium heat, melt the butter. (Grandma uses a large electric frying pan so she can do it all at once, and she doesn’t have to clean the stove afterward.)
Dip the fillets in the egg, shake off the excess, then dredge in the cracker crumbs. Lay the coated fillets in the pan of melted butter. Repeat until all the fillets are in the pan, or the pan is full. (Mama warns not to overcrowd, but Grandma puts them pretty close without touching.) Season liberally. Fry the fish until they’re tantalizingly golden brown, then flip. Add more butter, if needed, and watch your heat. If they’re overbrowning or browning too quickly, lower it a tad. These aren’t done quickly, so take your time. Trust me, they’re worth it.
Serve with a sprinkle of lemon juice and/or vinegar. Grandma and GeeGee usually serve these with homemade coleslaw and/or oven fries. And if you happen to have any leftover (because maybe Grandma made a lot), these little fillets are great in a bun for lunch the next day.
Note: Mama says it’s easy to make cracker crumbs—just put a few crackers in a ziptop plastic bag, seal it, then roll a rolling pin over it a few times. You can also use a meat mallet to crush them. They don’t have to be powder-fine, but they should be crumb-y enough to give an even, thorough coating.
What is it about a grandma’s house? I’ve been to my Grandma Rita’s house only four times, but I can tell you I’m never hungry there. We just eat and eat. (And my GeeGee likes to sneak me food I’m not “supposed” to eat.)
Mama and I just got back from a week with my Grandma and GeeGee. But why didn’t I write about all that good food? Because I can’t type, and Mama is limited in her technological capabilities. (You saw how long it took her to register this domain, didn’t you?) And because our refrigerator at home is still sort of bare, I’ll use the next couple days to share some of Grandma and GeeGee’s goodies.
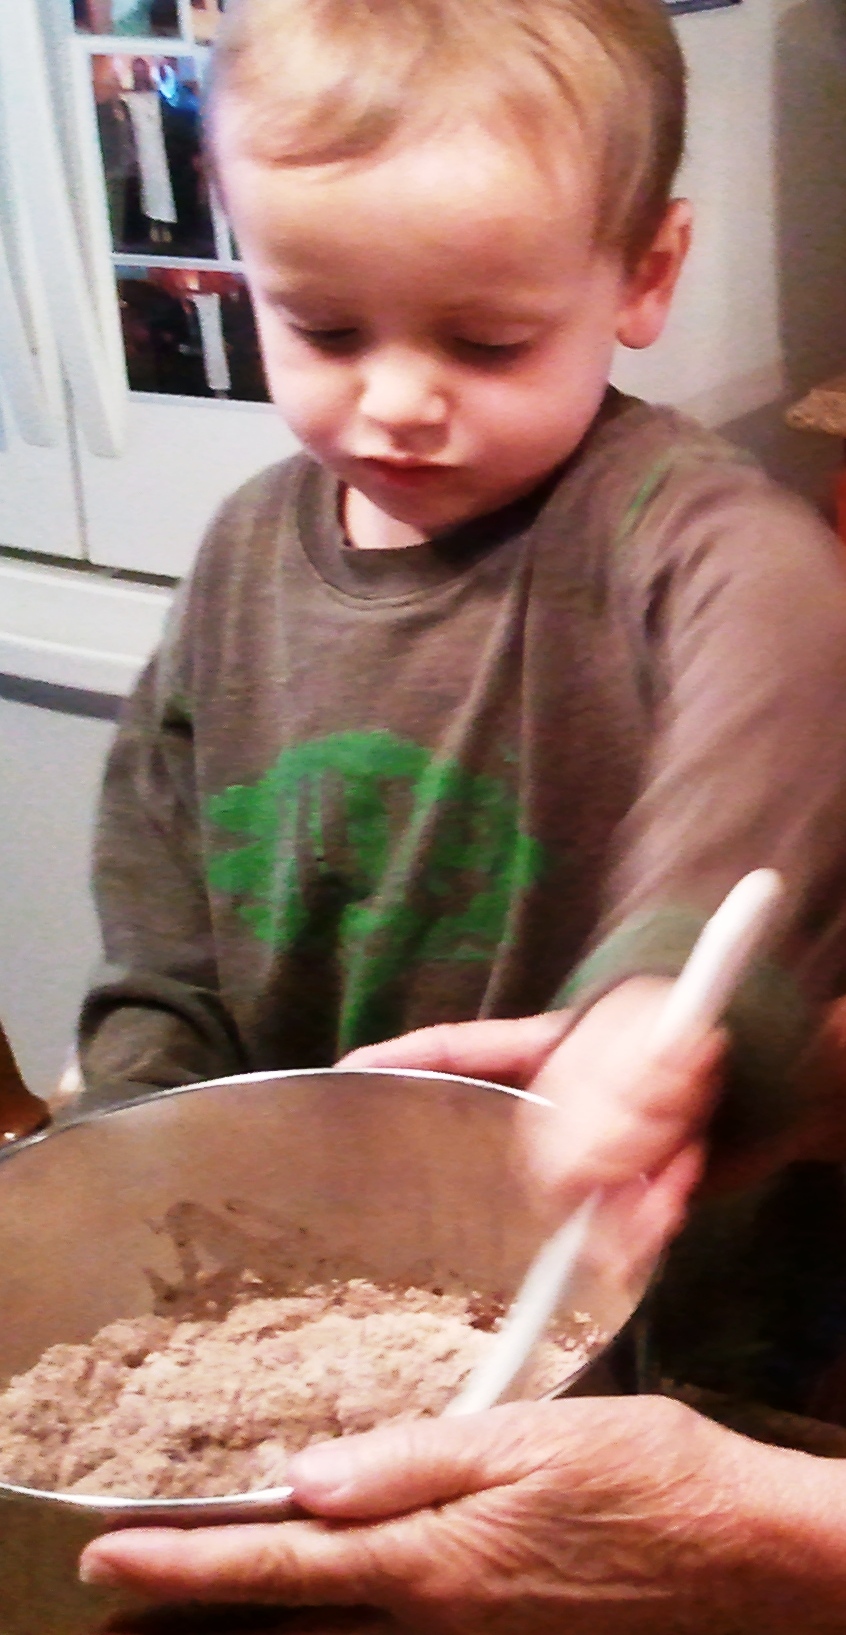
Like brownies. Can you believe I made brownies?! Grandma makes them a lot quicker than Mama does since most of her ingredients come out of a box. But that doesn’t mean I didn’t get to stir the oil and egg into it. Grandma held the bowl for me, and she told me to stir it really well.
Grandma doesn’t like having her picture taken. I hope she doesn’t mind her hand in this photo.
Then she let me help spread the brownie batter into the pan, AND I got to lick the spoon!
I’m a much neater baker at Grandma’s house.
And the bowl.
Yes, that would be chocolate on my nose.
Now, I don’t have a photo of me eating the finished product, but I will say that I enjoyed the brownies very much…what little of them Mama allowed me to have. They might not have been as gooey as a from-scratch brownie, but you can’t beat the time it took to make them, or the clean up. (Not that I possess any concept of either.) And it made for a perfect rainy-day activity with my grandma.
Love, Jude
Jude on Food: Who cares if you make something out of box from time to time? As long as you have fun making it, and it tastes good.