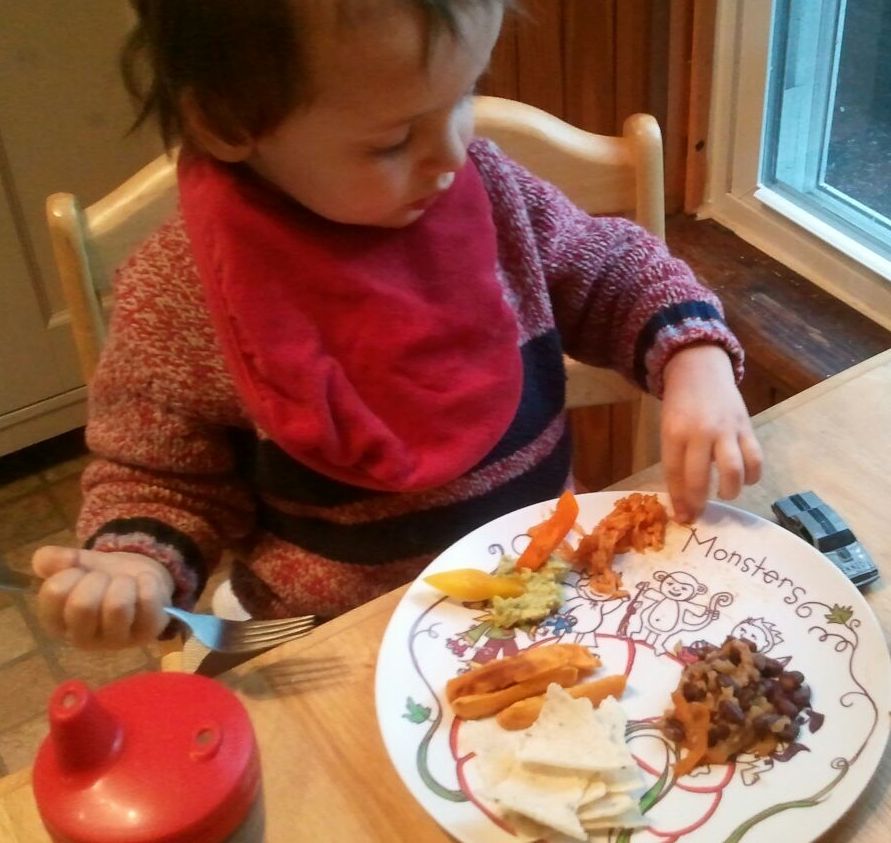
You know that Mama makes quesadillas and fish tacos on occasion, but did you know she also makes fajitas? A lot of people cook a marinated skirt steak or chicken breast, then thinly slice it for the fajita filling, but Mama made ours minus the meat. And they’re really simple—but not necessarily quick, like a quesadilla. Mama said the more thinly the vegetables are sliced, the quicker they’ll cook and soften, so that part’s really up to you.
You can also change up the veggies and spices you use. Try zucchini and carrot ribbons with fresh mint or cilantro. You can even dress them like a taco salad with tomatoes, lettuce, sour cream, and cheese. And if you don’t want to use a corn tortilla (Mama and Papa say they’re pretty bland, but I ate mine), use an alternative kind. You can serve it with salsa, refried beans, Spanish rice, or whatever else you prefer. Mama whipped up a quick guacamole. Normally, I love avocados, but tonight, I just wasn’t feeling the guac. I tried everything (I’m getting very clever about the size of my “no thank you” bite), but I stuck with the Spanish rice.
Love, Jude
Mama deconstructed my fajita for me, but she needn’t have bothered. I was all about the rice.
Easy Veggie Fajitas
Canola oil
½ Spanish or sweet onion, thinly sliced
1 red, yellow, or orange bell pepper, thinly sliced
½–1 jalapeño or Serrano pepper, minced (optional)
1 or 2 cloves garlic, minced
1 can black beans, drained & rinsed
½ tsp cumin
Salt and pepper, to taste
Juice of 1 lime
6” corn or flour tortillas
In a large skillet, heat the oil over moderate heat. Add the onion and pepper and sauté until browned and very tender. Add the garlic, and sauté 1–2 minutes more. Add the beans, cumin, s&p, and lime juice, and stir to combine and heat the beans. Remove the pan from the heat. Heat tortillas according to package directions. Spoon about ½ cup filling into each and serve.
Note: Mama says you can add a tropical twist to this fajita filling by finely chopping up a small amount of pineapple or mango and adding that along with the beans. (Even with the pineapple in ours, I still didn’t want to eat more than 1 bite.) And if you’re adding meat, cook that separately.
It’s true. I really said it. I can’t tell you why I like them so much, but I gobble up lima beans. And green beans. But not cauliflower, as you know. Mama bargained with me that she would prepare more lima beans (I had eaten them all by this point) if I ate more salmon, which I liked, so that was an okay deal. What can I say? Some kids like jelly beans. I like lima beans.
I have to keep this short. Papa’s back in Italy this week, and Mama and I have worn each other out. We are both sooo sleepy.
Mama makes something she calls a one-pot Indian dish. It’s really simple, and I’ve mentioned it before because we have it about once a month. She starts with onions, cooked in oil, then adds whatever she finds in the fridge, beginning with garlic and ginger, curry powder, cardamom, some veggie stock, and coconut milk; she often adds home-canned tomatoes, chickpeas, peas, spinach, and basmati rice. This is always a “what’s-in-the-fridge” sort of dinner, but if Mama’s planning ahead, she might buy some paneer (Indian cheese) from an Indian market beforehand, and I really like that. Anyway, before you know it, the house smells so good and warm and inviting.
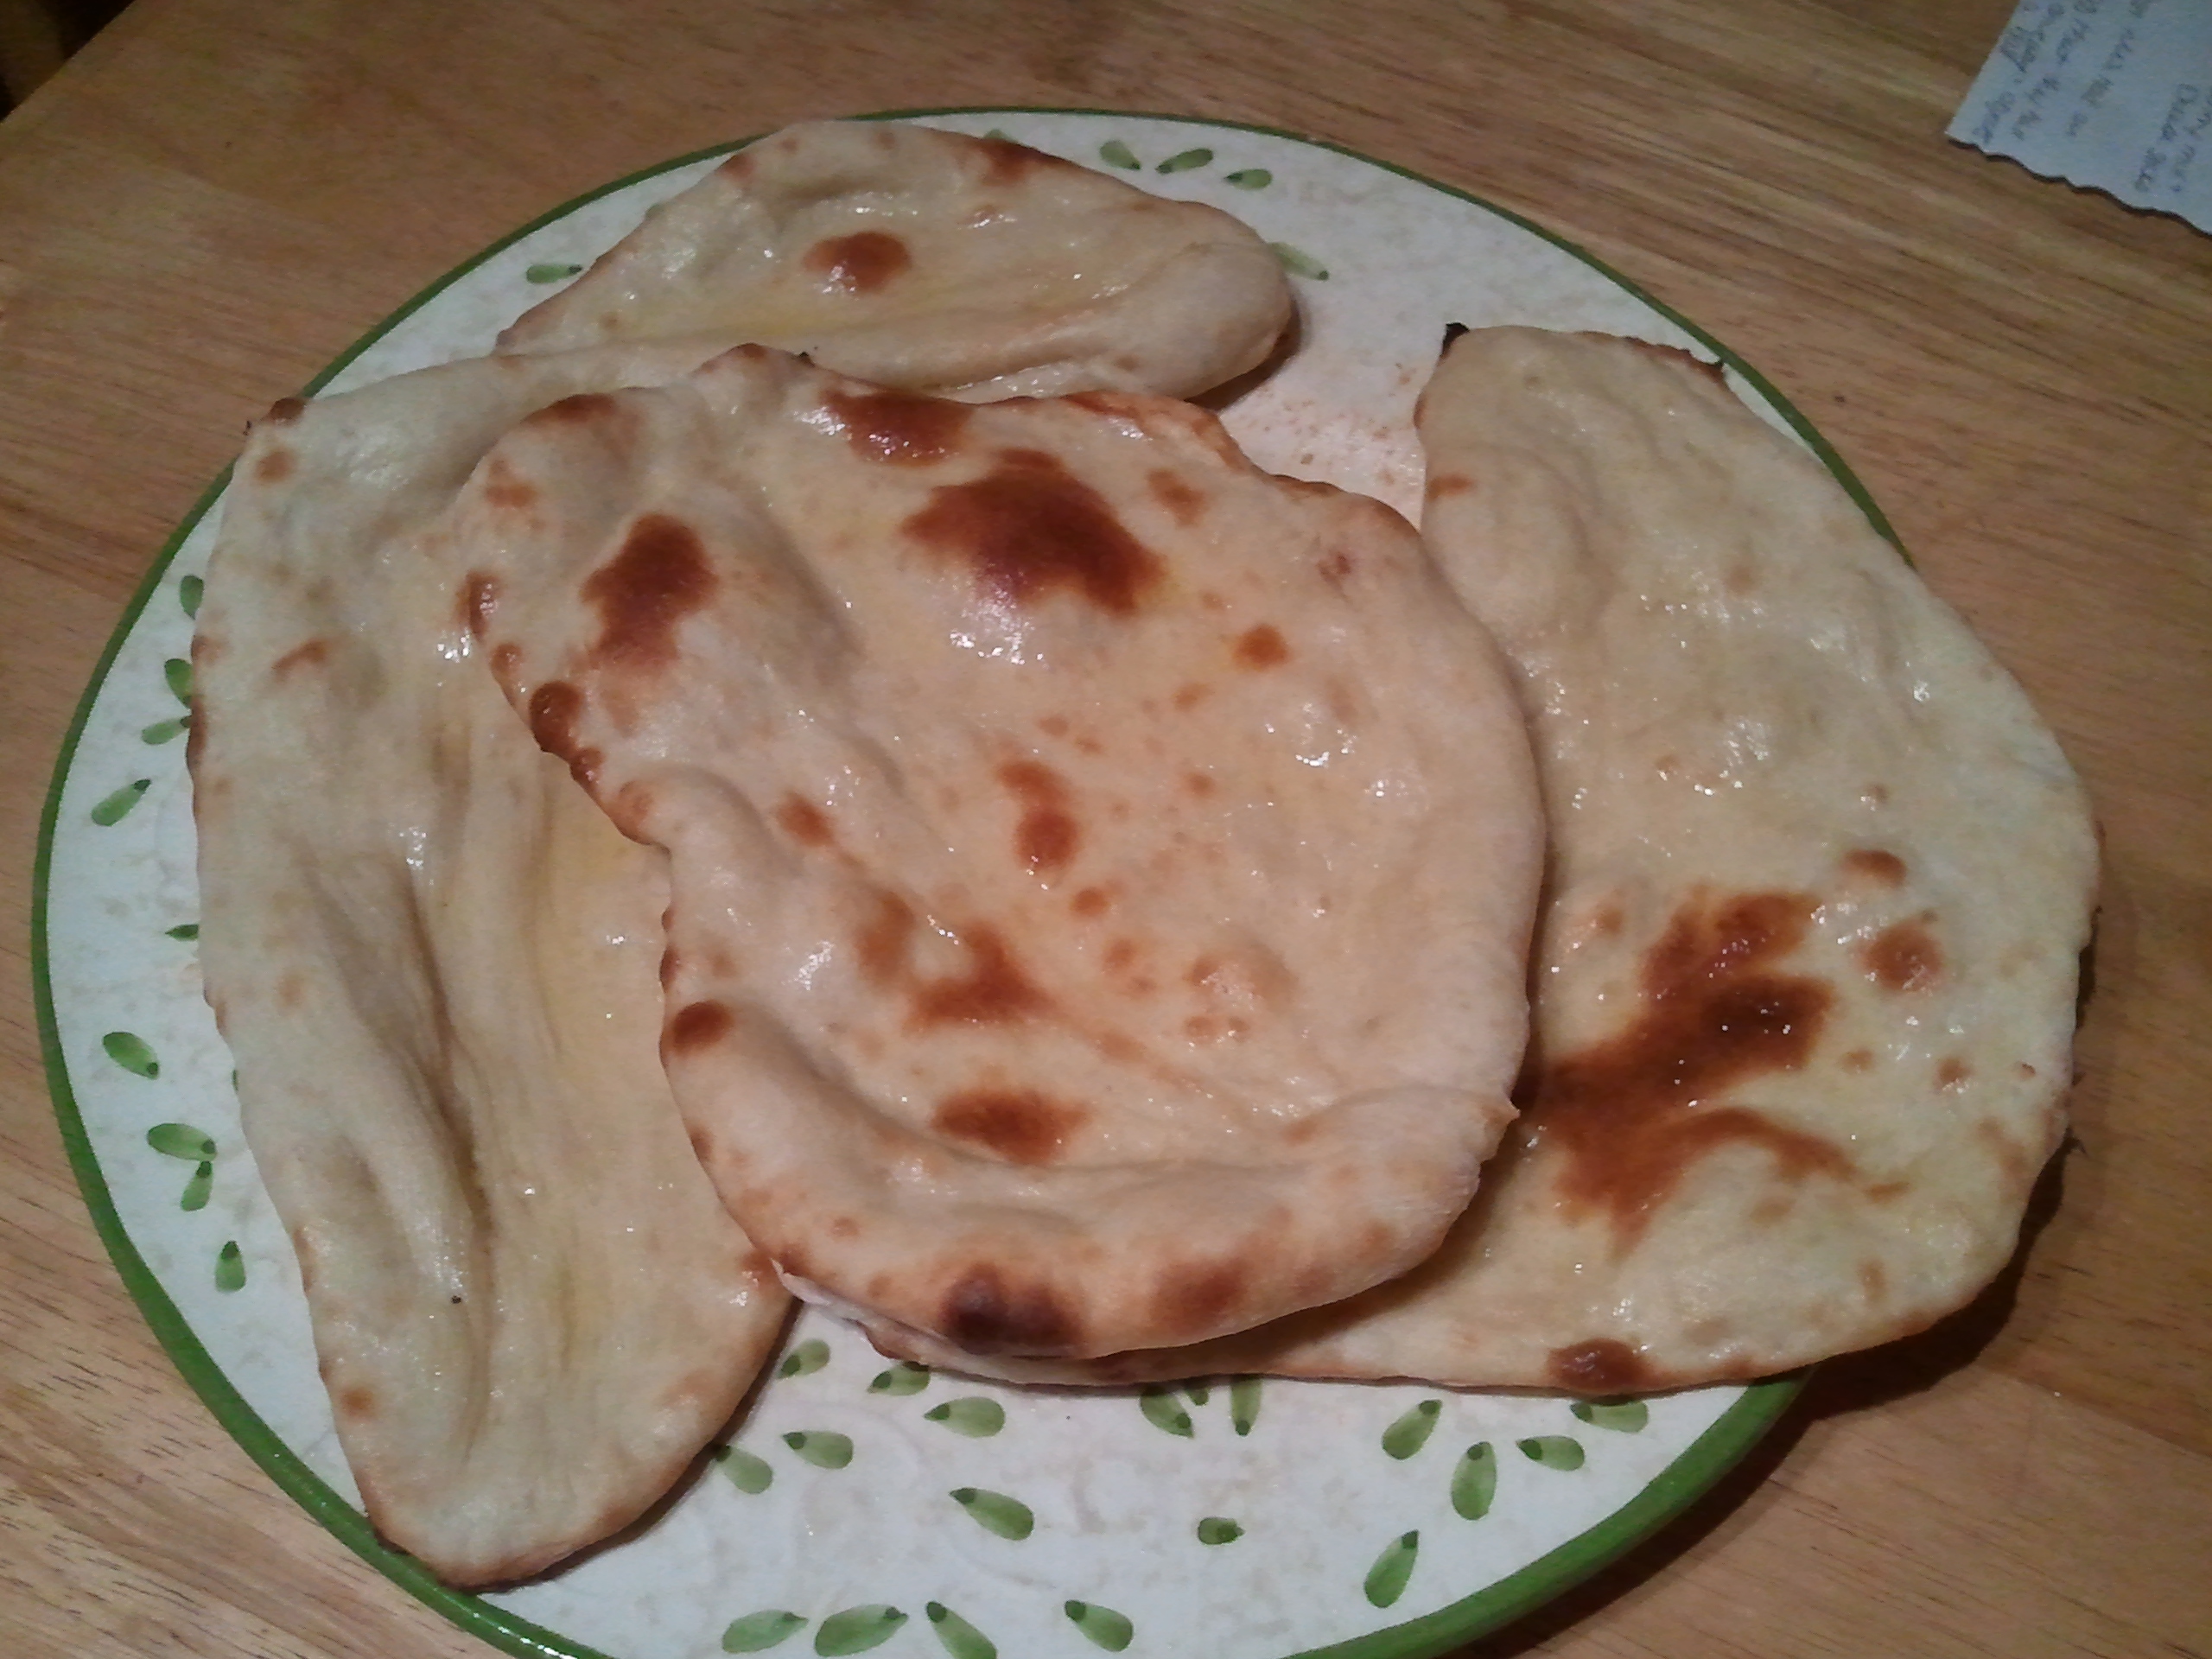
But before she even does that, she gets to making naan. Naan? you ask. Naan is a leavened bread–that means, it uses something (in this case, yeast) to rise. What’s funny about that is that naan doesn’t rise like the other breads we’ve made; it’s actually a flatbread.
Mama’s recipe is super simple to make and pretty good to eat. (I told her so myself.) And if you make the dough before you start the rest of your dinner, it’ll be ready to put in the oven by the time you’re just about ready to eat.
3 pieces of naan, all shiny from the melted ghee
But Mama didn’t stop at naan. She made me a mango lassi. (I helped press the button on the hand blender.) I’ve had one of these drinks before, but I can’t even begin to tell you how much I loved it tonight. It’s really similar to a smoothie, except I had it with dinner! I sported a lassi mustache through most of the meal. The drink was refreshing and cooling, as Mama made the dinner a wee bit spicy. (I like spicy, though.)
I’m saving this lassi for later.
All in all, this was a great dinner. I wouldn’t mind having it more than once a month–and the lassi, maybe every night.
Love, Jude
Naan
1 tsp active dry yeast
3/4 c warm water (105–110°, hot enough to hold your finger in it without scalding)
2 c all-purpose flour
1 tsp salt
1 tsp sugar
2 Tbsp veg oil or melted coconut oil
Pinch baking soda
2 1/2 Tbsp plain yogurt (or 2 Tbsp milk with a tsp. of lemon juice)
Preaheat oven to 500°. Dissolve the yeast in the water. Use a whisk to be sure it’s all dissolved and slightly foamy.
In a separate bowl, stir together the flour, salt, sugar, oil, soda, and yogurt. Add the yeast mixture and stir to combine, until smooth. Oil your hands and coat the dough ball. Set on a sprayed baking sheet and allow to double in size, 30-60 minutes. (Mama covers it with a light towel to keep the draft off.)
Divide the dough into 6 and roll out each piece on a floured surface–roll into more of an oval, rather than a circle (you know, like naan!). These don’t have to be perfect, remember. Wet your hands and flip the dough between them (so it stretches a bit). Put directly on a clean pizza stone on the bottom (or bottom rack) of oven, working in batches if necessary. (Mama feels a regular baking sheet that’s been preheated would also work, too.) Bake 4 to 6 minutes–keep an eye on them to bake them to your desired puffiness. (They’ll crisp up and brown the longer they’re in there.)
Remove from oven with tongs and immediately brush with melted butter. (If you want to get fancy, brown the butter for more of a ghee-like taste. And if you really want to get fancy, clarify that butter to make your own ghee.)
Mama’s Mango Lassi
1 ripe mango, peeled and cubed
Couple big tablespoons yogurt (plain, vanilla, or “banilla”)
About 1/4 cup canned coconut milk
Enough milk to thin [or swap out this and the canned coconut milk for coconut milk in a carton]
Few dashes of cardamom
Place all the ingredients in a blender and whir until smooth and creamy. (May also use a hand blender.) It should be thin enough that you can drink it with a straw, but not runny.
You know that Mama and I have made pizza before. Back when I first wrote about it, I’m embarrassed to admit, I was a bit on the fence about the stuff. That’s no longer the case.
Mama got a yen for pizza around 4:00, and that’s all the time that was needed to make the dough and a sauce from some home-canned tomatoes. She set the dough on the oven, so it proofed really quickly, then she made personal pizzas for each of us. Mine had roasted carrots, capers, and uncured bacon on it. Papa’s had carrots, capers, onions, bacon, and arugula. Mama had the same, minus the bacon. (She swears by arugula on pizza, but I wouldn’t touch it.)
A side of peas made this one good dinner.
The best part was that since most of this dinner made itself, Mama could play with me!
Love, Jude
Pizza Sauce
1 tablespoon olive oil
1 shallot, thinly sliced
2 cloves garlic, minced
1/2 quart home-canned tomatoes with their juice, chopped (or a 15-oz can diced tomatoes)
1-2 tablespoons tomato paste
Pinch sugar
Kosher salt and freshly ground black pepper
Oregano (fresh or dried)
Basil (fresh or dried)
Heat the oil in a medium saucepan over medium heat. Cook the shallots until soft and golden, then add the garlic and cook 30-60 seconds more, until fragrant. Add the tomatoes, tomato paste, and sugar. Bring to a simmer, then let it cook down, stirring occasionally, until it begins to thicken. Season to taste with salt, pepper, oregano, and basil. Lower heat to medium-low and simmer sauce until it thickens to desired consistency. Marvel to yourself at how good the sauce tastes, then spread over pizza dough as is.
Yield: Mama really likes a saucy pizza, so this amount covered 4 6″ pizzas (or 1 medium-large pie)
You know I enjoy squash (because it’s orange). Mama tends to keep it simple—roasted and added to other things, like risotto, or mashed with sweet or savory flavors. Since squash is still so abundant right now, she tried something a little new, something that combines her two primary methods for cooking it.
First, Mama halved and seeded 2 acorn squash, smeared some olive oil on the cut sides, then sprinkled salt and pepper over them. She put them on a baking sheet, covered them with foil, and roasted them at 450ºF until they were soft and starting to caramelize, about half an hour.
In the meantime, she sautéed half a chopped onion and half a pound of finely chopped cremini mushrooms in a bit of olive oil, stirring occasionally. Somewhere along the way she added the leaves off a few sprigs of thyme and some salt and pepper. When the mushrooms and onion were tender and browned, she added 1 cup rice (she happened to have basmati on hand, which is easy enough) and sautéed that for a couple minutes to give the rice a nutty flavor. Then, just when the pan seemed like it was about to dry out, she added 2 cups homemade vegetable stock (chicken stock also would have worked). She brought it all to a boil, covered it, then reduced the heat and simmered it until the rice absorbed the liquid and was tender, about 20 minutes. You might recognize this as the pilaf method, and it sure makes for some tasty rice.
When everything was cooked, Mama carefully spooned the flesh out of the squash shells and added it to the skillet of rice and mushrooms. She said if she wanted to make it look fancy, she would have loaded up the shells with the mixture, but as it was just us, she glopped a big ol’ portion on our plates. (This is why there’s no picture. You probably wouldn’t want to eat it either.) Then she grated some Parmesan on top.
I was reticent at first, because this didn’t look like any squash I’ve eaten before, but Mama reminded me about my “no thank you” bite. I’m sure glad she did, though, because this was quite tasty! The roasted squash flavor was subtle, and the rice gave it body and texture. I didn’t even mind the mushrooms, as I’m still hit or miss on those. Mama ate this for dinner, along with steamed mixed veggies, and Papa and I added pork to our dinners. I really just wanted to eat the squash and the veggies, though.
I don’t know what else Mama might have snuck into that dish because after dinner, I went on the kitchen floor to play with my cars…and I didn’t get up. I fell fast asleep right where I played, much like those Flopsy Bunnies. I suspect Mama might be giving me the squash again tonight….
To be fair, I refused to nap today, so that might have played a part in my passing out mid-play.
Which is what I told Mama for at least the 20th time. (I can count that high now, so I should know.) She didn’t seem to believe me. She kept saying that wasn’t true, that there were potatoes and cheese involved, and that I needed to have “just 1 bite.” I think if she thought about it hard enough, she’d realize that I really don’t like cauliflower. I couldn’t tell you the last time I ate the stuff. I even took more bites of my meatloaf as a peace offering, but she wasn’t buying. Our standoff eventually escalated beyond “no grapes” and “no Caillou” to “and you’ll go straight to bed.” So I took a stinkin’ bite (while my mouth was full of meatloaf). She asked if it was okay, and I nodded. Then she asked if I would take another bite, and I said, “No, thank you.” Then, “I want my grapes!” and “I want Caillou!” So you see…everyone wins.
Love, Jude
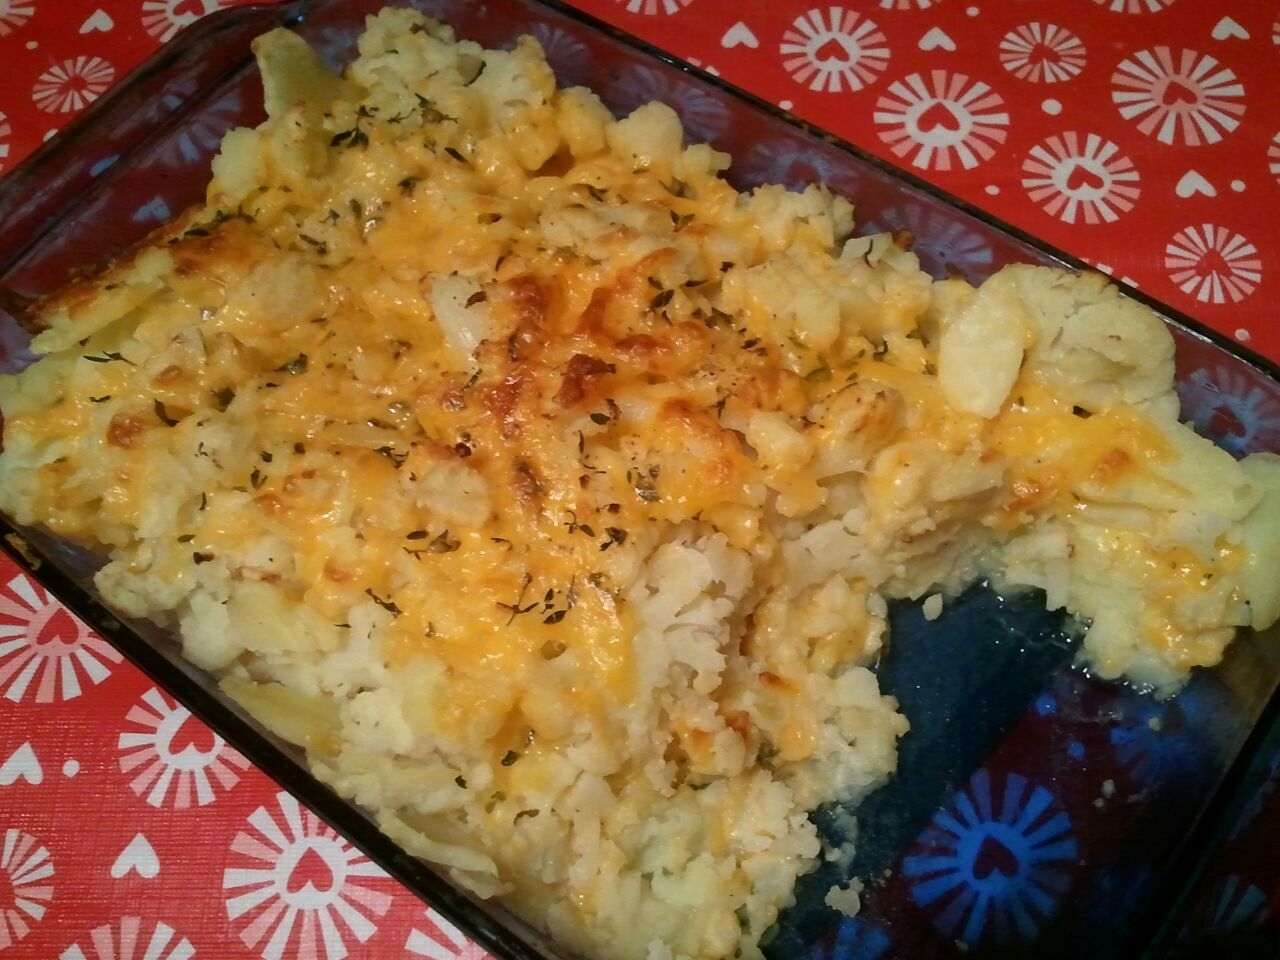
Baked Cheesy Potatos and Cauliflower
3–4 medium potatoes (Mama used yellow ones; choose whatever’s smallish and organic)
1 head cauliflower (organic ones tend to be smaller)
A few sprigs of fresh thyme, leaves stripped (you may also use dill or parsley)
Salt & pepper
A Tbsp or so of butter (optional)
Couple handfuls shredded cheese of choice (Mama used Cheddar)
½ cup veggie broth (or milk)
Preheat the oven to 450ºF. Butter an 8 x 11″ baking dish (or even a 9 x 13″).
Peel and slice the potatoes. Slice the cauliflower into “steaks” and pull away the bottom-most core. (Did you know you could do that? I didn’t!) Place in a large pot, cover with a couple inches of cold water, add salt, and bring to a boil. Boil for about 10 minutes, until the potatoes are tender and the cauliflower just starts to get tender. (Don’t worry if you go over. You can’t hurt it.) Drain.
Spread ½ the potato-cauliflower mixture in the prepared dish. Sprinkle with half the thyme and some salt and pepper. Sprinkle with a handful of cheese (as much as you like). Repeat with the remaining potato-cauliflower mix, thyme, and cheese. Pour the broth over it, then dot with a couple small cubes of butter, if you like. Bake for 15–20 minutes, until the cheese is melty and golden.
I don’t care how much cheese is on there, I’m not eating it!
Note: If you really want to make this a funky-looking dish, choose purple or orange cauliflower and purple potatoes! Also, Mama says it’s important that you buy a block of cheese then grate it yourself. Those packs of pre-shredded cheese have a lot more stuff in them than cheese, like cornstarch. Eww!
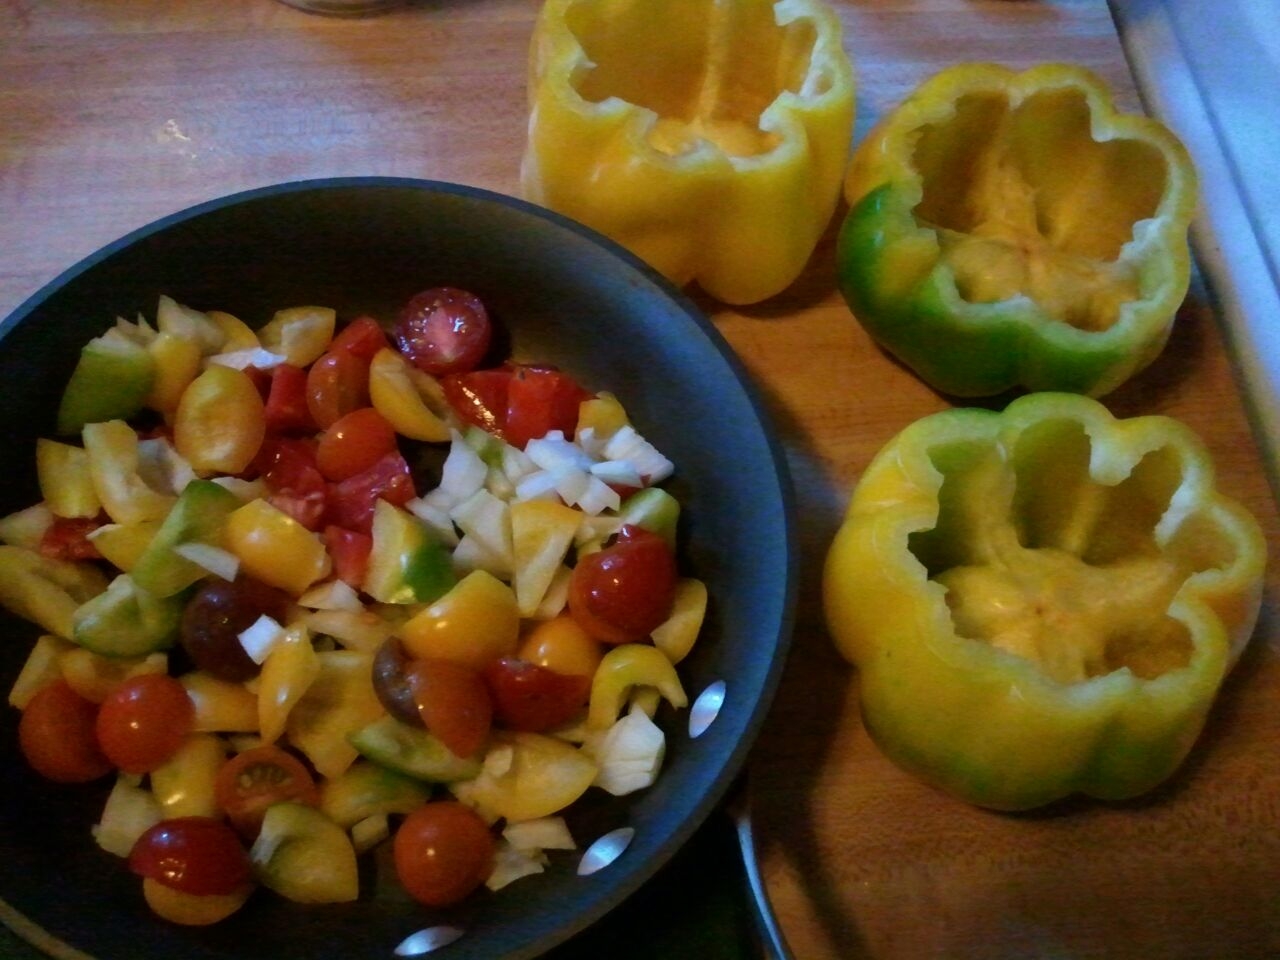
In an effort to fill a Sunday, Mama and I traipsed around to different farm stands (with a stop at the zoo somewhere in between). Next to the zucchini that was almost as big as me, she spied some gorgeous giant yellow peppers and thought they would make good stuffers. At a later stand, she bought a couple ears of sweet corn (this is important, so pay attention).
Much like our ham-and-pea roll-ups, these peppers were stuffed with things we already had in the house. Mama says you can cram practically anything into them. She cut around the top of the pepper and pulled out the seedy core. Then she broke off the pieces of the pepper top and chopped it so she could add it to the pepper stuffing mix. We still had some tiny heirloom tomatoes from my friend Walter, and we had an already-cut onion in the fridge. She put these veggies into a small frying pan with olive oil, cumin, coriander, and salt & pepper and sautéed them until the pepper and onion were soft and the tomatoes were cooked down. She added the kernels from an ear of corn and some crumbled veggie meatballs she had made a few weeks ago and had in the freezer.
How can these not be good?
She stuffed a pepper for me, then added to the rest of the stuffing some adobo sauce from a can of chipotle peppers that were also leftover in the freezer. Mama tented foil over the peppers and baked them in a 375°F oven until they softened, 20–30 minutes. She took the foil off towards the end of cooking, to brown the tops of the peppers.
You can see the added corn & broken up “meat”balls added to the filling.
Meanwhile, Mama cooked some brown rice, but she could very well have used quinoa or couscous. You can certainly add this to the pepper stuffing, but she kept it on the side and added it to the peppers before we ate them. She also made a fast guacamole and baked some tortilla chips by breaking up a whole-wheat wrap, spraying the pieces with cooking spray, and putting them in the oven for 10 minutes while the peppers cooked. (You can season these with salt & cumin, but Mama left them plain.)
Though I’m generally a fan of avocados, I wasn’t too keen on the guacamole. I did dip my chips in it (just barely), though. And to everyone’s surprise, I ate more than a few bites of the pepper stuffing. I had to examine each bite first to figure out what was on my fork, and I wasn’t much in the mood to eat (having missed my nap), but eat it I did. Mama and Papa kept asking, “Isn’t it silly that there’s a pepper for a bowl?” I’ll tell you what’s silly: they ate their bowls. Now, isn’t that silly?
In a medium skillet over medium heat, heat 1 teaspoon olive oil. Add the beef and cook, stirring occasionally, until just barely cooked through, about 6 minutes. (If using frozen soy crumbles, cook until heated through.)
Meanwhile, carefully cut around the top of each pepper, right below the “shoulder,” then pull out the seedy core. (Save the tops.) Pull out any remaining ribs and seeds. Set cored peppers aside. Break off the pepper tops from the stems, and roughly chop.
To the skillet, add the remaining tablespoon olive oil, if necessary. Add the chopped pepper tops, onion, tomatoes, cumin, coriander, and salt and pepper to taste. Cook, stirring occasionally, until the pepper and onion are soft and the tomatoes have cooked down, about 8 minutes.
Add the corn and the chipotle pepper, if using, with as much adobo sauce as clings to it. Stir to heat through.
Divide the mixture among the peppers, setting them in a baking dish just big enough to hold them, such as a pie plate or 8 x 8” pan. Loosely tent the peppers with aluminum foil, then bake for 20 minutes. Remove the foil, then bake another 10 minutes, or until the peppers are softened and the tops are browned.
Papa announced that he had a hankering for pad thai. Now, normally he and Mama would just order in Chinese, but for some reason, they decided to make it themselves.
If there were a signature dish to Thailand, this would be it. There are oodles of variations on it, but your basic components include rice noodles, tofu and/or shrimp, cooked egg, fish sauce, chilies, garlic, bean sprouts, cilantro, lime, and crushed peanuts—all done in the same wok. Often there’s carrot, scallion, basil, and tamarind in some form, as well.
Mama said I could be in charge of the noodles, but as they required being steeped in boiling water, she thought better of it, so off I went to play with my trains. Papa was in charge of chopping, while Mama made the sauce and got everything ready to go. When you stir-fry, you’re cooking over very high heat, so it goes quickly. If you start cooking, then stop to chop your garlic or mince your chilies, what’s in the wok will probably already be burned before you’re done. So get your mise en place together.
The first step is to cook your egg, as a kind of tiny, very flat omelet. First you lightly beat your egg, then when it hits the hot oil in the pan, you continue to beat it for about a minute before it starts to set. Once it’s cooked, remove it from the pan, slice it into thin strips, then add more oil to the wok. From there, you start to quickly cook your protein (cut into small pieces if it’s not tofu or shrimp); then remove it from the pan and then add your veggies. Follow with your sauce and your noodles, mixing it all up. Add back the egg and protein, and keep mixing everything. You want your noodles to absorb the yummy sauce and begin to fry a little bit. Then top with crushed peanuts and raw sprouts. Serve with wedges of lime.
You don’t have to use a wok, but the deep sides of the pan sure help to keep all the noodly goodness in one place.
Mama had the back of her mind on alternate dinners for me, so sure she was that I wouldn’t eat the pad thai. But since she opted to go without the chilies, there was nothing about this I didn’t like. Those springy noodles were great, and I really liked the egg! The crunch of peanut was nice, too. But you know… I felt it needed more lime. So I said so. “I need lime.” And the reward for my fledgling sentence was more lime. Mama also served a cucumber-soy-ginger salad on the side. I had one salty bite, but I preferred the pad thai. What can I say? I’m a simple guy.
Next to tastiness, these noodles were just plain fun to eat.
By now, it’s no secret that I love eggs. I’ll take them any way I can get them. But Mama says people are a little afraid of soufflés because they have a reputation for being temperamental [insert joke about soufflés being like Mama here]. Kidding aside, Mama showed me that there’s nothing to fear about this puffy little delicacy whose name comes from the French word for “blow.” I blow on my food when it’s hot, and just yesterday I blew my first bubbles outside, so I’m excited to learn how to make these.
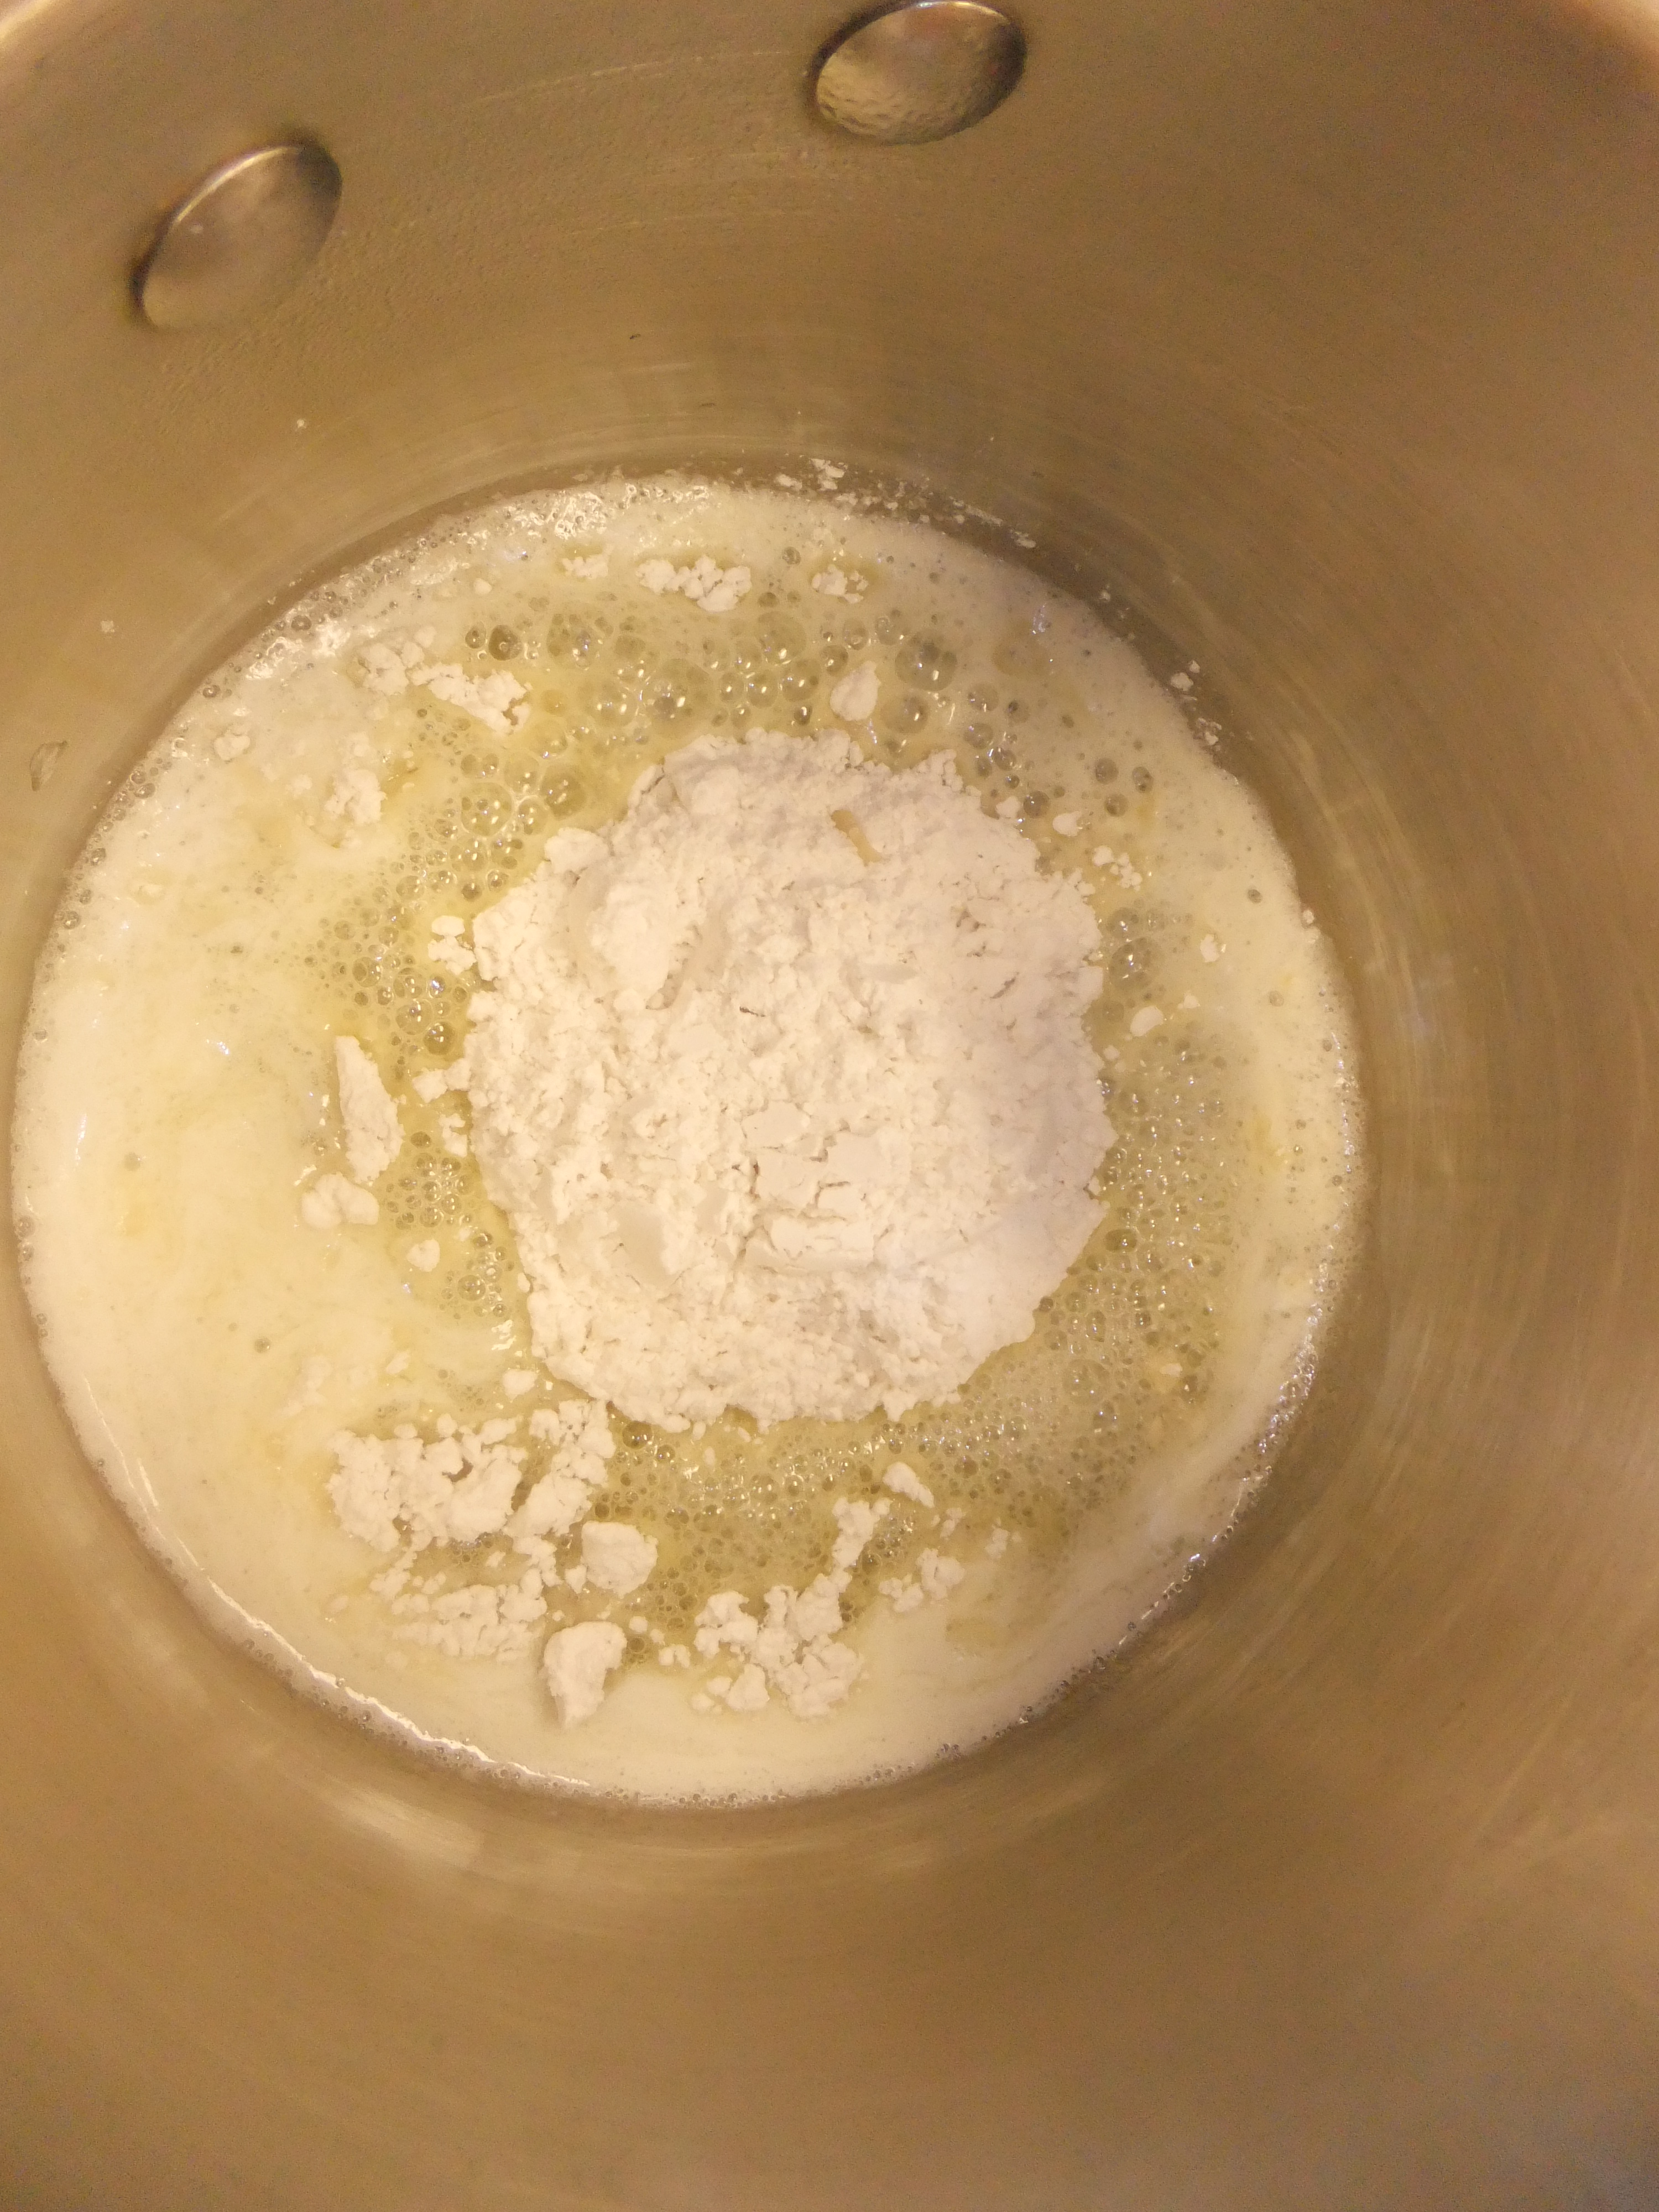
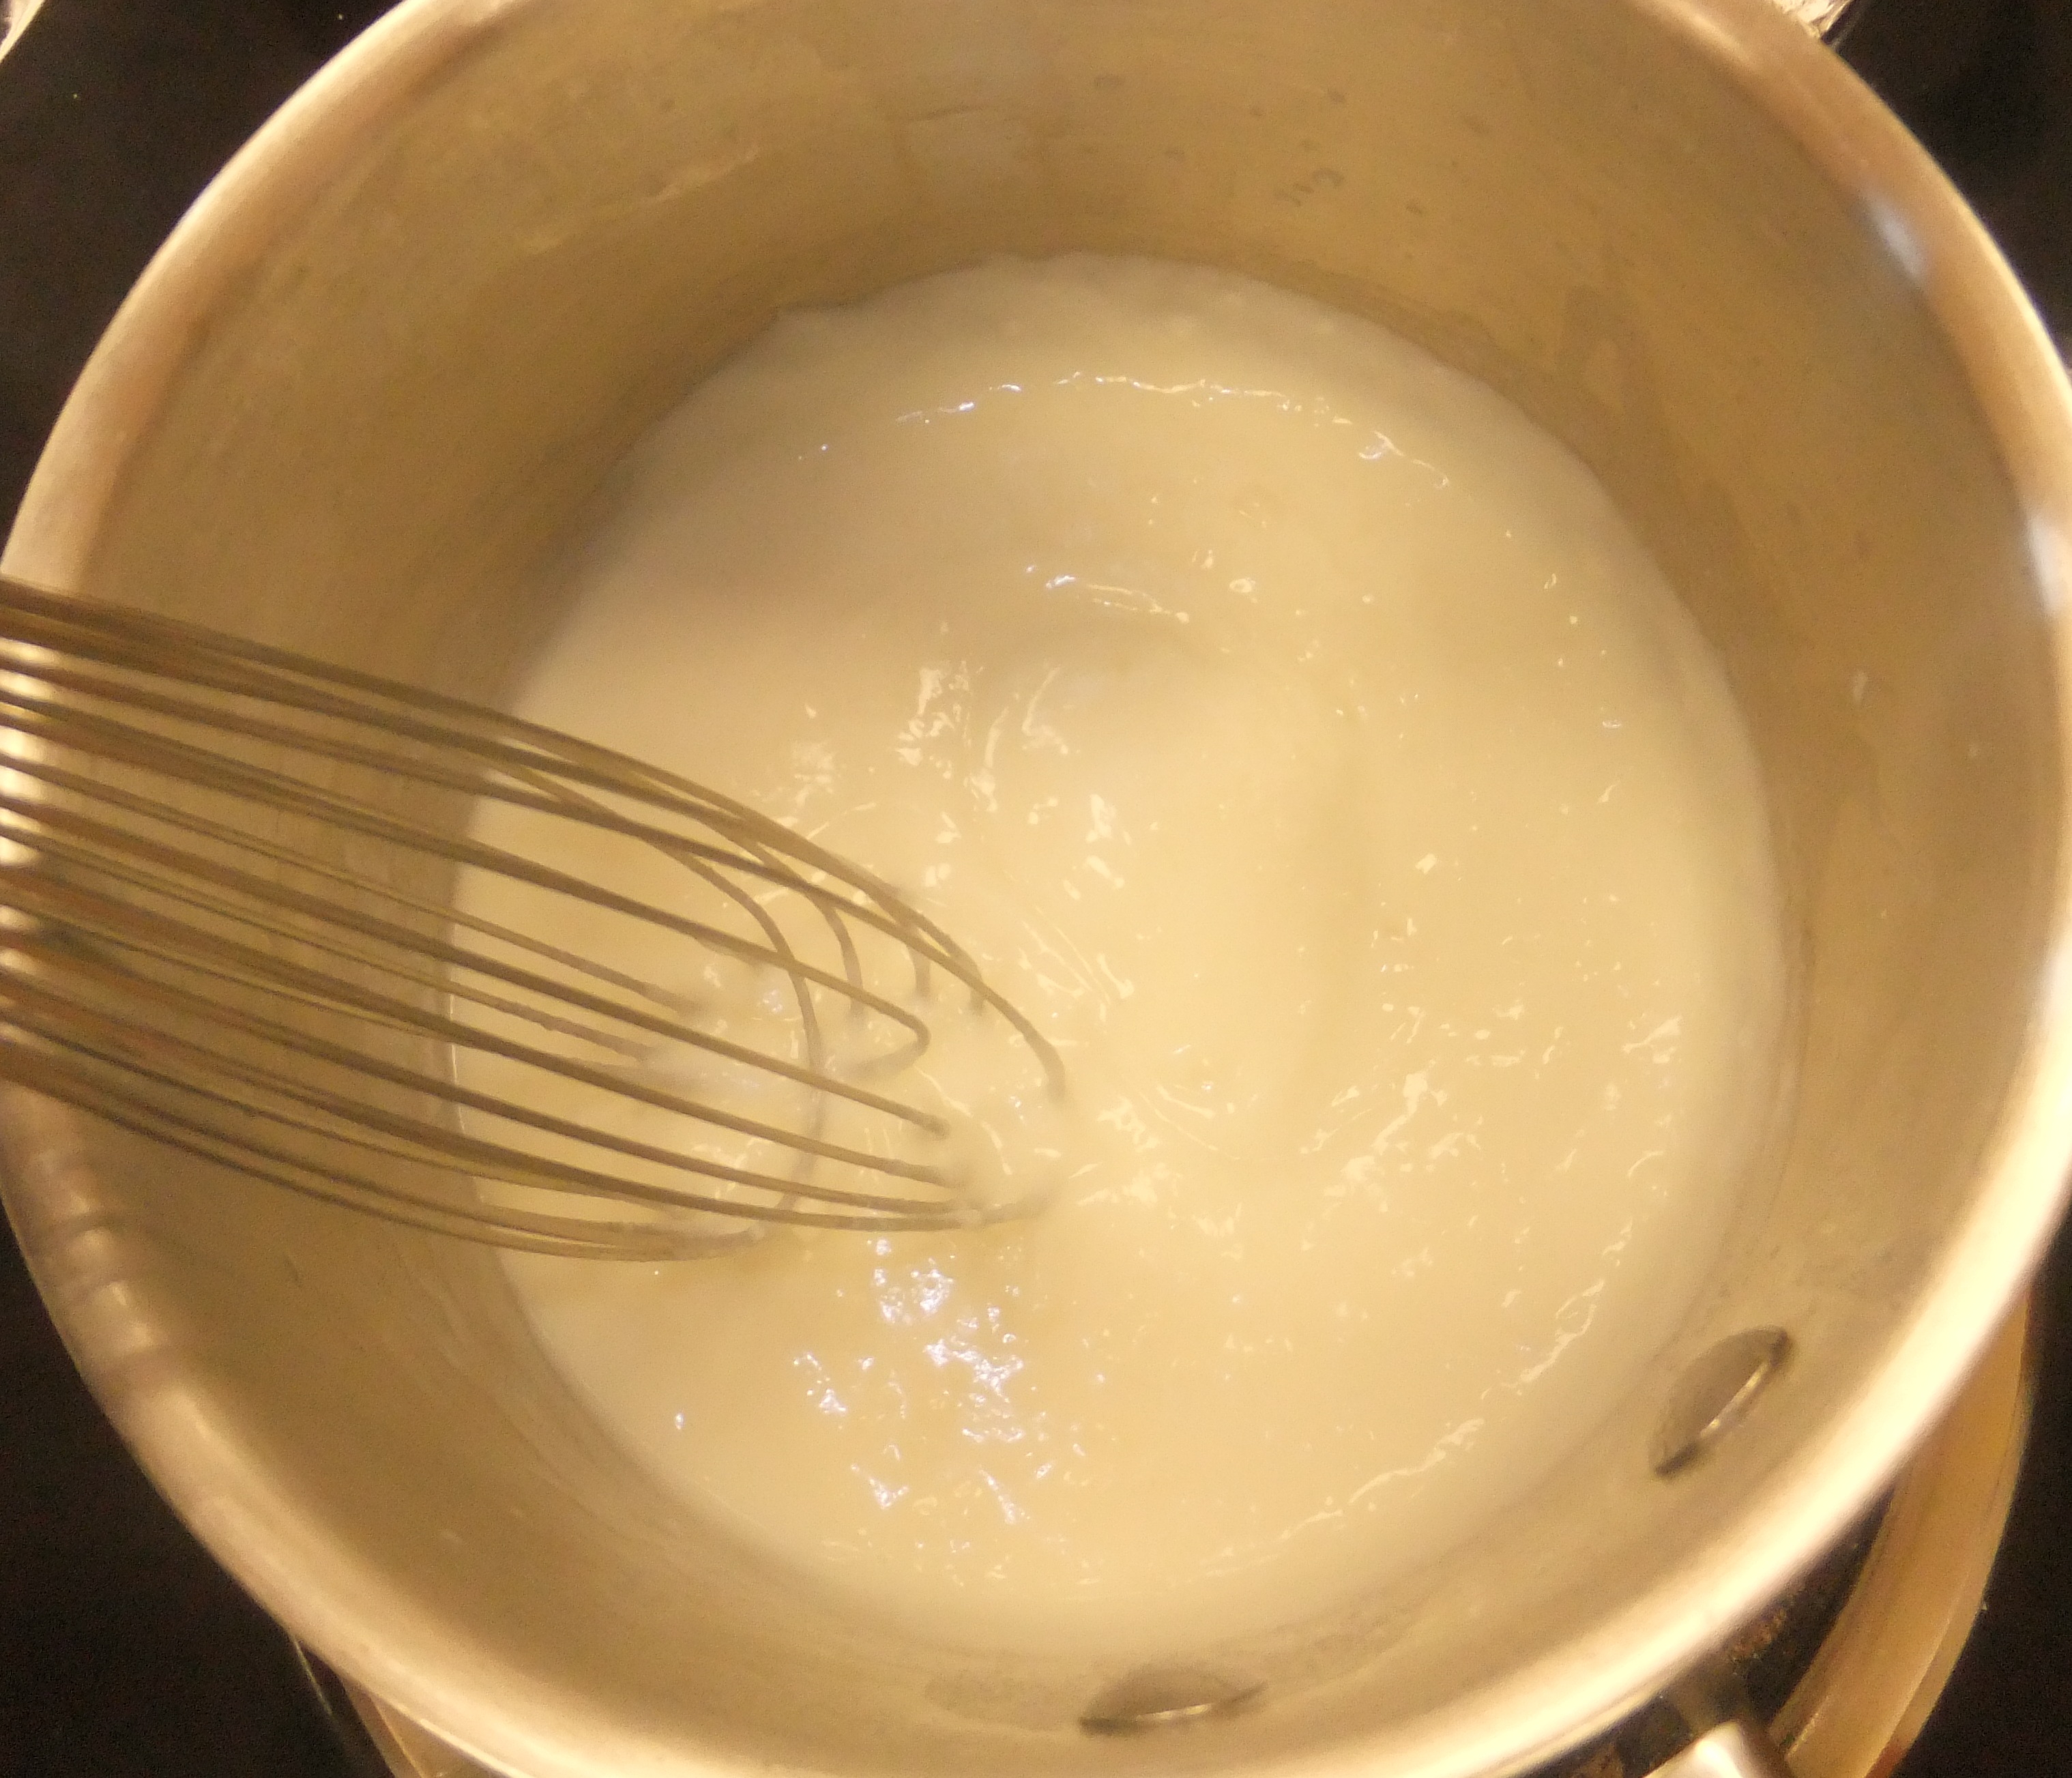
First, Mama said we have to make a “roo.” We’ve made this before by melting butter in a saucepan, then whisking in flour until it’s all cooked and bubbly. Then we add milk. Mama says some people say to use cold milk, while others say to use hot milk. She “splits the difference” by using milk that’s been taken out of the fridge for a little while, “just to take the chill off.” Once the milk’s added to the saucepan, we stir and stir until it thickens. (Well, Mama took care of the stirring because it was very hot.) She said this is what’s called a béchamel, but it looked like a white sauce to me.
When butter’s all foamy, add the flour all at once and start whisking.
This is how the white sauce will look once all the floury clumps are worked in to the milk.
This next part is where it starts to get a little scary. You have to separate your eggs. I don’t quite understand how sometimes I can crack the eggs and roll them around and the shell comes off, and other times, Mama cracks the egg and out comes a runny gloppy mess. But this is one of those times when Mama has to crack the eggs. She notes that the whites must be meticulously free of yolk, and because she doesn’t take her own advice to separate the eggs one at a time over a small bowl (and then dumping each white into a larger bowl), she creates an opportunity to show me how to remove errant yolk from the white: use the shell to scoop it out!
Now Mama sets aside the bowl of whites and sets the bowl of yolks on a damp dishcloth—she explains that it’s to keep the bowl from sliding when she “tempers” the yolks. (I thought this must be why soufflés are considered temperamental, but Mama says it’s how you bring hot and cold liquids together without ruining them.) She whisks the yolks to break them up, and then she pours a little of the hot white sauce into them, whisking the whole time. She adds a bit more sauce, still whisking, and keeps at this until all the sauce is in the yolks. Now you have your soufflé base. Mama says this is the time to add any flavors—crumbled cooked bacon, puréed or small-dice cooked veggies, cheese, fruit, finely ground nuts, chocolate—but we’re keeping it plain today.
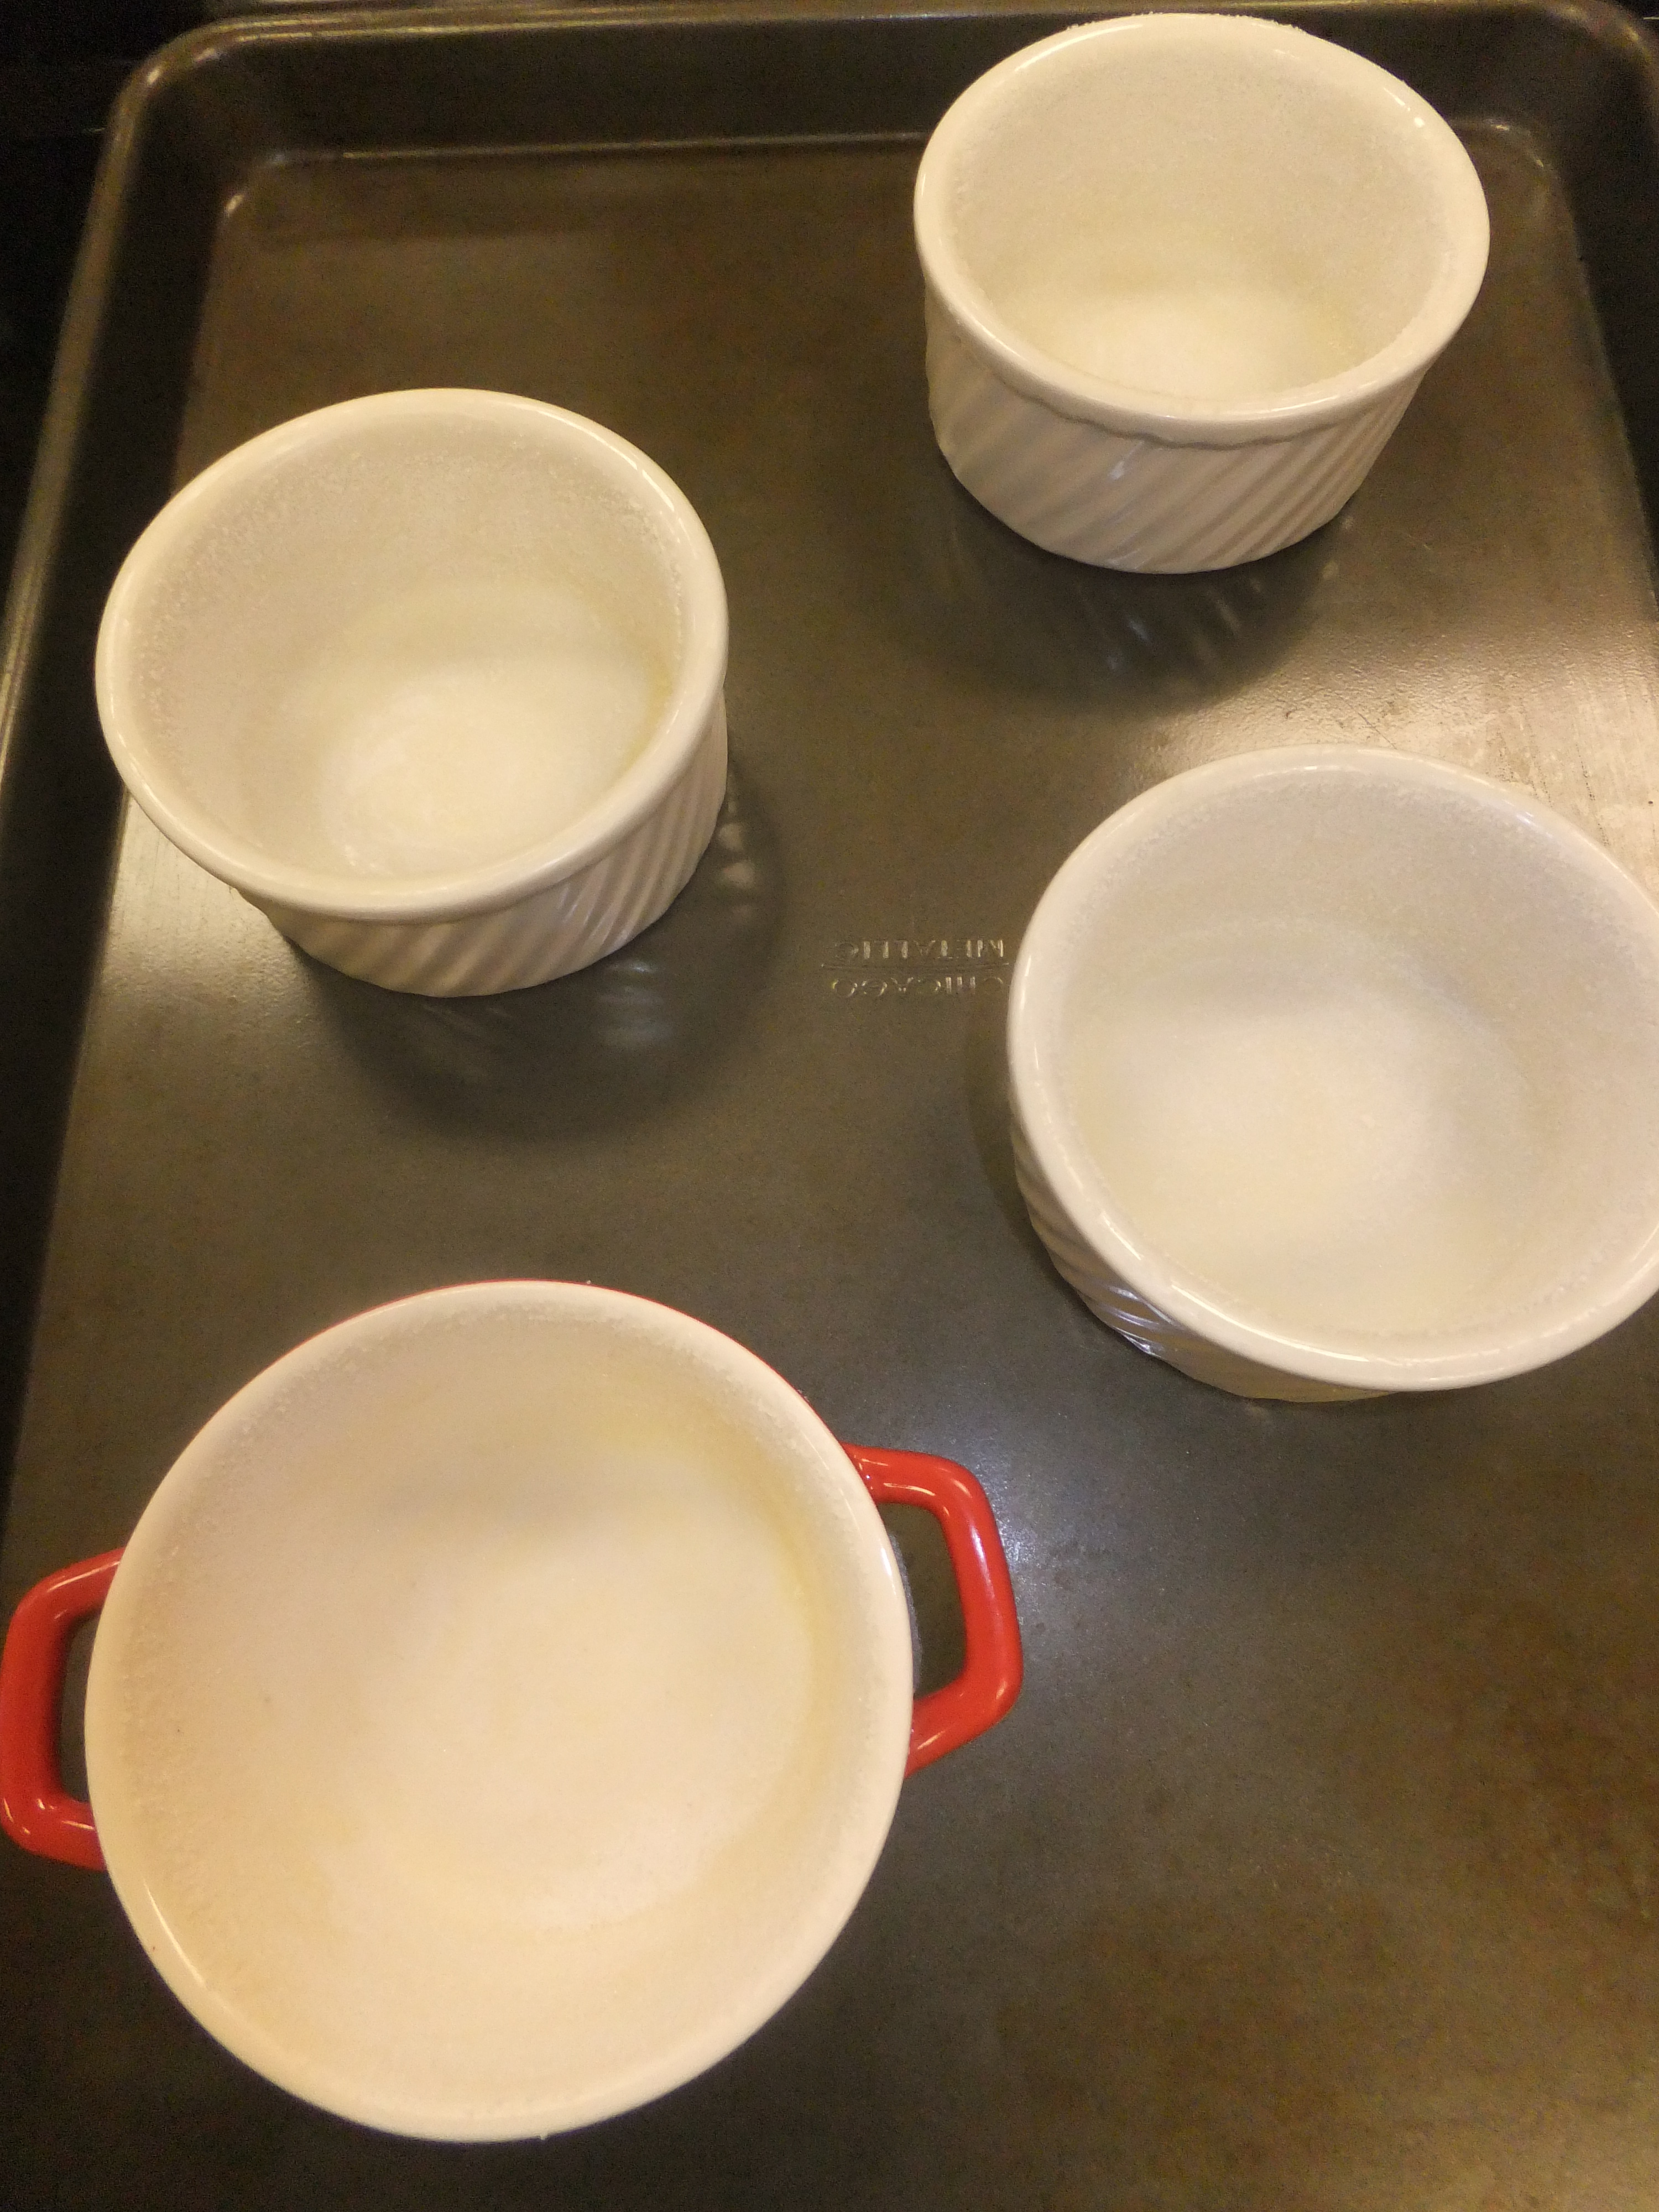
Mama notes that here’s a good place to stop, if you have to. If you’re making soufflés for breakfast the next day or for dessert later on, this is where you should stop, put everything in the fridge, then take it out about a half an hour before you want to resume cooking—to “take the chill off.” That’s when you should turn on your oven, too. But before finishing the recipe, there’s one more thing to be done: prepare the ramekins. I didn’t know these could be used in the oven or for food other than mine. Mama always used to feed me from these…until I discovered that they break into so many pieces when they hit the floor. (I’m just learning about gravity, you know.) Brush melted butter all around the inside of each ramekin (or other small ovenproof dish), then dust each with either parmesan cheese (if savory) or sugar (if sweet). (Mama thinks finely chopped nuts might work, too.) This step, Mama says, gives the soufflé something to grab onto as it climbs up the ramekin. Mama set the prepared ramekins on a baking sheet.
These are sugared.
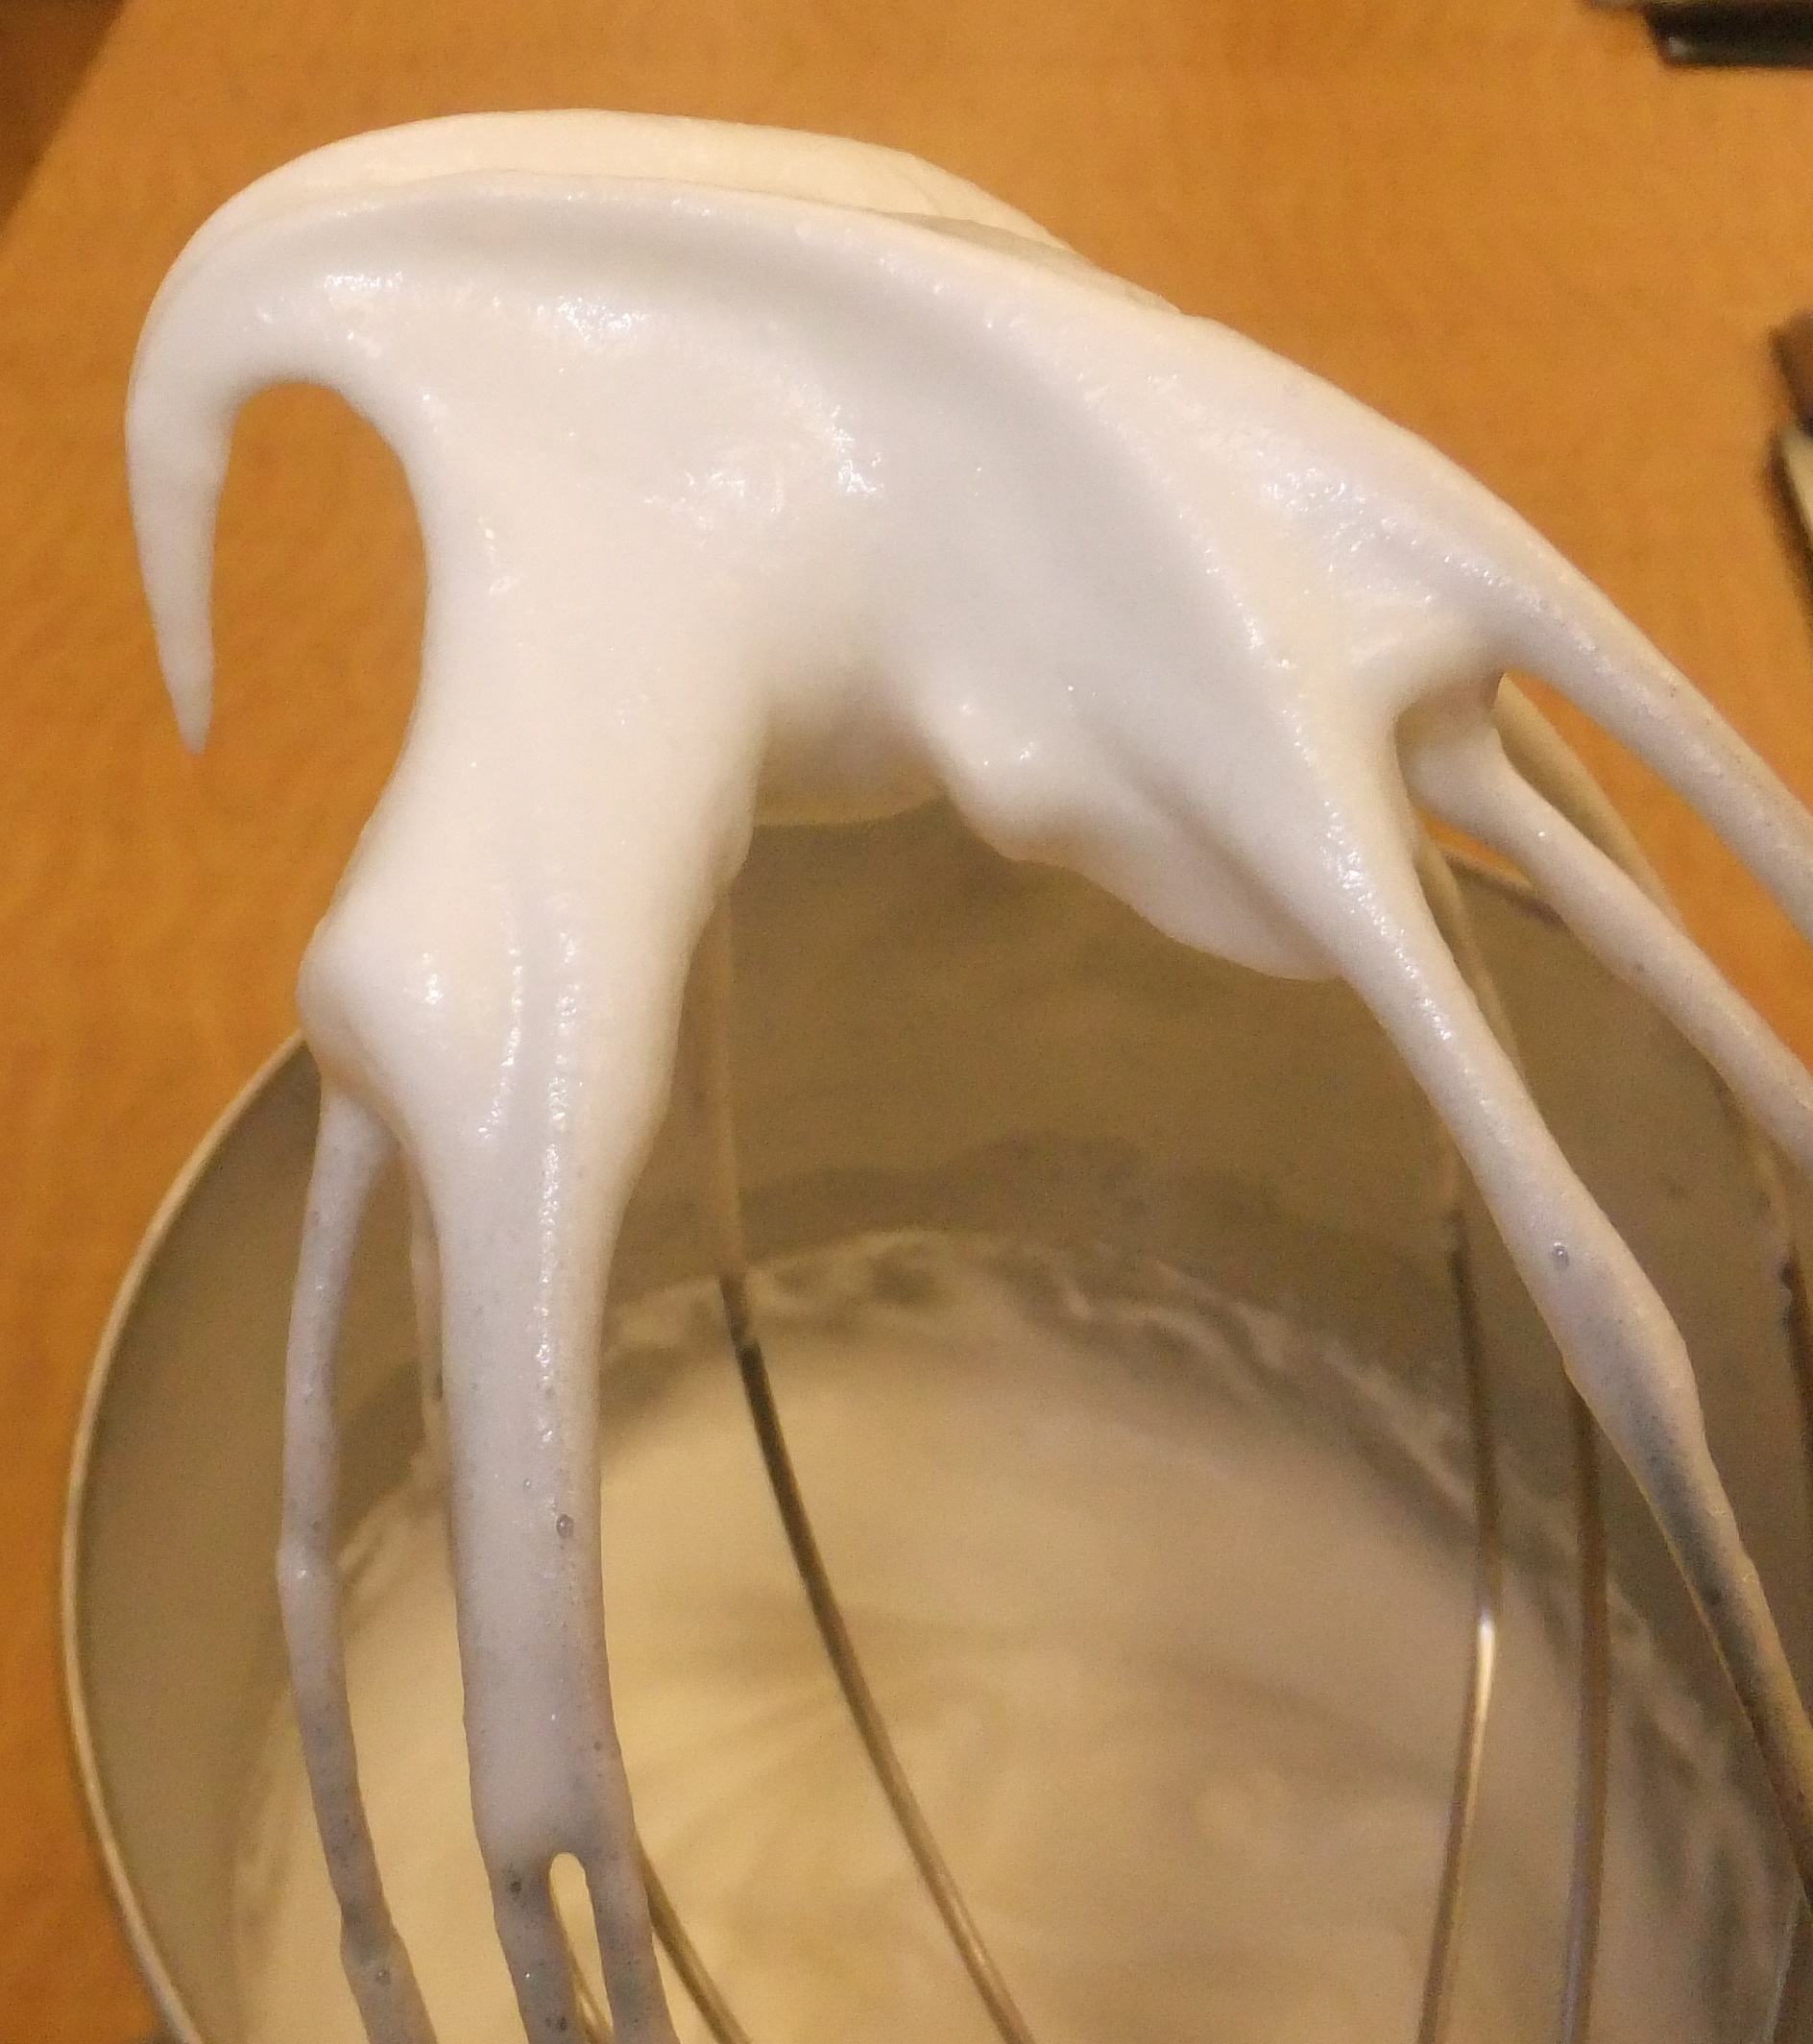
Next, Mama turned her attention to the egg whites. She plugged in the mixer and began to beat them until they formed soft peaks.
See how the “peak” flops over?
Then she folded the whites into the yolk mixture, being careful to not overmix—she explained that if she stirred too vigorously, she could deflate the whites, which would not bode well for the soufflés. Mama says that as soon as the whites are folded in, it’s time to pour the mixture into the prepared ramekins. Fill them nearly to the top (most ramekins have an inner rim that’s a good marking spot). She sprinkled a bit more parmesan on top and popped them in the oven.
Then we waited. Mama said we may not open the oven to check on them, otherwise they’ll deflat like a balloon. So when the time was up, we turned on the oven light to take a peek. Those soufflés had puffed up like my grandma’s hairdo and were golden brown. Mama called them gorgeous. The real test was taking them out of the oven… and they held! They stayed puffy until we dug in. They were eggy, and they tasted as soft and fluffy as they looked. I could eat these all day.
Love, Jude
Basic Soufflés
2 Tbsp butter
3 Tbsp flour
1 cup whole milk or half-and-half
4 eggs, separated
Salt and pepper, to taste
1/4 tsp nutmeg (optional)
Melted butter (about 2 Tbsp)
Grated parmesan cheese (or sugar, if making a dessert soufflé) (about 2 Tbsp)
Preheat the oven to 425°F. Brush six 6-ounce ramekins with melted butter, then dust with parmesan cheese (or sugar). Set aside on a baking sheet. Over medium heat, melt the 2 tablespoons butter in a medium saucepan, then add the flour, and cook, whisking constantly, until the flour is incorporated and the mixture begins to bubble, 1–2 minutes. Slowly add the milk and continue to whisk, working out any clumps. Then whisk occasionally until the mixture is hot and begins to thicken, 5–10 minutes. Do not let the mixture boil. Remove from heat and add the salt, pepper, and nutmeg.
Whisking constantly, pour a small amount of the milk mixture into the yolks. Add a bit more milk, continuing to whisk. Then add the remaining milk mixture to the bowl and whisk thoroughly. If adding flavors or cheese, do so now.
Beat the egg whites with a hand mixer on high speed until soft peaks form. Then immediately and carefully fold in to the yolk mixture in three additions. Immediately pour the mixture into the prepared ramekins, up until the inner line. Wipe the rims of any errant mixture. Sprinkle with additional parmesan, if desired.
Bake for 17–18 minutes in the center of the oven, until puffed and golden. The centers should look set and firm. Resist the urge to open the oven to check on them, but when you do take them out, a toothpick inserted into the center should come out clean. Serve immediately.
Yield: 6 soufflés
Note: Mama says it’s not a bad idea to add an additional yolk to the base if you’re going to be adding a lot of stuff to the soufflé; the extra yolk will make the base stronger. Try adding up to ½ cup shredded cheese and either ½ cup vegetable puree or 1/3 cup small-diced cooked vegetables or crumbled cooked bacon to the base (before folding in the egg whites). Some ideas: butternut squash-gruyere-paprika; onion-roasted pepper-rosemary-spinach; artichoke-red pepper-gruyere-thyme; red pepper-fennel-onion; or try blue cheese-walnuts by substituting finely ground walnuts for the parmesan cheese.
Variation: To make a chocolaty soufflé, whisk in 1/2 cup unsweetened cocoa powder and 1/2 cup sugar to the finished white sauce. After the mixture is tempered into the egg yolks, add 1 tsp vanilla extract. Add 1/4 cup sugar to the egg whites as they’re being whipped to soft peaks. Proceed with the rest of the recipe, but be sure to sugar your ramekins.
Soufflés will fall a little bit (cracking the tops) once they’re taken out of the oven, but they really should remain fairly puffy.
To say that Mama ate a lot of pizza when she was pregnant with me would be an understatement. She tells me that one week, she ate it four times. That was when Papa told her, “I’ll be glad to get you a pizza tonight, but I just can’t eat it again.” Even without the pregnancy excuse, Mama continues to eat pizza at least once a week.
So shame on her for keeping it from me for as long as she did! While some people choose to believe pizza’s actually sort of good for you (wheat in the crust, tomatoes in the sauce, dairy in the cheese, and all those other veggies you choose to put on top), Mama’s more on the fence about it. At least as far as it concerns me, pizza is a junk food. But as I grew up, I began to notice this interesting food she and Papa were putting into their mouths. It smells delicious, it’s shaped like a triangle (that’s a shape I know!), and it’s covered in cheese. Little by little, Mama relented. She started by giving me the tiniest pieces cut from a slice…
Little did she know what kind of floodgates she was opening. I can now eat a (small) slice all by myself. Her favorite (and I suppose mine, too) has tomatoes and pineapple on it. Sometimes olives or mushrooms, too, but I’m not always keen on them. I never get to eat Papa’s slices, though. Mama says pepperoni is definitely not good for babies.
So Mama finally showed me how to make a pizza so that I didn’t think they all come in a box (no matter how fun those boxes are to play with). She said dough seems scarier than it is because of the yeast. (It must be worse than the furnace kicking on to be that scary.) I thought it would be more fun, but after it was mixed, the dough just sat in the mixing bowl, hiding under a towel all afternoon. That thing slept longer than I do! Mama turned on the oven and put her big heavy pizza stone on the bottom to get it good and hot (this is a word I’m learning).
Mama said it’s important to have all your ingredients ready before you get your dough out because things move quickly then. When she removed the towel from the mixing bowl, I was shocked to see that the dough had grown! She called it “proofed,” but it looked like a big puffy pillow to me. She pulled it out and started smacking it around. “This is the best part,” she said and she let me touch it too. It was kind of warm and oh-so-soft. She pulled the stone from the oven, set it on the stove, and then dusted it with cornmeal. (She noted semolina would also work fine, but we just happened to have cornmeal.)
Then she started flinging the dough between her hands! Back and forth, back and forth, back and forth. The dough started stretching and sagging, and before I could say “Chicago style,” she flopped it onto the stone with a thwack. She patted it a few times to make a ridge around the edge, then she brushed the edge with olive oil and sprinkled it with garlic powder. She spooned lots of sauce around the middle, put our favorite toppings on it, then smothered it with mozzarella and parmesan. I couldn’t even see the pineapple there was so much cheese.
It only took about 10 minutes to bake, but we had to wait a long time before it was cool enough to eat. Something about a burning palate. All I know is I’ll take pizza any way I can get it.
Love, Jude
Once we cut into the pizza, there was no time to stop and take a picture. Be glad Mama paused to take this one.
Pizza Dough
2½–2¾ cups bread flour (mix in some whole wheat flour, if desired, but use 2¾ cups total)
1½ teaspoons salt
2 tablespoons olive oil
Scant tablespoon baking (active dry) yeast
1 cup warm water (ideally 105°–110°, but Mama says it just needs to be hot enough that it feels hot but that you don’t scald your finger)
Semolina or cornmeal
Pizza sauce, cheese, & toppings
Put the flour, salt, and olive oil in the bowl of an electric stand mixer. Separately, mix the yeast and water with a whisk until foamy. (Be sure you dissolve all the yeast.) Add to the mixer, and mix on low speed with the dough hook about 4 minutes, then on the next speed up for another 4 minutes. The dough will be slightly sticky. Remove the hook and cover the bowl with a towel. Let it sit for 3–4 hours, or until the dough is doubled in size (if you put it on your stove, the pilot light will make this process go a little faster). Pull it out of the bowl and give it a few kneads before shaping it.
Preheat oven to 500°. If you don’t have a pizza stone, liberally grease a cookie sheet before putting down the dough (otherwise, dust the stone). Spread out the dough, brush the edges with olive oil (optional), and top with desired sauce, cheese, and toppings. Mama says you can jazz up any store-bought sauce by sautéing some chopped onions and garlic and adding in a few fresh herbs. Bake for 10 minutes and enjoy. But watch you don’t burn your palate.